4. Managing Power Settings
As the cost of energy continues
to rise, power conservation has become more important to companies
concerned about the bottom line. Windows 7 includes access to many power
settings that can be configured to help PCs conserve power.
Individual components can be
placed into low-power states, and the entire computer can be put to
sleep without completely powering it off. You can access the majority of
the settings from the Power Options page in Control Panel. Click Start => Control Panel. Select Hardware And Sound => Power Options. You'll see a display similar to Figure 12.
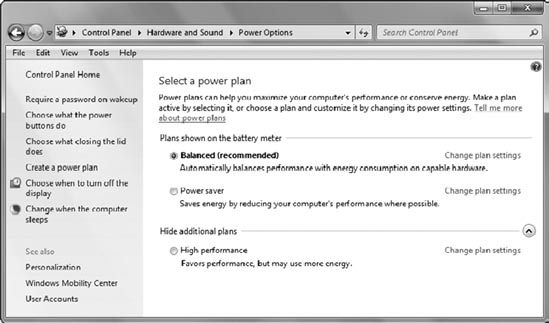
In the figure, the High
Performance plan is showing, but this is not displayed by default. By
default, this space will have a text link labeled Show Additional Plans
instead of Hide Additional Plans. If you click the text, the additional
plan will show.
NOTE
Powercfg is a neat tool
you can use to analyze and configure power settings on a computer. As
an example, you can use the following command to analyze the current
power settings and performance of a Windows 7 computer: powercfg -energy -output power.html. You can then enter power.html to view the report.
4.1. Understanding Low-Power States
Windows 7 supports three low-power states:
Sleep
When the computer is in sleep
mode, most of the components will not draw any power, but the memory
and processor will still consume some power. Enough power is provided to
the memory to ensure that the contents of memory are not lost and that
the processor has enough power to check occasionally for use action such
as pressing a key. When a key is pressed on the keyboard, the computer
wakes up fully.
If the system senses that the
battery power is low on a laptop computer, it will automatically put the
laptop into hibernate mode.
Hibernate
Hibernate
is primarily used for laptops. It takes the entire contents of memory
and stores them on the hard drive. When the data is stored on the hard
drive, the system will completely power down and not use any power. This
works even if a user has open applications and open documents. For
example, you could have a Microsoft Word document open when the system
hibernates. Later, when you turn it back on, Microsoft Word will open
with your document just as it was when the system hibernated.
Hybrid Sleep
Hybrid sleep
mode is similar to the hibernate mode used on laptops but remains
powered on. The current state of the computer is retained in memory with
enough power provided to keep the memory refreshed. In addition, the
contents of memory are stored on the hard drive. If a power failure
occurs, the system can resume as if it was hibernated. If a power
failure doesn't occur and the user takes an action such as pressing a
key, the system will resume as if waking from sleep mode. Hybrid sleep
mode is intended to be used on desktop PCs.
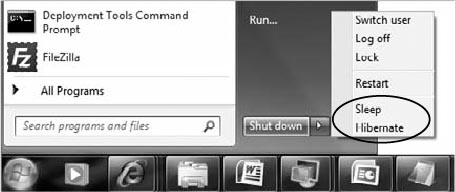
You can choose one of the
low-power states from the Start menu, or you can configure a system to
enter these states based on different actions. Figure 13 shows how you can select either Sleep or Hibernate on a laptop computer from the Start menu.
|
Available power
settings are dependent on the capabilities of your system and whether
the capabilities are enabled in the system BIOS.
|
|
You can also configure your
system to go into one of these states when the power button is pressed,
when the sleep button is pressed (if the system has a sleep button), or
when the lid of a laptop is closed.
Figure 14 shows the System Settings page that you can access from the Control Panel => Hardware And Sound =>
Power Options page. In the figure, I've selected the drop-down box for
When I Close the Lid when the system is Plugged In. These same options
are available for any of the choices.
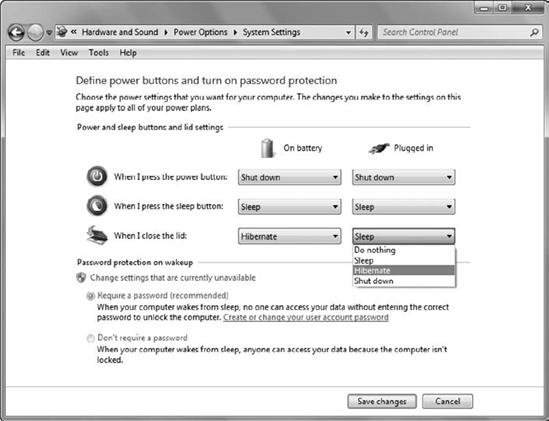
For a desktop PC, the On Battery settings and the When I Close The Lid settings are not available.
4.2. Understanding Power Plans
A power plan is a
collection of individual settings that can be configured for individual
components of a computer. While the low-power states like sleep and
hibernate affect the entire computer, these power settings affect
specific components such as the display or hard drive.
Three power plans exist on the
system. The two plans that are shown by default are designed to help you
maximize the performance of the system while also conserving energy;
the High Performance plan is hidden by default.
Balanced (Recommended)
This is the default setting for a system that is plugged in, and it
will meet the needs of most systems. It provides high performance for
the system while it is being used, and it will automatically invoke
different power settings when the computer is not being used.
Power Saver
The Power Saver plan uses reduced power all the time to conserve
energy. This is a good choice for a laptop that will be on battery power
for an extended period of time.
High Performance
The High Performance plan is used to provide maximum performance
without considering energy conservation. This plan could be used if a
system has extra uses such as sharing a printer or sharing files.
The settings for these plans can be manipulated individually by clicking Change Plan Settings. Figure 15 shows the basic settings for the Balanced plan.
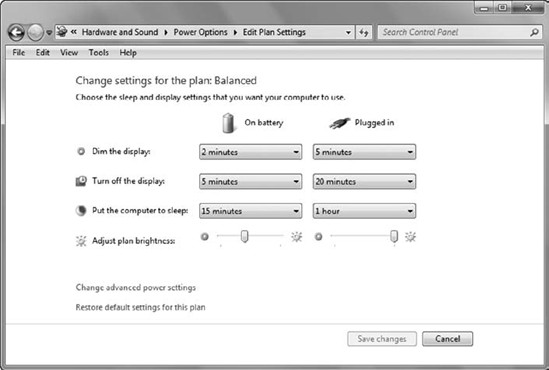
Notice that you can
configure different power savings for a laptop when it is plugged in
and when it is on battery power. The Adjust Plan Brightness setting uses
a slider bar. By sliding it to the right, the brightness becomes full.
Slide it to the left to make it dimmer. This setting is probably the one
that users will notice the most.
4.3. Changing Advanced Power Settings
You can also click the
Change Advanced Power Settings link to access advanced power settings
for any of the individual plans. These settings allow you to access
settings for disk drives, USB settings, and more.
Figure 16 shows the Advanced Settings page for the Balanced power plan and also indicates that the Balanced plan is active.
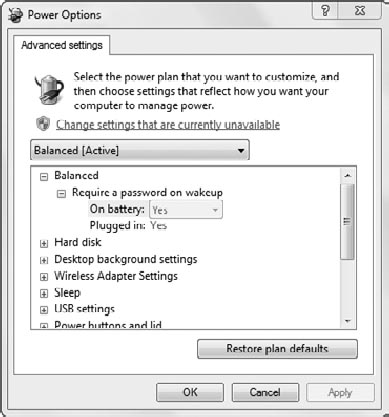
|
Settings that
require advanced permissions often don't appear, and when they do
appear, they are dimmed. You can enable all the settings by clicking the
link Change Settings That Are Currently Unavailable.
|
|
You can configure several settings on this page. Table 2 lists of many of the settings and comments.
Table 2. Advanced power settings
| Setting | Comments |
|---|
| Require A Password On Wakeup | This requires the user to provide credentials when the system wakes up from sleep or hibernate mode. |
| Hard Disk | You can configure the hard disk to turn off after a specific amount of time (such as 20 minutes) to conserve power. |
| Desktop Background Settings | Slide
shows can be configured to run (Available) or not (Paused). For
example, you can configure this as Paused on battery power to reduce
power consumed by the disk, video, and processor. |
| Wireless Adapter Settings | Adapters
can be configured for Maximum Performance, Low Power Saving, Medium
Power Saving, and Maximum Power Saving modes. This affects the power
used for wireless transmissions, but it can also affect the ability to
connect to wireless networks. |
| Sleep | The
different low-power modes can be configured here, such as automatically
putting the computer to sleep after 15 minutes when on battery or after
30 minutes when plugged in. You can also configure the system to awaken
for timed events. |
| USB Settings | You
can enable the Selective Suspend setting, which allows the USB hub to
suspend individual ports selectively (such the port for a hard disk but
not the hub for the mouse or keyboard). |
| Power Buttons And Lid | You can specify actions for closing the lid, pressing the power, or pressing the sleep button. |
| PCI Express | You
can configure power settings for PCI Express devices. You can turn Link
State Power Management off or select Maximum Power Savings or Minimum
Power Savings. |
| Processor Power Management | These settings allow you to configure thresholds for power consumed by the processor. |
| Display | You can configure when a display is dimmed and when it is turned off. You can also configure the brightness in percentages here. |
| Multimedia Settings | If
the computer is used to share media or play video, you can configure
when it is allowed to sleep and the power plan to use when it is
running. |
| Battery | You
can configure thresholds and actions for different battery power
levels. For example, the system can provide a low-battery warning when
it reaches a low battery level (configured at 10 percent) and go into
hibernate when it reaches a critical battery level (configured at 5
percent). |
NOTE
As long as we're
talking about power, you may be interested in how you can modify the
default behavior of the Shut Down button available from the Start menu.
Right-click the Shut Down button and select Properties. You can
reconfigure the Power Button Action to Switch User, Log Off, Lock,
Restart, Sleep, or Hibernate.
4.4. Configuring Wake On LAN
Most systems include Wake On LAN
or Remote Wake-up capabilities. This allows the system to go into a
low-power mode such as sleep but awaken in response to a special data
packet, referred to as a Magic Packet. Network administrators use this
to schedule remote administration while still allowing the system to use
the lower power modes.
In order for system to
listen for and respond to Magic Packets, the motherboard, BIOS, network
adapter, and adapter driver must all support it. When all of the pieces
are available, you can configure it in the properties of the NIC via
Device Manager. Most NICs include a Power Management tab where Wake On
LAN can be enabled.
