7. Mapping a
Volume to an NTFS Folder
In addition to (or in
place of) a drive letter, you can assign one or more paths to NTFS
folders to a volume. Assigning a drive path creates a mounted volume. A mounted volume appears as a folder within an
NTFS-formatted volume that has a drive letter assigned to it. Besides
allowing you to sidestep the limitation of 26 drive letters, mounted volumes offer these
advantages:
You can extend
storage space on an existing volume that's running low on free space.
For instance, if your digital music collection has outgrown your drive
C, you can create a subfolder of your Music folder and call it, say,
More Music. Then you can assign a drive path from a new volume to the
More Music folder—in effect increasing the size of your original Music
folder.
You can
make commonly used files available in multiple locations. Say you have
an enormous collection of clip art that you store on drive X, and each
user has a folder in his or her Documents folder where they store
desktop publishing files. In each of those personal folders, you can
create a subfolder called Clip Art and assign that folder's path to
volume X. That way, the entire clip art collection is always available
from any user's desktop publishing folder, and no one has to worry about
creating shortcuts to X or changing drive letters while they work.
To create a mounted volume, follow these steps:
In
Disk Management, right-click the volume you want to change. (You can do
this in either the graphical pane or the tabular pane.) Choose Change
Drive Letter And Paths from the shortcut menu.
Click
Add to open the Add Drive Letter Or Path dialog box.
Select
Mount In The Following Empty NTFS Folder. (This is the only option
available if the volume already has an assigned drive letter.)
Click
the Browse button. The Browse For Drive Path dialog box that appears
shows only NTFS volumes,
and the OK button is enabled only if you select an empty folder or
click New Folder to create one.
Click
OK to add the selected location in the Add Drive Letter Or Path dialog
box and then click OK to create the drive path.
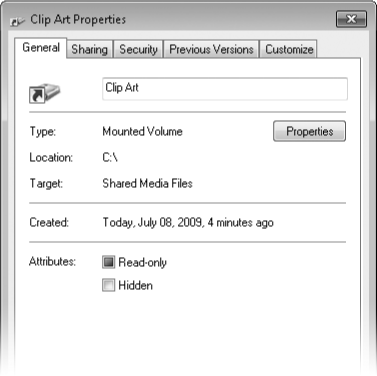
You can manage files and
subfolders in a mounted volume just as if it were a regular folder. In
Windows Explorer, the folder icon will be marked by a shortcut arrow. If
you right-click the folder icon and choose Properties, the General tab
will reveal that the folder is actually a mounted volume, as shown here:
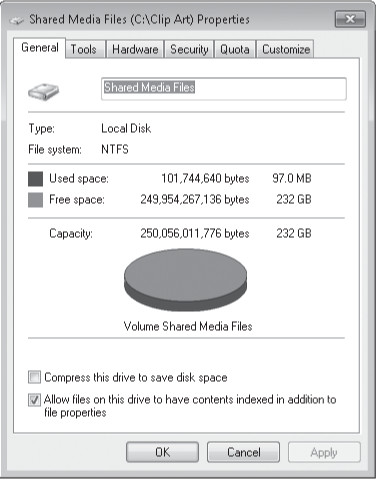
And, as Figure
2 shows, if you click the
Properties button within that properties dialog box, you'll see the
status of the drive to which the folder is mapped.
If you use the Dir
command in a Command Prompt window to display a folder directory, a
mounted volume is identified as <JUNCTION> (for junction point,
another name for mounted volume), whereas ordinary folders are
identified as <DIR> (for directory,
the MS-DOS term for a folder).
Warning:
When creating
mounted volumes, avoid
establishing loops in the structure of a drive—for example, by creating a drive path
from drive X that points to a folder on drive D and then creating a
drive path on drive D that points to a folder on drive X. Windows allows
you to do this, but it's invariably a bad idea, because an application
that opens subfolders (such as a search) can go into an endless loop.
To
see a list of all the mounted drives on your system, choose View, Drive
Paths in Disk Management. A dialog box like the one shown in Figure 3 appears. Note that you can remove a
drive path from this dialog box; if you do so, the folder remains in the
same spot it was previously located, but it reverts to being a regular,
empty folder.

|
A bootable flash disk can be a great way to install Windows 7 on a
netbook that lacks an external DVD drive. Putting the system files on a
flash disk also makes the operating system a little easier to tote, if
you happen to need the ultimate in portability. The trick is to make the
flash disk's partition active,
and Disk Management won't do that for you. Fortunately, Diskpart, the
command-line disk management utility, is willing and able. For a clearly
written, well-illustrated set of step-by-step instructions, see
"Windows 7: Setting Up a USB Bootable Device for Installs," by Microsoft
blogger Jeff Alexander, at w7io.com/2503.
|
Windows 7 makes it easy to transfer .ISO files to DVD.
Simply right-click the .ISO file in Windows Explorer, choose Burn Disc
Image from the context menu, and follow the prompts. No more scrambling
for third-party disc-burning utilities. (You can also select the .ISO
file and click Burn on the toolbar.)
