No matter how well you plan, your approach to
deploying storage resources is likely to change over time. Disk
Management can help you adjust to changing requirements. You can expand
volumes (assuming space is available), shrink volumes, reformat,
relabel, assign new drive letters, and more. We'll consider these
options next.
1. Extending a
Volume
Disk Management will be
happy to make an NTFS volume larger for you, provided unallocated space
is available on the same or another hard disk. To accomplish the
expansion, right-click the volume you want to expand, and choose Extend
Volume from the shortcut menu. Click Next to move past the Extend Volume
wizard's welcome page. The Select Disks page, shown in Figure 1, appears.
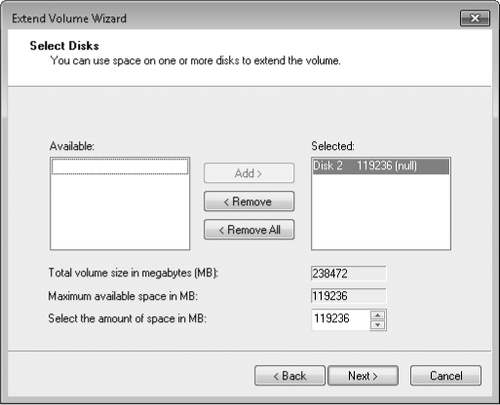
The Selected list, on
the right side of this dialog box, initially shows the disk whose volume
you intend to extend. The Maximum Available Space In MB box shows you
how much larger you can make the volume, assuming you want to confine
your expansion to the current disk. The Select The Amount Of Space In MB
box, initially set to equal the maximum available space, is where you
declare the number of megabytes you want to add to the volume, and the
Total Volume Size In Megabytes (MB) box shows you how big your volume is
about to become. When you're ready to continue, click Next, review your
orders on the ensuing page, and then click Finish. If your volume
resided on a basic disk to begin with, it will remain basic after the
expansion—provided the space into which you expanded was contiguous with
the original volume. Note that no separate formatting step is required;
the new territory acquires the same formatting as the original.
Volume extension is subject
to the following limitations:
Only NTFS-formatted volumes can be
extended.
A
logical drive can be extended only within the extended partition that
contains it.
The
system and boot partitions can be extended only into contiguous
unallocated space.
You
cannot extend a striped volume.
|
If you're thinking of expanding a partition because you're running
short of space, consider compressing your files and folders instead. You
can compress individual files, particular folders, or entire volumes.
Items compressed in this manner are decompressed on the fly when opened
and recompressed when closed. You won't achieve huge savings in storage
space this way—less than you would get by using Compressed (Zipped)
Folders—but the convenience of NTFS is high and the cost, in terms of
performance, is virtually unnoticeable. To compress a volume, open
Computer in Windows Explorer, right-click the volume, choose Properties,
and then, on the General tab of the Properties dialog box, select
Compress This Drive To Save Disk Space. To compress a particular folder
or file, right-click it in Windows Explorer, choose Properties, and then
click Advanced on the General tab of the Properties dialog box. In the
Advanced Attributes dialog box, select Compress Contents To Save Disk
Space. Note that this form of compression is available only on NTFS
volumes, and that NTFS compression is incompatible with encryption. You
can have one or the other, but not both.
|
2. Shrinking a
Volume
Provided space is
available, you can shrink an NTFS-formatted volume to make more space
available for other volumes. To do this, right-click the volume in
either the tabular or graphical pane, and choose Shrink Volume from the
shortcut menu. Disk Management responds by analyzing the disk, and then
reports the amount of shrinkage possible in a dialog box like the one
shown next.
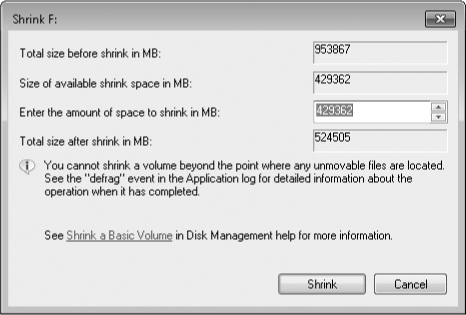
Enter the number of
megabytes by which you want to reduce your volume, and then click
Shrink. Disk Management defragments the disk, moving all its data to a
contiguous block, and then performs the shrink.
Be aware that page
files and volume shadow copy files cannot be moved during the
defragmentation process. This means that you might not have as much room
to shrink as you would like. Microsoft also advises that the amount by
which you can shrink a volume is "transient" and depends on what is
happening on the volume at the time. In other words, if you are trying
to eliminate, say, 10 GB from the volume and Disk Management can manage
only 7, take the 7 and then try for more later.
