You can't become a Windows expert without mastering
Windows Explorer. This general-purpose tool is used throughout Windows, for
general file-management tasks, for opening and saving files in Windows
programs, and even in parts of the Windows shell such as Control Panel.
The more you understand about how Windows Explorer works, the more
effective you'll be at speeding through tasks without unnecessary
delays.
The design of
Windows Explorer in Windows 7 is significantly refined from its Windows
Vista predecessor, and it's practically unrecognizable compared to its
ancestor in Windows XP. To give you the lay of the land, we'll start by
introducing the individual elements that allow you to navigate through
Windows and display and arrange data.
Windows Explorer is extremely
customizable. You can show or hide some navigation and display elements
and choose from a dizzying array of views and column layouts. Figure 1 shows Windows Explorer with all of its
basic elements visible. The contents of a single folder within the
Pictures library are shown in Medium Icons view.
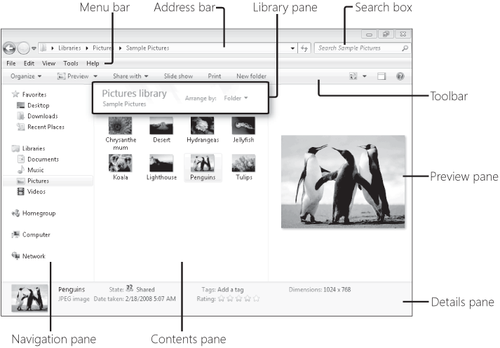
The important landmarks, optional and otherwise,
are as follows.
Navigation pane The default view of the navigation pane, which appears at the left
side of Windows Explorer, shows four or five nodes: Favorites,
Libraries, Homegroup (visible only if the network location is set to
Home), Computer, and Network. You can hide the navigation pane, adjust
its width, or change its content to include only the Favorites node and a
hierarchical folders list. We discuss the navigation pane and its
customization options later in this section.
Details pane Running across the
bottom of the window, the details pane displays properties for the
current selection. You can adjust its height by dragging the top border
up or down. The details pane is shown by default but can be hidden.
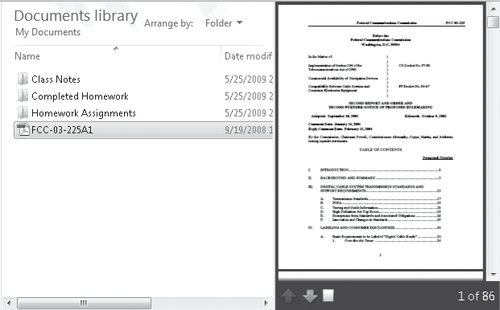
Preview pane A button on the
toolbar allows you to show or hide the preview pane with a single click.
If the currently selected file has a preview handler,
the file's contents are displayed in the preview pane. Default preview handlers allow
you to view the contents of most graphics file formats, plain text
files, and those saved in Rich Text Format (RTF). Select a media file,
such as an MP3 music track or a video clip, and a compact media player
appears in the preview pane. Programs that you install after setting up
Windows, such as Microsoft Office and Adobe
Reader, can add custom preview
handlers as part of their program setup, allowing you to preview files
created in the formats supported by those programs. Figure 2 shows the preview pane displaying
the contents of a PDF file on a computer where Adobe Reader 9 has been
installed.
Toolbar The toolbar (known as the command bar in Windows
Vista) is not optional, nor can it be customized. A few elements on the
toolbar are always available, including the Organize menu on the left and the three buttons on
the far right, which (going from left to right) change views, show or
hide the preview pane, and open a help window. Other buttons on the
toolbar vary depending on the current selection; available commands are
relevant to the selected file type or folder location.
Menu bar Sitting directly
above the toolbar shown in Figure 1 on Section 1 is the menu bar, which is normally hidden. You
shouldn't need this relic from Windows XP in everyday use, as most of its offerings are now
available in the Organize menu and the Change Your View button (or, in
some cases, on the shortcut menu that appears when you right-click in Windows Explorer).
Nevertheless, some Windows XP veterans prefer to keep the menu bar
visible because it takes up little space and leaves frequently needed
functionality (such as a command to open the Folder Options dialog box) in familiar places.
(Expert network users might be accustomed to using an option on the
Tools menu to map a shared network folder to a local drive letter; in
Windows 7, this option appears on the toolbar but is only visible when
you click Computer in the navigation pane.)
|
The fastest way to get to
the Folder Options dialog box is to type folder in the Start menu's
search box. Folder Options should pop to the top of the search results
list, under the Control Panel heading.
|
If the menu bar
isn't displayed, you can make it appear temporarily by pressing Alt or
F10; the menu bar disappears after you open a menu and execute a
command, or if you click anywhere else in Windows Explorer, or if you
tap Alt again.
Library pane This navigation aid
appears by default above the file list when a library is selected. It
can be hidden.
Address bar Like its counterpart in a
web browser, the address bar shows you where you are and helps you get
where you want to go. (You can even type a URL here and launch your web
browser, although that's hardly its principal function.) Back and
Forward buttons allow you to navigate between destinations you've
visited in the current session, and the drop-down history list lets you
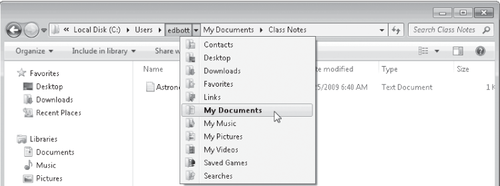
revisit addresses you entered in previous sessions. Like its Windows
Vista predecessor, this version of Windows Explorer uses a breadcrumb trail
feature to help you navigate in the address bar. Figure 3 shows this feature in action. The Class
Notes folder is open, and each parent folder is represented with a name
separated by a small arrow. Click any folder name to move straight to
that location; click the down arrow, as shown, to display other
subfolders at the same level.
We regularly hear
from experienced Windows XP users who are perplexed by the absence of the familiar Up button. A design change in the Windows 7
address bar should help ease the transition; the address bar is designed
to always show the link for the parent folder (sliding the name of the
current folder to the right if necessary), allowing you to go up a level
by clicking that link.
|
If you're moving from
Windows XP to Windows 7, you'll notice that the address bar no longer
shows you the full path of the current folder in the traditional manner,
with backslash characters separating folder names. If you need to see
the full path displayed that way, click anywhere to the right of the
path in the address bar or right-click any part of the address bar and
choose Edit Address. This shortcut menu also includes two additional
options that allow you to copy the current address to the Clipboard.
Click Copy Address to save the location in a format that is optimized
for copying and
pasting folders in Windows Explorer; use Copy Address As Text if you
plan to paste the folder path into a document.
To copy the full
path for an individual file, hold down the Shift key as you right-click
the file, and then choose Copy As Path. This option is especially useful
if you've found a file in Windows Explorer and you want to upload it to
a website or open it in another program without browsing to the same
location in an Open dialog box. Copy the full path for the file, then
paste it into the File Name box in the target program.
|
Search box Typing in the search
box begins a search whose scope is restricted to the current location
and displays the search results immediately in the contents pane. The
width of the search box can be adjusted by dragging its left edge in
either direction.
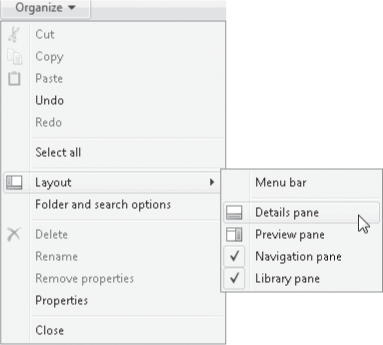
As we noted in the
preceding list, you can show or hide some of the navigation and
display elements in Windows
Explorer. To toggle the show/hide setting for any of these items, click
Organize, click Layout, and then select from the fly-out menu shown
here. A check mark indicates that the element in question is visible in
the current view.
1. Navigating
in Windows Explorer
In its default
arrangement, Windows Explorer offers four or five starting points for
navigating through files on your computer and on your network. The most
prominent jumping-off point is the new Libraries feature, , but older, more traditional organizational
structures are still there in the background. If you're a Windows
veteran and you prefer working directly with the subfolders in your
user profile folders or navigating through the hierarchy of drives and
folders, you can do that.
In fact, if you prefer
the Windows XP–style folder tree, you can replace the default
navigation pane layout with a single flat tree. On the General tab of
the Folder Options dialog box, under the Navigation Pane heading, select
Show All Folders.
If you want the folders tree in the navigation pane to automatically
open to show the contents of the current folder, select Automatically
Expand To Current Folder. (Both options are available on a shortcut menu
when you right-click any empty space in the navigation pane.)

Figure 4 shows these two views of the navigation pane side by
side. On the left is the default, Windows 7–style view; on the right is
the Show All Folders view.

Interestingly, how you
start Windows Explorer also dictates where you start.
Here's a quick cheat sheet of what each option does:
Press Windows logo
key+E to open Windows
Explorer with Computer selected in the navigation pane. This has the
same effect as clicking Computer on the Start menu.
Click the Windows Explorer button on the taskbar to open Windows
Explorer with Libraries selected in the navigation pane. This displays
all available libraries (default and custom) for the logged-on user.
Click the user name at the top
of the Start menu's right column to open the user profile folder for the
currently logged-on user. This option does not correspond to a
top-level entry in the default navigation pane.
The Favorites list that appears at the top of the navigation pane
provides direct transport to folders that might or might not be located
somewhere along the current path. Windows Explorer populates this list
with three links by default: the Desktop and Downloads folders from your
user profile, and Recent Places. The third one is a shortcut that
displays a filtered view of the Recent Items list, showing only folders
and hiding files.
You can add as many
shortcuts as you want to the Favorites list. If you continually need to return to the same
folder (say, for a project that you'll be working with for the next few
weeks or months), you can add a link to that folder. To do this, display
the folder's parent in Windows Explorer, drag the folder to the navigation pane, and
then drop it on the Favorites heading. Initially, your new link will
have the same name as the folder you dragged, but you can right-click
and rename it.
If you're opening or saving files in a Windows program that uses
the Windows 7 common dialog boxes (a set of dialog boxes provided by the Windows
application programming interface to give applications a consistent
appearance and behavior), you will find essentially the same navigation
tools provided by Windows Explorer. In fact, these dialog boxes use the
same program code as Windows Explorer, with minor modifications to make
them useful for opening and saving files.
Every trick you
can use in a standalone Windows Explorer window will work in an Open or
Save As dialog box. You can filter the contents of a window using the
search box. The dialog boxes are resizable as well, unlike their
predecessors in Windows XP. That option is especially useful in
combination with the preview pane. Click the toolbar button to make the
preview pane visible, and then double-click the dialog box title bar so
that it expands to use the full screen. In that fully expanded view, you
should be able to find the file you're looking for with relative ease.
