Windows Search is the collective name for a set of
features that affect practically every aspect of Windows 7. At its
heart, Windows Search relies on a speedy, powerful, and well-behaved
indexing service that does a fine job of keeping track of files and
folders by name, by properties, and (in supported formats) by contents.
All of those details
are kept in the search index, a database that keeps track of indexed
file names, properties, and the contents of files and e-mail messages.
As a rule, when you do most common types of searches, Windows checks the
index first and returns whatever results it finds there.
Note:
The search index is
stored by default in %ProgramData%\Microsoft\Search\Data. Default
permissions for this folder are set to allow access only to the System
account and to members of the Administrators group. This folder contains
no user-editable files, and we recommend that you leave its contents
undisturbed.
|
Although we focus
mostly on indexed searches in this section, Windows 7 actually includes
two search engines. The second engine is informally known as grep search (the
name comes from an old UNIX command derived from the full name global \ regular expression \ print). Windows Search uses the index whenever you use the
search box on the Start menu, in the Search Home folder, in libraries,
and in locations that
are part of a homegroup. In those circumstances, search looks only in
the index and ignores any subfolders that are excluded from the index.
Windows uses the grep search engine if you begin your search from
the Computer window, from the root of any local drive (including the
system drive), or from a local file folder. Grep searches include the
contents of all subfolders within the search scope, regardless of
whether they're included in the search index.
|
To build the index
that makes its magic possible, Windows Search uses several separate
processes. The index is constructed dynamically by the Windows Search
service, Search-Indexer.exe. The indexer crawls through all locations
that are prescribed to be indexed, converting the content of documents (in
supported formats) into plain text and then storing the text and
metadata for quick retrieval.
The Windows Search
service begins running shortly after you start a new Windows session.
From that point on, it runs in the background at all times, creating the
initial index and updating it as new files are added and existing ones
are changed or deleted. Protocol handlers
do the work of
cracking open different data stores to add items to the index; Windows 7
includes protocol
handlers for Microsoft Office Outlook and Windows Live Mail, for
example, to enable indexing
of your e-mail messages as well as files. Property
handlers allow Windows Search to
extract the values of properties from items and store them properly in
the index. Filters
extract the contents of supported file types so that you can do
full-text searches for those items.
1. Which Files
and Folders Are in the Index?
Indexing
every 0 and 1 on your hard disk would be an exhausting task—and
ultimately pointless. When you search for a snippet of text, you're
almost always
looking for something you wrote, copied, or saved, and you don't want
the results to include random program files that happen to have the same
snippet embedded in the midst of a blob of code. So the default
settings for the indexer make some reasonable inclusions and exclusions.
Certain locations are specifically included. These
include your user profile (but not the AppData folder), the contents of
the Start menu, and your Internet Explorer history. If your mail program
includes a protocol handler, the files that contain your saved messages
are indexed when you are logged on and the mail program is running.
Offline files stored in the client-side cache (CSC) are automatically
included in your local index. You can explicitly add other folders to
the index, but Windows 7 eliminates the need to do that. Instead, just
add the folder to a library; when you do so, Windows automatically adds
that folder to the list of indexed locations and begins indexing its contents,
without requiring any additional steps on your part.
To see which folders
are currently being indexed, open the Indexing Options dialog box. You can find this in
Control Panel, but it's usually quicker to type index in the Start
menu search box. Indexing Options should appear at the top of the
results list, under the heading Control Panel. Warning:
If you poke through
the Windows Features list under Control Panel's Programs And Features
category, you might notice an entry for Indexing
Service (Cisvc.exe),
which is missing from a default installation of Windows 7. You might be
tempted to install and enable it. Don't. This service is a holdover
from previous Windows versions and deserves its reputation as slow and
difficult to use. It was supplanted by Windows Search beginning with
Windows Vista, and the only reason this feature is still available
(albeit buried deeply) is to enable corporate applications that rely on
this legacy service.
Figure 1 shows the list of indexed locations on a system where we've
already added one custom folder to the index. The Archives folder at the
top of the list is a new folder we created in the root of the system
(C:) drive and then added to the Documents library.
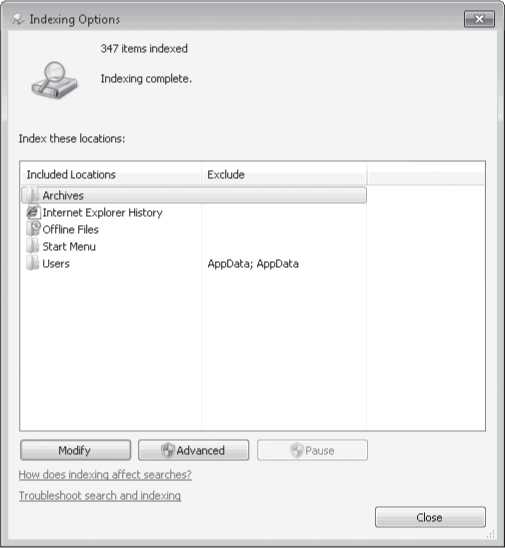
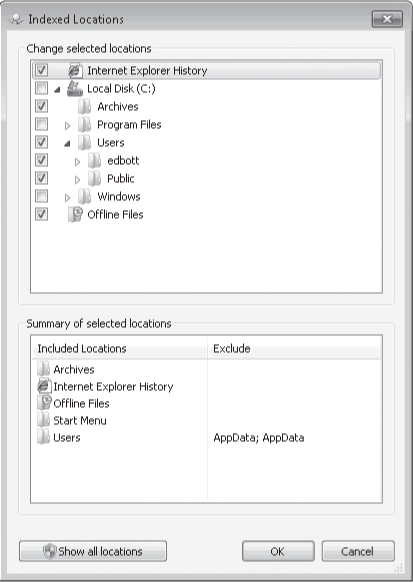
To add locations manually or to
remove existing locations, click Modify. That displays the dialog box
shown in Figure 2 where you can browse through a
list of local drives, folders, and subfolders; select a check box to add
a location to the index; or clear the check box to remove the
corresponding location.
Warning:
We strongly recommend that
you not try to manage locations
manually using the Indexed
Locations dialog box. If you add a folder to a library and then remove
it from the list of indexed locations, the folder will remain in the
navigation pane under the associated library, but none of its contents
will be visible in the library itself.
In its default view,
the Indexed Locations list shows only locations that are accessible to
your user account. To see (and manage) locations from other user
profiles, click Show All Locations. As the User Account Control (UAC)
shield icon makes clear, you'll need to be logged on as an administrator
(or provide an administrator's credentials) to continue.
Within that list of indexed
locations, the Windows Search service records the file name and
properties (size, date modified, and so on) of any file or folder. Files
marked as System and Hidden are indexed but are only displayed in
search results when you change Windows Explorer settings to show those
file types. Metadata for common music, image, and video file formats are included
in the index by default. The indexer also includes the contents of a
file and its custom properties if the file format has an associated
property handler and filter. The list of formats supported by filters
included with Windows appears in Table 1.
Table 1. File Formats That
Support Content Indexing| File Format | Extension |
|---|
| HTML | .ascx, .asp, .aspx, .css, .hhc, .hta, .htm, .html,
.htt, .htw, .htx, .odc, .shtm, .shtml, .sor, .srf, .stm | | MIME | .mht, .mhtml, .p7m | | Office | .doc, .dot,
.pot, .pps, .ppt, .xlb, .xlc, .xls, .xlt | | Plain Text | .a, .ans,
.asc, .asm, .asx, .bas, .bat, .bcp, .c, .cc, .cls, .cmd, .cpp, .cs,
.csa, .csv, .cxx, .dbs, .def, .dic, .dos, .dsp, .dsw, .ext, .faq, .fky,
.h, .hpp, .hxx, .i, .ibq, .ics, .idl, .idq, .inc, .inf, .ini, .inl,
.inx, .jav, .java, .js, .kci, .lgn, .lst, .m3u, .mak, .mk, .odh, .odl,
.pl, .prc, .rc, .rc2, .rct, .reg, .rgs, .rul, .s, .scc, .sol, .sql,
.tab, .tdl, .tlh, .tli, .trg, .txt, .udf, .usr, .vbs, .viw, .vspcc,
.vsscc, .vssscc, .wri, .wtx | | XML (xmlfilt.dll) | .csproj,
.user, .vbproj, .vcproj, .xml, .xsd, .xsl, .xslt | | Favorites | .url | | Journal File | .jnt | | Rich Text | .rtf | | Wordpad | .docx, .odt | | XML Paper Specification | .dwfx, .easmx, .edrwx, .eprtx, .jtx, .xmlps |
|
Eagle-eyed readers might
notice that no pictures are included in the list of formats in Table 1. That's perfectly normal,
because images by definition consist of colored pixels rather than
words, and thus contain no content to index. But one image format is a
noteworthy exception to that rule. If you use your PC's fax modem to
receive pages sent from a remote fax machine, the received faxes are
saved using Tagged Image File Format (TIFF), but the original document
usually consists of at least some text. Windows 7 Home Premium and
higher editions contain code that can perform optical character
recognition on received faxes saved as TIFF files and include the recognized text in
the search index. To enable this feature, open Control Panel and click Turn Windows
Features On Or Off (under the Programs And Features heading). In the
Windows Features dialog box, select Windows TIFF IFilter and then click
OK.
|
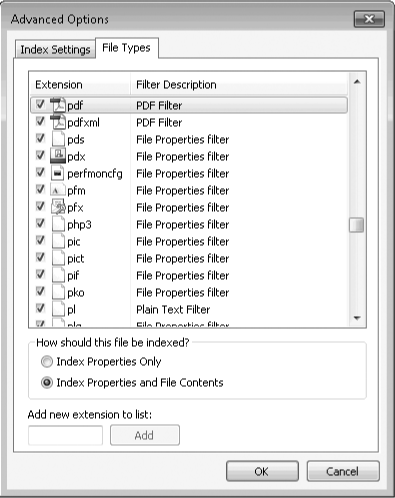
To see which file formats
support full-text indexing,
open the Indexing Options dialog box and click the Advanced button
(you'll need to supply an administrator's credentials to do so, although
elevation is silent if your logon account is a member of the
Administrators group). On the File Types tab of the Advanced Options
dialog box (see Figure 3), you will find a long list of file name
extensions. By default, the check box next to every item in this list is
selected.
The list yof formats on
the File Types tab on your computer might include more file types if
you've installed Windows programs that include custom property
handlers and filters,
such as those installed with Microsoft Office 2007 or Microsoft Office
2010. The list shown in Figure 3 includes several file name
extensions that aren't part of a default Windows 7 installation. When we
installed Acrobat Reader 9 on this machine, it installed a PDF filter
and assigned it to the file name extensions it supports, including .pdf
and .pdfxml. Any file with one of these extensions that is stored in an
indexed location has its full contents added to the index, courtesy of
the PDF filter.
Each of the file types in
this list can be indexed in one of two manners, using the option
buttons below the list—Index Properties Only or Index Properties And
File Contents. The latter option is selected by default for any file
type that has a registered filter, and the name of the associated filter
is listed in the Filter Description column. If you don't need to search
content in a file type that has a filter and would normally
be indexed, you can save some processing overhead by selecting the file
type and choosing Index Properties Only. If you need content indexing
where none is currently provided, you can try switching a file from
Index Properties Only to Index Properties And File Contents. In that case, the
indexer will use the Plain Text filter—which might or might not yield
satisfactory results.
Windows Search does not
index the content of files that are saved without a file name extension,
nor does it index contents of files that are protected by Information Rights Management (IRM)
or digital rights management (DRM).
A handful of
locations are specifically excluded from indexing. Even if you manually specify that you
want your system drive (normally C:) to be included in the index, the
following files and folders will be excluded:
The entire
contents of the \Windows folder and all its subfolders (Windows.000 and
Windows.old folders are also excluded) \$Recycle.Bin (the hidden folder that
contains deleted files for all user accounts) \Users\Default and all of
its subfolders (this is the user profile template used to create a
profile for a new user) The
entire contents of the \Program Files and \Program Files (x86) folders
and all of their subfolders The \ProgramData folder (except the subfolder that
contains shortcuts for the shared Start menu)
|
