To
begin creating a new task, select the folder in the console tree where
you want the task to reside. If you need to create a new folder for this
purpose, right-click the folder's parent in the console tree and choose
New Folder from the shortcut menu.
You can create a new task in the Scheduled Tasks snap-in either by using a wizard
or by filling out the Create Task dialog box. The wizard, which you
launch by choosing Create Basic Task (in the action pane or from the
Action menu), is ideal for time-triggered tasks involving a single
action. It's also fine for setting up a task to run when you log on or
when Windows starts. For a more complex task definition,
you'll need to work through the Create Task dialog box. Select the
folder where you want the task to appear (in the console tree), and then
choose Create Task in the action pane or from the Action menu.
The one required entry on the General tab
is a name for the task; everything else is optional. The task's author
is you (you can't change that), and unless you specify otherwise, the
task will run in your own security
context. If you want it to run in the security context of a different
user or group, click Change User Or Group and fill out the ensuing
dialog box.
Regardless of which
user's security context the task is to run in, you have the option of
allowing the task to run whether or not that user is logged on. If you
select Run Whether User Is Logged On Or Not, you will be prompted for
the user's password when you fiish creating
the task. If you don't happen to have that password, you can select Do
Not Store Password. As the text beside this check box indicates, the
task will have access to local resources only.
1. Setting Up a Task's Trigger or Triggers
Tasks can be triggered in the following ways:
On a schedule
At logon
At startup
On idle
On an event
At task creation or modification
On connection to a user session
On disconnection from a user session
On workstation lock
On workstation unlock
You can establish zero,
one, or several triggers for a task. If you don't set any triggers, you
can still run the task on demand (unless you clear the Allow Task To Be
Run On Demand check box on the Settings tab of the Create Task dialog
box). This gives you a way to test a new task before committing it to a
schedule, for example. If you set multiple triggers, the task runs when
any one of the triggers occurs.
To set up a trigger,
click the Triggers tab in the Create Task dialog box, and then click
New. In the New Trigger dialog box that appears (shown in Figure 4), choose the type of trigger you want from the Begin The Task drop-down list.
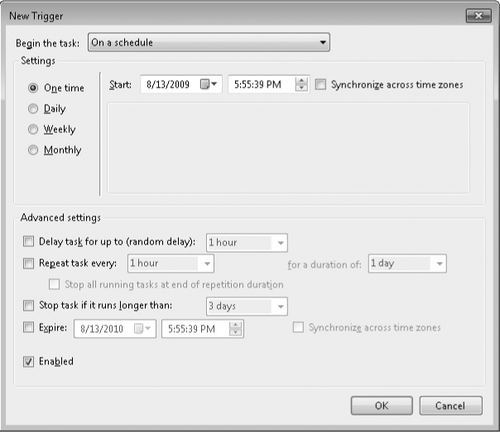
Note the Advanced Settings options at the bottom of the dialog box shown in Figure 22-11.
These choices—which let you establish delay, repeat, and expiration
parameters (among other things)—are not so easy to find when you're
reviewing a task that you or someone else has already created. They
don't appear in the read-only version of a task's properties, and if you
reopen the read/write version of the properties dialog box, you'll need
to select a trigger (on the Triggers tab) and click Edit to see or
change the advanced options.
Triggering a task on schedule
Time-triggered tasks can be set to run once or to recur at regular
intervals. The choices are probably self-explanatory, with the possible
exception of the Synchronize Across Time Zones check box. Time triggers
are governed by the clock of the machine on which the task is to run,
unless you select this check box—in which case, they are triggered by
Coordinated Universal Time (UTC). You might want to go with UTC if
you're trying to coordinate time-triggered tasks on multiple machines in
multiple time zones.
Triggering a task at logon
Logon tasks can be set for any user or a specific user or user group.
If the user whose logon has triggered the task is not the user in whose
security context the task is running, the task will be noninteractive—in
other words, essentially invisible. (The user can note the presence of
the task—and terminate it—by running Windows Task Manager, going to the Processes tab, clicking Show Processes From All Users, and answering the UAC prompt.)
Triggering a task at startup
If you set a task to be triggered at startup, the trigger takes effect
when you start your own computer but before you log on. Therefore, if
you intend for the task to run on your own system, be sure to choose Run
Whether User Is Logged On Or Not on the General tab of the Create Task
dialog box. Otherwise, the task will never run.
If
you use the Change User Or Group button on the General tab to specify
another user on your domain, and you choose Run Only When User Is Logged
On, the startup-triggered task will run on the remote system when you
restart your own, provided the specified user actually is logged on.
Triggering a task on idle
If you set a task to be triggered when your computer is idle, you
should also go to the Conditions tab of the Create Task dialog box to
specify what you mean by "idle."
Note that you need to set an idle trigger on the Triggers
tab only if idleness is the only trigger you want to use. If you're
setting one or more other triggers but you want to ensure that the task
starts only when the computer is idle, select Start The Task Only If The
Computer Is Idle For on the Conditions tab and specify the time period
in the field to the right.
Using an event to trigger a task Anything that generates an item in an event log can serve as a task trigger. The simplest way to use this feature is to launch Event
Viewer (Eventvwr.msc), find the event that you want to use as a
trigger, right-click it in Event Viewer, and choose Attach Task To This
Event. This action launches the Create Basic Task wizard, with the
trigger portion of the wizard already filled out. The new task appears
in a folder called Event Viewer Tasks (newly created for you if it
doesn't already exist), and you can modify it if needed by selecting it
there and opening its properties dialog box.
Triggering at task creation or modification
The option to trigger a task at task creation or modification gives you
an easy way to make a task run the moment you finish setting it up the
first time or editing it subsequently. You can use this setting for
testing purposes, or by combining it with other triggers you can use it
to make a task run immediately as well as subsequently.
Triggering a task at user connection or disconnection The options On Connection To A User Session and On Disconnect From A User Session give you some flexible ways to set tasks running in response to user activities. Option buttons associated with these choices let you specify whether the settings
apply to any user or to a particular user or group. Additional options
make the trigger apply to remote connections and disconnections or to
local connections and disconnections. Setting a trigger to a particular
user on the local computer, for example, would enable you to run a task
in response to that user's connection via Remote Desktop Connection or
the Switch User command.
Triggering a task at workstation lock or unlock
Like several other triggering choices, the On Workstation Lock and On
Workstation Unlock options can be configured to apply to a particular
user or group or to anyone who locks or unlocks the computer.
2. Setting Up a Task's Action or Actions
Besides the name of the
task (which you supply on the General tab of the Create Task dialog
box), the only other task parameter you must provide is the action or
actions the task is supposed to perform. This you do by clicking New on
the Actions tab and filling out the rest of the dialog box. Three types
of actions are possible:
Start A Program
Send An E-Mail
Display A Message
You can specify one or
several actions. Multiple actions are carried out sequentially, with
each new action beginning when the previous one has completed.
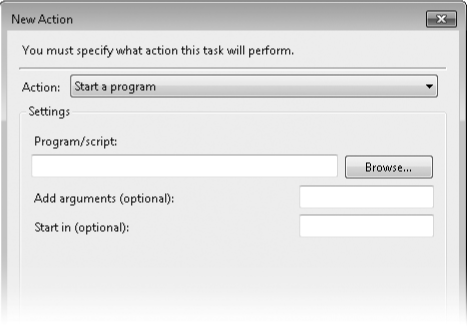
The Start A Program
option (shown in the New Action dialog box on the next page) can be
applied to anything that Windows can execute—a Windows program, a batch
program or script, a document associated with a program, or a shortcut.
You can use the Browse button to simplify entry of long path
specifications, add command-line parameters for your executable in the
Add Arguments box, and specify a start-in folder for the executable. If
your program needs elevated privileges to run successfully, be sure that
you have selected Run With Highest Privileges, on the General tab of
the Create Task dialog box.
If you choose to send an e-mail, Task
Scheduler will require the address of your outbound (SMTP) server. If
you opt for a message, the dialog box will provide fields for the window
title and message text. The Send An E-Mail and Display A Message
options are not available for tasks set to run on Windows XP, Windows 2000, or Windows Server 2003.
3. Starting and Running a Task Only If the Computer Is Idle
On the Conditions tab of the Create Task dialog box (shown in Figure 5),
you can require that the computer be idle for a specified period of
time before a triggered task can begin. To do this, select Start The
Task Only If The Computer Is Idle For and specify the time period in the
field to the right. Other check boxes in the Idle section of the
Conditions tab let you specify what should happen if the task has begun
during a required idle period but the computer subsequently becomes
active again.
Task Scheduler defines idleness as follows:
If a screen saver is running, the computer is presumed to be idle.
If
a screen saver is not running, the system checks for idleness every 15
minutes, considering the machine to be idle if there has been no
keyboard or mouse input during that interval and if the disk I/O and CPU
usage figures were at 0 percent for 90 percent of that time.
In addition to
specifying a required period of idleness, you can also tell Windows to
wait some period of time after a task has been triggered before
beginning to determine whether the computer is idle. Clearly, adjusting
the idle parameters is a bit of an art; if you have precise requirements
for some reason, you might need to experiment and test to get things
just the way you want them.
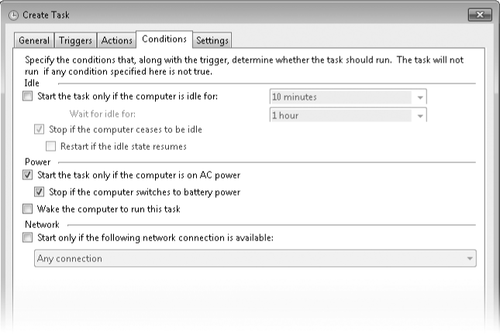
4. Requiring AC Power
If you're setting up a
task to run on a portable computer, consider whether you want the task
to begin running while the computer is running on battery power. If you
do not, select Start The Task Only If The Computer Is On AC Power, in
the Power section of the Conditions tab. A second check box below this
one lets you decide whether the task, once begun, should cease if the
computer switches to battery power.
5. Waking the Computer to Run a Task
If it's essential that
your task run at some particular time, whether or not the computer is
asleep, be sure to select Wake The Computer To Run This Task on the
Conditions tab. Once aroused, the computer will then perform whatever
duties you've assigned, returning to sleep on completion in accordance
with whatever power plan is in effect.
If you do not want to
disturb your computer's rest, you might want to stipulate that the task
run as soon as possible after the machine awakes. You can do that by
selecting Run Task As Soon As Possible After A Scheduled Start Is Missed on the Settings tab of the Create Task dialog box.
6. Requiring a Network Connection
If your task
requires access to network resources, be sure to select Start Only If
The Following Network Connection Is Available on the Conditions tab.
Then use the drop-down list directly below this check box to specify
which network connection is required. You might want to use this option
in conjunction with Run Task As Soon As Possible After A Scheduled Start
Is Missed, a check box on the Settings tab.
The option to require a
network connection is not available for tasks set to run on Windows XP,
Windows 2000, or Windows Server 2003.
7. Running a Task on Demand
One of the small but handy features in the Windows 7 Task Scheduler is the ability for scheduled
tasks to be run on demand, as well as in response to various time or
event triggers. You can turn this feature off for a task by clearing the
Allow Task To Be Run On Demand check box on the Settings tab. But
unless you're concerned that another user with access to your system
might run a task against your wishes, it's hard to imagine why you would
want to disallow on-demand execution.
To run a task on demand,
assuming you have not disallowed it, locate the task's folder in the
console tree, right-click the task in Task Scheduler's upper pane, and
choose Run from the shortcut menu.
