Spyware is a term that has come to describe a variety of
undesirable software programs, whose bad behavior ranges from annoying
you with pop-up ads to surreptitiously sending your private information
to other people. Indications of common spyware infections include the
following:
Unexpected new toolbars, favorites, and links in your web browser
Changes to your browser's home page and default search provider
Numerous pop-up ads
Sudden occurrence of computer crashes or slow performance
Note that spyware
doesn't necessarily "spy" on you. A common characteristic of anything
dubbed "spyware" is that it does its deeds—malicious
or otherwise—without your informed consent. (Spyware typically gets
installed by deceitfully asking permission to do something other than
what it actually does or, in some cases, by exploiting browser
vulnerabilities. In this regard, most spyware is fundamentally different
from earlier types of malware; it typically relies on social
engineering to install instead of exploiting vulnerabilities.)
That's where Windows
Defender comes in. For known malicious programs that have no redeeming
value to you, it intercedes without disturbing you and then quarantines
or removes the offending program. Other "spyware" programs, along with
programs that perform activities that are suspiciously similar to known
spyware tactics, fall into a gray area; when Windows Defender encounters one of these programs knocking at your door, it suggests a solution and asks what you want to do.
Note:
For detailed information about the criteria that Windows Defender uses to identify spyware, visit w7io.com/1517.
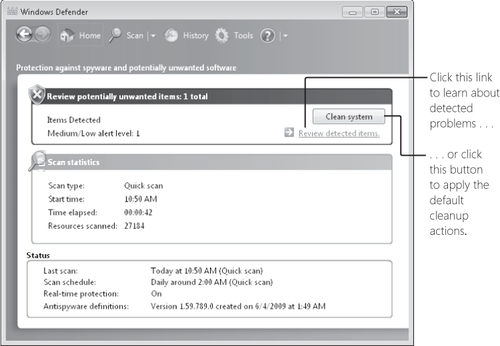
In addition to its real-time protection for spyware-like behavior, Windows Defender (shown in Figure 1) also scans your computer's files periodically, looking for known spyware.
Windows
Defender runs as a service, which allows it to provide protection for
all users on your computer. The Windows Defender user interface runs in
the context of the current user (therefore, UAC elevation is required
for some actions), but the scanning and spyware removal is done by the
service—and without the need for administrative privileges.
Note:
Windows Defender is a good antispyware solution for computers in homes and in small business networks. If you use a domain-based network, you might want to look into Microsoft Forefront Client Security (w7io.com/1519), which provides spyware protection with centralized control, management, and reporting.
1. Scanning Your Computer for Spyware
Scanning is one of the two primary detection mechanisms in Windows
Defender. (The other is real-time protection.) When Windows Defender
scans your computer, it checks applications it finds against a database
of spyware
definitions. The database, which is frequently updated via Windows
Update, contains detailed information about known spyware, including
file names and version numbers, a description of the threat presented by
each program, and a recommended action to take if the program is found
on your computer.
Scanning performance has been improved in Windows 7. Automatic
scans, which run at low priority, use better algorithms to determine
when your computer is idle than does Windows Defender in Windows Vista;
this enables scans to run efficiently when you're not using your
computer and to stay out of the way when you are. In addition, the
scanning engine uses a caching system that improves performance over
time, persisting through reboots and spy-ware definition updates.
|
Spyware definitions don't update properly
Microsoft Knowledge Base article 918355 (w7io.com/1520) explains how to troubleshoot and resolve definition update problems.
|
1.1. Scanning Automatically
By default, Windows
Defender scans your computer automatically once a day; your current
scan schedule appears near the bottom of the home page in Windows
Defender, shown in Figure 15-8.
You can modify the schedule and set other scanning options by clicking
Tools and then clicking Options. The Options page is shown next.
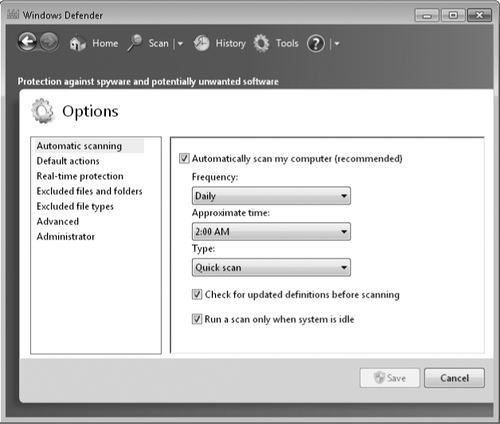
The Automatic Scanning panel of the Options page is where you specify a schedule and the type of scan: quick or full. A quick scan
checks only the places on your computer that spy-ware is most likely to
infect, and it is the recommended setting for frequent regular scans. A
full scan checks
all files on your local hard disk drives and all running programs, and
it is likely to slow down your computer during its sometimes lengthy
run.
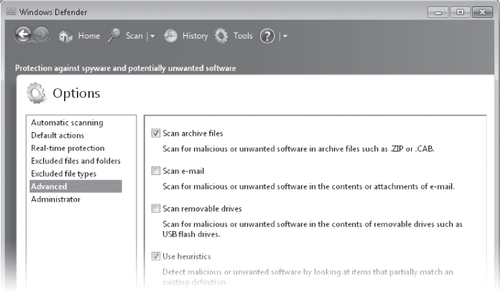
Before you leave the Options page, review some additional, less intuitive options that affect scanning:
Excluded Files and Folders In this box, you can specify files or folders that you know to be safe. Generally, the only reason to consider excluding files in this way is if you have a program that you knowingly run regularly and that is detected by Windows
Defender every time it runs, despite your telling it to allow the
program. If this happens, you should exclude the detected file (or
files) rather than its containing folder; if you grant blanket approval
for files in the containing folder, and later some real spyware ends up
in the folder, Windows Defender won't detect it.
Excluded File types Similarly, you can exclude from scans all files with the file name extensions that you specify.
Advanced The first three options on the Advanced panel expand the scope of Windows
Defender scans when selected. Note that archive files—the subject of
the first option—provide the storage mechanism for compressed folders as
well as .zip and .cab files.
1.2. Scanning Manually
Regular automatic
scanning is normally suffiicient for identifying and resolving spyware
problems. However, if you suspect that you've been infected—or if you've
disabled automatic scanning—you can scan on demand. To immediately run a
quick scan, simply click the Scan button on the toolbar. If you want to
run a full scan, which is a better option if you suspect infection,
click the arrow next to the Scan button and click Full Scan. The Custom
Scan option lets you narrow your scan to the drives and folders you
specify.
|
Windows Defender also includes a command-line
utility, %ProgramFiles%\Windows Defender\MpCmdRun.exe, that you can use
to automate the use of Windows Defender. For details about using the
utility, open a Command Prompt window and run the program with no
parameters.
|
2. Using Real-Time Protection
Real-time protection
runs in the background, always on the lookout for spyware that attempts
to install itself or to run. To enable real-time protection, open the
Options page and click Real-Time Protection. For full protection, be
sure that all check boxes are selected.
When real-time protection is enabled, if Windows
Defender encounters spyware (or suspected spyware), an alert appears by
the Action Center icon in the notification area, as shown below.

3. Responding to Windows Defender Alerts
If Windows Defender
detects the presence of spyware, whether during the course of a scan or
caught by real-time protection, you must decide how to handle it. If you
see an alert triggered by real-time protection, as shown above, click
the alert balloon (or, if it deflates before you have a chance to click
it, click the Action Center icon and click Potentially Harmful Software
Detected). Alternatively, on the Home page of Windows Defender (shown
earlier in Figure 15-8), click Review Detected Items. A Windows Defender Alert dialog box opens, as shown in Figure 2.

For each suspected spyware program, you can specify one of three actions:
Remove
Windows Defender permanently removes the detected spyware from your computer.
Quarantine Windows Defender moves the program to a different folder and prevents the program from running.
Allow
Windows Defender allows the program to be installed or to run and adds
the program to the allowed list; Windows Defender no longer alerts you
to its presence and its risks. You should allow only software that you
know to be safe.
If you simply want to remove all detected items, click Clean
System; Windows Defender begins the removal process and reports the
results when it completes. If you're unsure which action to take, click Show
Details to display additional information, advice, and a link to online
details about the selected item. After you select an action for each
item, click Apply Actions. If you later change your mind about items you
chose to quarantine or allow, you can reverse those decisions, as
described in the following section.
|
How do you decide what to
do based on the rather cryptic information that's presented? Begin with
the Windows Defender advice, if shown. Then consider the publisher of
the program: is it a company that you've heard of and trust? Examine
each of the details and, for the ones you can understand, consider if
that's a reasonable action for the type of program you think you're installing.
If you're still unsure,
search the web for the names of any programs or files shown; you're
likely to find many sites that better describe the source and potential
risks with a particular file or program. (You're also likely to find a
number of sites packed with misinformation, and it's sometimes hard to
tell the difference. Until you find a site that gives you confidence,
check several sites to find a consensus. And when you do find one of
those good sites, bookmark it for the next time you have to deal with an
uncategorized risk.) Dealing with potentially risky software is not
clear-cut. Not everyone agrees on what constitutes a risky program; some
are willing to accept the risk in return for benefits derived from the
program. Furthermore, some perfectly safe, perfectly legitimate programs work in ways similar to some spyware, and they could be flagged as spyware. Ultimately, you have to decide.
|
|
You can't get rid of a spyware program
Some spyware is
pernicious and uses every trick in the book to avoid being removed and
to reinstall itself—much like a monster in a horror movie. After you
take action to disable spyware (either remove or quarantine), be even
more vigilant in case it rears its ugly self again. After you restart
your computer (usually required by Windows Defender after cleanup), run a
full scan. Be sure that all real-time protection agents are enabled.
And watch out for the sequel.
If spyware does
return, you're dealing with a tough one, and you're going to need some
up-to-date expert advice to help you through the process of manually
removing it. Because the advice depends on the particular spyware as
well as other factors, we can't provide it here—but we can point you to
an excellent resource: the Spyware Warrior forums (w7io.com/1521), where you'll find links to diagnostic and removal tools and volunteer experts to help solve problems.
|
4. Working with Allowed and Quarantined Items
When you choose to let
Windows Defender remove a detected spyware item, whether by selecting
the Remove action or by clicking Clean System, it's gone for good.
That's not the case with items for which you select the Allow or
Quarantine actions. The detected files remain on your system. You can
view and manage allowed and quarantined items from the Tools page in
Windows Defender.
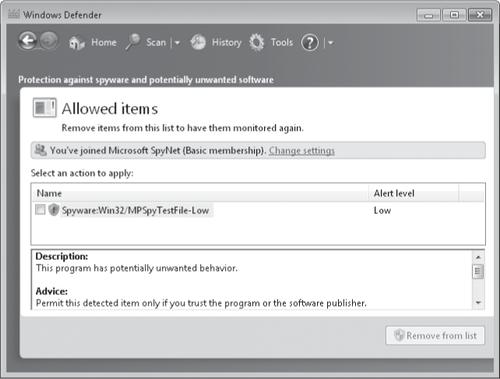
Allowed files remain
in their original location, and you can use them without interference
from Windows Defender. If you later change your mind, you can remove an
item from the allowed list. On the Tools page, click Allowed Items. By
default, Windows Defender hides allowed items to protect the privacy of
other users on your computer (allowed items for all users appear here);
click View and respond to the UAC elevation prompt to view the files. To remove a program from the allowed list, shown in Figure 3,
select the item and click Remove From List. Windows Defender does not
remove the program from your computer—but it does resume monitoring it
and warning you when the program does something provocative.
Quarantined items are moved
to an isolated folder location where they can't be accessed, except
through Windows Defender. If you later decide what you want to do with a
quarantined item, you can visit the quarantine, where you can choose to
restore an item (that is, return it to its prequarantine condition) or
remove it from your computer. On the Tools page, click Quarantined Items
and then click View to expose the file list and the available actions:
Remove All (removes all quarantined files from your computer), Remove
(removes the selected item), or Restore (returns the selected item to
its previous location).
|
To protect the privacy
of other users on your computer, Windows Defender requires you to click
View and then provide administrator credentials before you can see the
quarantined items list, the allowed items list, or the history of
Windows Defender actions taken. If that's too cumbersome, on the Tools
page, click Options. On the Administrator panel, select Display Items
From All Users Of This Computer. Thereafter, when you click the link to
Quarantined Items, Allowed Items, or History, you go directly there
without any further roadblocks.
|
5. Disabling Windows Defender
Choices on the
Options page—specifically, the first option on the Automatic Scanning
and Real-Time Protection panels—let you turn off
automatic scanning and real-time protection. Even if you turn off both
options, however, the Windows Defender service continues to run and the
program remains available for manual scans. If you want to disable
Windows Defender altogether, open Windows Defender, click Tools, click
Options, and then click Administrator. Clear the Use This Program check
box to disable Windows Defender.
