4.
Using Windows Live Photo Gallery
Windows Live Photo Gallery is
a much enhanced replacement for the Windows Photo Gallery application
that was included with Windows Vista. You can use it to import, manage,
tag, and edit your entire collection of photos and videos. Initially,
your gallery includes all folders in your Pictures library and
Videos library. You can add folders to the gallery (choose File, Include
A Folder In The Gallery) and remove such folders subsequently if you
change your mind (right-click the unwanted folder in the navigation pane
and choose Remove From The Gallery).
Figure 4 shows some of the major landmarks in the
Windows Live Photo Gallery user interface. The Information pane, not shown by default
(click Info on the toolbar to see it), displays particulars about the
selected image. The Zoom control lets you see more or fewer pictures in
the gallery pane—the main part of the window. The navigation pane makes
it easy to display a subset of your gallery. A search box lets you find
pictures by tag, author, and file name—but not by date (for that, use
the Date Taken section of the navigation pane). When you hover over a
picture, as we have here with the koala, Windows Live Photo Gallery
displays a pop-up preview.
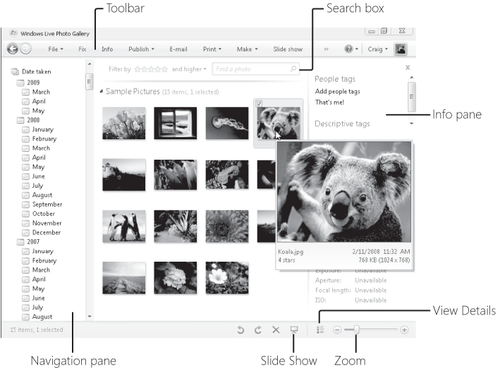
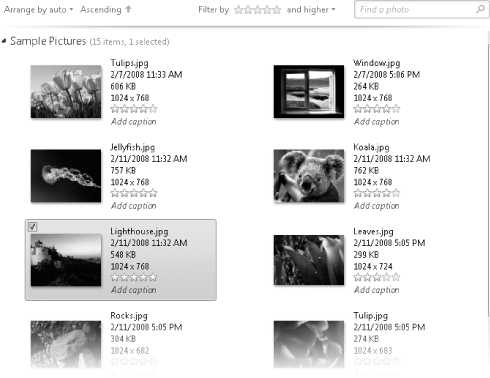
Figure 4 shows the gallery in thumbnails view. By
clicking the View Details button, you can toggle into an alternative
view that shows names, dates, and other attributes alongside each
thumbnail:
Double-clicking a
picture displays that picture in its own window, along with an edit pane
that includes commands for cropping, fixing red eye, adjusting
exposure, and more.
4.1.
Importing Pictures into the Gallery
Windows Live Photo Gallery monitors your Pictures library
and any additional folders that you have assigned to the gallery; any
image added to one of those folders is automatically added to the
gallery.
If the image files
are freshly captured in a digital camera or saved on a portable storage
device, you have other options. Virtually all recent-vintage cameras support the Windows
Image Acquisition (WIA)
driver standard introduced in Windows XP or the newer Windows Portable Devices
(WPD) standard introduced in Windows Vista. Plug in the camera, connect
it to a USB port, and turn the camera on. In the AutoPlay window that
appears, choose Import Pictures And Videos Using Windows Live Photo
Gallery. (Avoid the alternative choice, Import Pictures And Videos Using
Windows; this option offers fewer organizing
features.)
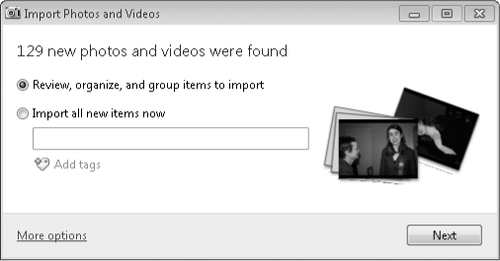
The Windows Live Photo
Gallery Import Photos And Videos Wizard is lean and straightforward. In
fact, you can complete the import with two or three clicks if you're in
a hurry. Figure 5 shows the initial window.
From start to
finish, the import wizard is designed to help you accomplish three
goals, either automatically or manually, using preferences you can reset
on the fly:
Sort photos
and videos into groups. You can dump
all photos from a given import session into a single folder, or you can
group photos into separate folders. Windows Live Photo Gallery does the
grouping based on the date and time stamps for each photo. You can adjust
the grouping manually and also mark individual photos or videos to be
skipped during this import.
Specify folder names for the
imported photos. Give a folder name to the
entire batch or to individual groups. If you skip this step, Photo
Gallery uses the default settings.
Add tags. Here, too, you can add tags to the entire import or
assign separate sets of tags to each group.
How you choose to
accomplish each import operation depends on how diligent you want to be
about folder naming and tagging; if consistent and complete folder
naming and tagging is important to you, you'll probably want to spend a
little time getting these details filled in each time you connect your
digital camera to your computer. If you prefer the "shoebox" approach,
you can accept all the defaults and go back later to review images,
refilling and tagging as needed.
The fastest way to get a group of pictures into the
gallery is to select Import All New Items Now and not click the Add Tags
link or type a folder name. Click Import, and all new pictures on the
connected device are imported into the gallery using the default
settings. Any photos or videos that you previously imported but left on
the camera are ignored during this process.
If your camera contains
a large number of photos taken at different times and places, you might
prefer to allow Photo Gallery to sort the imported photos into separate
folders. To do so, use the default option (Review, Organize, And Group
Items To Import) and then click Next. The next dialog box shows the
camera's contents divided into groups, as in Figure 6.
Click to the right of
any folder icon to give that group's folder its own descriptive name.
Click Add Tags to apply tags to all photos in that group. If the
grouping doesn't make sense, use the Adjust Groups slider to change the
time interval from its default 4 hours to a value that's higher or
lower.

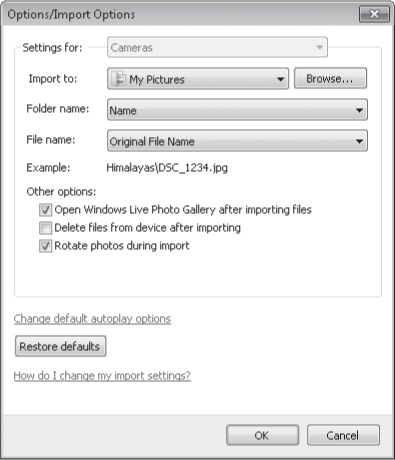
The More Options link allows you to adjust any
or all of the default settings. It leads to the dialog box shown in Figure
7. (If you'd prefer to set these options
before connecting a camera, choose Windows Live Photo Gallery and choose File,
Options, and then click the Import tab.)
Using this dialog box,
you can adjust any or all of the following settings:
Import To Designate which folder your imported pictures should be stored in.
Folder Name The drop-down list lets you choose a variety of
combinations of the date imported, the date or date range when the
pictures were taken, and the text you enter in the Add Tags box.
File Name The default setting here uses the file
names originally created by your camera. You can choose instead to use
the folder name, with or without the Date Taken information, plus a
sequence number.
Other Options The
check boxes in this section allow you to specify whether to immediately
open the imported pictures in Windows Live Photo Gallery, whether to erase pictures from the
camera after the import is successful, and whether to rotate pictures
automatically when importing.
Warning:
The option to erase
pictures on import is potentially dangerous, especially for
irreplaceable photos of once-in-a-lifetime events. If you leave this
check box unselected, you can decide on a case-by-case basis whether to
erase pictures on the fly. Just select the Delete Files From Device
After Importing
option in the status dialog box that appears after you click Import.
4.2. Adding
People Tags and Descriptive Tags to Image Files
Tags are
an extraordinarily flexible way to organize files, especially digital
photos. A tag can consist of a single word (Hawaii,
sunset, Judy) or a phrase of up to 255
characters, and if there's a theoretical limit to the number of tags you
can add to an image file, we haven't found it. Windows Live Photo
Gallery distinguishes two types of tags—people tags and descriptive
tags—but both have essentially the same purpose and effect: they let you
categorize pictures, navigate to pictures of interest using the tags
sections of the navigation pane, and search for pictures, from within Windows Live Photo
Gallery, in the Start menu search box, or in Windows Explorer.
To add a people tag to
an image, select the image, click Info to display the info pane, and
click Add People Tags
in the info pane. You can then select names from the Contacts list that
descends, or you can type in someone new. To add a descriptive tag,
click Add Descriptive Tags. Windows Live Photo Gallery will try to save
you keystrokes as you type by presenting candidate tags that you have
already used. This autocomplete feature will help you maintain
consistency in your tagging.
Tags assigned to
images saved in the JPEG format are stored with the file itself and are
thus preserved if the file is e-mailed or moved to a new computer.
4.3. Editing
Image Files
Windows Live Photo
Gallery includes an easy-to-use set of editing tools to help you fix flawed images. To
touch up or crop an image, select it in the gallery and click Fix. Figure 8 shows the options available in the edit
pane.
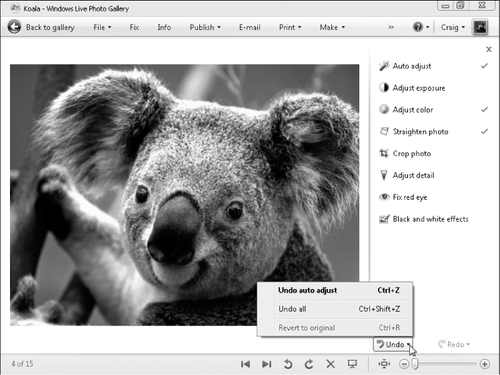
Each of the entries in
the edit pane, with the exception of Auto Adjust, opens a set of
sub-options. Auto Adjust, as its name implies, automatically performs
whatever editing
the program thinks the image needs. Green check marks appear beside the
options that have been applied. In this example, in response to Auto
Adjust, the program has performed a color adjustment and straightened
the image. You don't need to explicitly save your changes; Photo Gallery
saves changes automatically when you close the program or return to
Gallery view. If you change your mind after you have returned to the gallery, select the
picture and click Fix again. The Undo button will be replaced by a
Revert button that will let you restore the original, unedited, image.
