Windows Media Player can copy, or rip,
tracks from audio CDs and store them as files on your hard disk. The
copies you make are completely unrestricted: you can listen to the saved
tracks on your PC, burn a collection of tracks to a custom CD, or copy
those tracks to another PC or to a portable device. Before you use
Windows Media Player to rip your first CD, however, it's smart to answer
the following questions:
What format do you want to use?
At what bit rate should you copy?
Where should your files be stored?
What naming convention do you want to use?
Your answers to the
questions in the preceding list dictate specific settings in Windows
Media Player. We discuss each of these settings in more detail in this
section. You can adjust settings any time—changing to a different,
higher-quality format before ripping a CD you're especially fond of, for instance.
Before you can rip an
audio CD, you have to insert the disc in your CD or DVD drive. When
Windows Media Player recognizes the presence of an audio CD, it adds its
icon to the navigation pane. Click that icon and you'll see a list of
tracks on the CD. To copy the CD to your hard disk using the currently
selected file format, bit rate, naming scheme, and location, click Rip
CD on Windows Media Player's toolbar (note that you can play a CD and
rip it at the same time).
When you're connected
to the internet, Windows Media Player consults its online data sources
to determine the name of your disc, as well as the names of the
artist(s) and tracks and the genre of music the disc contains. This information is used to automatically tag and name tracks you rip to your collection from CD.
By default,
Windows Media Player selects the check boxes to the left of all track
names when you choose to copy a CD to disk. To copy particular tracks
only, clear the check boxes beside tracks that you don't want to copy.
To clear or select all the check boxes at once, click the check box in
the column heading.
To begin ripping, click Rip
CD. Copying begins immediately. Entries in the Rip Status column tell
you which tracks are pending, which are being copied, and which have
already been ripped to the library. You can do other things in Windows
Media Player while this is going on, including listening to an album or
playlist from your library.
Windows Media Player copies
each CD track to a separate file and stores it, by default, in the
Music folder of the currently logged-on user (%UserProfile%\Music). The
Player uses the information about each track—the name of the artist,
album, and song, for instance—as downloaded from the Windows
Metadata Internet Service and inserts that information into the saved
file as metadata. It then uses these details to organize your collection
of saved files into a hierarchy, with a folder for each artist and a
subfolder for each album by that artist.
|
The Windows Metadata Internet Service uses information from a variety of suppliers, including Allmusic
(previously known as AMG) and Muze (for UK titles). As of June 2009,
the ever-growing allmusic.com database included more than 1.7 million
albums and more than 15.1 million tracks. (You can find the latest
statistics at w7io.com/1204.) The service is heavily skewed in favor of pop and rock titles and has much less information about classical
music CDs. If you want to copy a classical collection to your hard
disk, your best bet is to find a third-party CD player that uses an
alternative internet service called the Gracenote
Media Recognition Service (formerly CDDB). The Grace-note Media
Database of classical discs is extensive, and after you have ripped your
discs using the other product, you can save the resulting files in a
folder monitored by Windows Media Player to add them to your library.
For more information, visit gracenote.com and search in the Powered By Gracenote section.
|
1. Choosing an Audio Format and Bit Rate
For practical
purposes, files copied from audio CDs to your hard disk must be
compressed; if you rip tracks to your hard disk using the uncompressed
WAV format, a typical 60-minute CD will consume more than half a
gigabyte of disk space. Compressing the files means you can store more
music on your hard disk, and it makes the process of backing up music
files easier and more efficient.
When it comes to compression, your first choice is simple: lossy or lossless? Most popular algorithms used to compress audio (and video) files are lossy,
which means that they achieve compression by eliminating data. In the
case of audio files, the data that's tossed out during the compression
process consists mostly of frequencies that humans don't ordinarily
hear. However, the more you compress a file, the more likely you are to
degrade its audio quality to the point where you'll notice it. Windows
Media Player allows you to rip tracks using the Windows Media Audio
Lossless format, which stores music files more efficiently than uncompressed
WAV files, without sacrificing any information. In theory, at least, a
track ripped in this format should be indistinguishable from the
original.
Deciding on the
type and amount of compression involves making a tradeoff between disk
space and audio quality. The level of compression is determined by the
bit rate you select for your copied files. Higher bit rates preserve
more of the original sound quality of your audio tracks but result in
larger files on your hard disk or portable player. Lower bit rates allow
you to pack more music into limited space, at a cost in fidelity.
|
Even a truly
massive music collection can fit comfortably in a fraction of the free
space on today's terabyte-and-up hard drives. Saving disk space is more
of a concern on portable devices with limited storage.
For those occasions, why not get the best of both worlds? Save the
original copy on your local hard drive or server, at the highest bit
rate you're comfortable with. When syncing music with your portable
device, use the sync software settings
to transcode each track to a lower bit rate for more efficiency in
storage.
|
To set your preferences, click the Rip Settings
button on the Player taskbar. Click Format, and choose one of the six
available formats, as shown here. If you choose a format that allows lossy compression, click the Audio Quality option to select from choices available for that format.
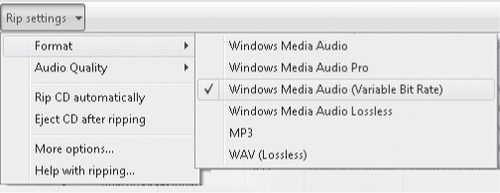
The following options are available, listed in order of compatibility with other hardware and software:
MP3
is the longtime standard for digital music files and has nearly
universal support. If you want the widest freedom to share, play, and
reuse files, this is your safest choice. The MP3 format supports
variable bit rate encoding, but Microsoft's MP3 codec allows you to rip
tracks at fixed bit rates only, in four steps ranging from the default
setting of 128 Kbps up to 320 Kbps. (If you want to rip MP3 tracks at
variable bit rates, you'll need to use a different program.) Most
commercial music services offer files in MP3 format at 192 Kbps or
higher.
Windows Media audio, which uses fixed bit rates, is the default choice. You can keep the default bit rate of 128 Kbps or choose one of five other settings
ranging from 48 Kbps to 192 Kbps. In previous versions of Windows Media
Player, it was possible to increase this bit rate by tweaking a
registry setting. That trick no longer works in Windows Media Player 12.
If you want higher-quality encoding in WMA format, choose the Variable Bit Rate option.
Windows Media audio (Variable Bit rate)
allows the encoder to vary the compression applied to portions of a
file, depending on the amount of information in it. Using variable bit
rate (VBR) can result in files of much higher quality compared to files
of similar size created using fixed bit rates. Options on the Bit Rate
menu are expressed in ranges, starting with 40 to 75 Kbps and topping
out at 240 to 355 Kbps. The VBR format might cause problems
with some portable players and home audio devices, especially older
ones; be sure any device you plan to use regularly supports it before
you choose this option.
Choose Windows Media audio Lossless
if you plan to use Windows Media Player to burn custom CDs that are
essentially equal in quality to the music source. This is also your best
choice if you want to play tracks on a high-end audio system (including
a home theater system connected to Windows Media Center) without
compromising quality. Because this format is lossless, no options are
available on the Audio Quality menu.
WaV (Lossless)
is the correct choice if you want nearly perfect copies of the tracks
on a CD and you want those copies to be usable with any burning program.
WAV files use nearly twice as much space as Windows Media Audio
Lossless files and cannot be streamed as easily as compressed formats,
making them unsuitable for all but temporary storage.
Windows Media audio Pro
is primarily intended for high-fidelity output on phones and other
devices with limited storage capacity. Its default bit rate is 64 Kbps,
although you can choose options ranging from 32 Kbps to 192 Kbps. This
format is not supported by all devices (in fact, we've never seen it
used out here in the real world), so check compatibility carefully
before choosing it.
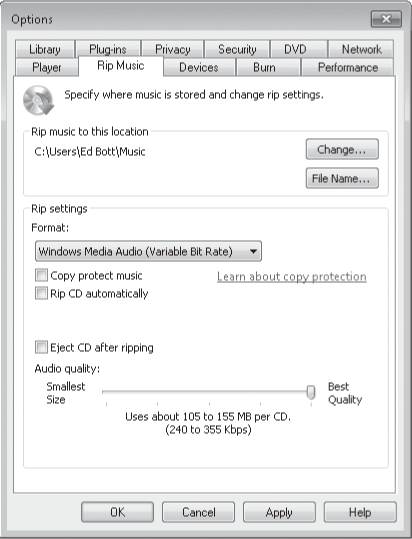
Most of the options
available on the Rip menu are also available in a slightly different
arrangement on the Rip Music tab of the Options dialog box. Instead of
choosing the bit rate from a menu, you use the Audio Quality slider, shown in Figure 1,
to select a bit rate. Moving the slider to the left produces smaller
files with lower quality; moving it to the right produces larger files
with better audio quality.
|
If you right-click the icon for an audio CD
in Windows Explorer and choose Explore from the shortcut menu, you'll
see that each track is listed as a small file with the file type CD
Audio Track, the .cda extension, and a date and time stamp of December
31, 1994, at 5:00 P.M. Most of that information is completely wrong and
represents a confused attempt by Windows Explorer to make sense of a
format it wasn't designed to read.
CD Audio is not a file
format; instead, these pointers serve as shortcuts to the actual files,
which are stored in a format that is essentially identical to a WAV
file. You can't copy a CD track directly to your hard drive from Windows
Explorer, and the default ripping options compress the resulting file
so that it loses some quality. Using Windows Media Player 12, you can
rip a track using the WAV (Lossless) format or specify the Windows Media
Audio Lossless format, which produces a file that is smaller than a WAV
file but still quite large. Either format will work if your goal is to
create a nearly identical copy of a CD using burning software. The WAV
format is certain to work with all third-party CD-burning programs,
unlike Windows Media Audio Lossless.
Notice we said "a nearly identical copy " The process of ripping a track from a CD
is not perfect, especially if the media is scratched. Tiny errors
caused by the mechanical operation of the drive components—a single bit
here and a couple of bits there—will inevitably creep in when you rip a
file, even if you use a lossless format. Similar errors can result when you use the "copy CD"
option available in most commercial CD- burning software. These errors
are mostly imperceptible to the human ear, but if you repeat the
rip/mix/burn cycle several times the errors can add up and create a
click, pop, or other noticeable glitch during playback. Perfectionists
who want to make a perfect copy of a single music
track or an entire CD need to take special precautions to prevent these
errors from occurring. For these tasks, we recommend Exact Audio Copy, written by Andre Wiethoff and available for download from exactaudiocopy.de;
this highly regarded program can reliably extract every bit of digital
information from the disc, without allowing any data to be lost.
|
2. Deciding How to Name Your Files and Where to Store Them
Unless you specify
otherwise, Windows Media Player saves ripped CD tracks in the Music
folder in your user profile (which is also the default save location in
the Music library). If you want ripped tracks to go to a different
location, click the Rip Music tab in the Options dialog box, and then
click Change under the Rip Music To This Location heading. This
capability is especially useful if you store your music library in a
shared folder or on a network device such as a Windows Home Server.
If you are online when you copy a CD, Windows Media Player connects to the Windows Media metadata
service and gets whatever information is available about that CD.
Typically, this information includes the name of the album and the songs
it contains, the names of performers and composers, information about
musical genres, and album art. Windows Media Player uses some of this
information to create file
names for your copied CD tracks. (All of the information Media Player
gets from this online repository of information can be used in one way
or another, even if it doesn't become part of your file names. The album
art, for example, appears on the Library tab, in the Now Playing list
when you play tunes from that album, and in Windows Explorer when you
use Thumbnails view.)
By default, the file
names for your tracks are made up of the track number, followed by a
space character, followed by the song title (which probably includes
spaces). Such a file name might look like this: 09 Tell Me All The
Things You Do.wma. This naming scheme works fine in Windows Media
Player, which uses metadata to sort, group, and display items in your
collection. However, if you copy a group of songs to a portable player
that doesn't use subfolders, that device might display and sort by only
the file name. Therefore, when you choose a file-naming convention in
Windows Media Player, give some thought to how your files will work in
your portable device. In that context, if you want to keep all songs
from a given artist or album together, the most important information is
probably the artist or album name (or both), followed by the track
number.
In any event, you can tell Media Player how you want your files named as follows:
Click Options on the Organize menu and then click the Rip Music tab.
Click File Name to open the File Name Options dialog box.
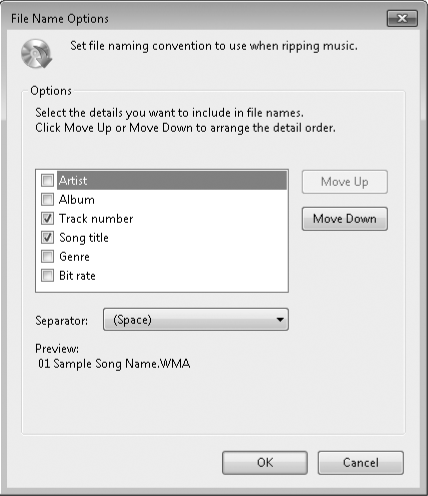
Select the check boxes for the information categories that you want to include in your file
names, and clear the other check boxes. As you adjust your choices here
and in the following two steps, the example in the Preview area of the
dialog box shows you the effect on file names.
If desired, use the Move Up and Move Down buttons to change the order in which name elements appear.
Use
the Separator drop-down list to choose the character that appears
between elements of a track name if you don't want to use spaces. You
can choose dashes, dots, underlines, or no separator character at all.
