7. Using InPrivate Filtering to Restrict Information Flow to Advertisers
When you visit a website containing advertising,
typically the ads are supplied by a party other than the website's
owner. Data concerning your visit to the site is commonly transmitted to
the third party, and if that party displays its ads on multiple sites
that you visit, this process of information collection can help the
advertiser generate more precisely targeted ads. Recognizing that you
might not be entirely comfortable with this process, Internet Explorer 8
provides InPrivate Filtering, a tool that lets you block information flow to all or selected third parties.
|
InPrivate Filtering is
turned off at the start of each Internet Explorer session, regardless
of whether it was on or off when you closed the browser. If you want to
use it consistently, turn it on each time you start (the keyboard
shortcut is Ctrl+Shift+F). Alternatively, to keep the feature on at all
times, open Registry Editor, navigate to HKCU\
Software\Microsoft\Internet Explorer\Safety\PrivacIE, add the DWORD
value StartMode (if it doesn't already exist), and set its value to 1.
Internet Explorer will then retain and apply whatever decisions you made
in the InPrivate Filtering Settings dialog box.
|
To configure InPrivate Filtering, choose Safety, InPrivate Filtering Settings. In the dialog box that appears (see Figure 3),
select either Automatically Block or Choose Content To Block Or Allow.
If you make the first choice, the filter blocks the flow of information
to all third parties. If you make the second, you get to specify how
each party listed in the dialog box is handled.
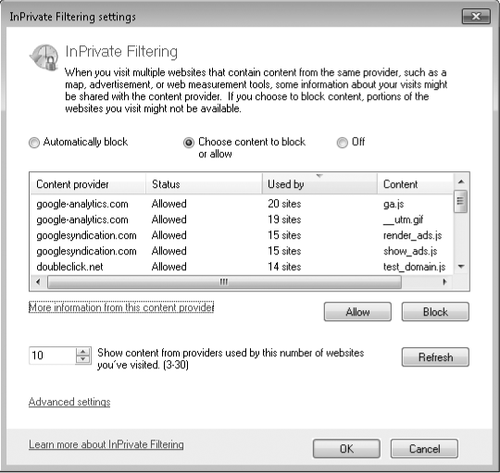
The InPrivate
Filtering Settings dialog box lists all parties that have tracked your
information on some minimum number of different websites. The default
threshold is 10, but you can reduce that to as low as three. Sites are
sorted initially in order of increasing activity, so to see who's been
the busiest, you'll need to scroll to the bottom of the list or reverse
the sort order. To allow or block a particular site, select it and click
the appropriate button. To visit a third party's own website, select it
and click More Information From This Content Provider.
8. Clearing Personal Information
Internet Explorer keeps a
copy of websites, images, and media you've viewed in your browser
recently. It also maintains a list of websites you've visited, whether
you arrived at the page by clicking a link or typing an address. This
cached information—combined with cookies, saved form data, and saved
passwords—can give another person who has access to your computer more
information than you might want him to have.
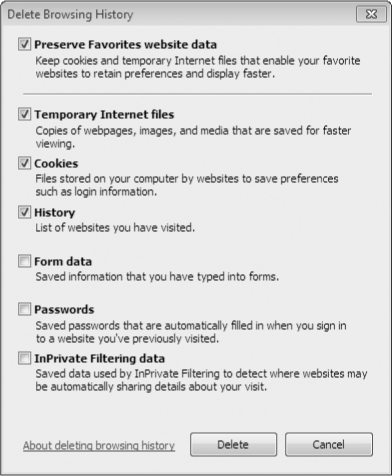
To wipe away most of your online trail, click the Delete
Browsing History option at the top of the Tools menu (on the menu bar,
not the Command bar; press Alt+T to get there if the menu bar is not
displayed). This dialog box, shown in Figure 4, allows you to clear some or all categories of information. The Preserve Favorites
Website Data check box, a new option in Internet Explorer 8, allows you
to preserve information related to your own Favorites sites while
deleting other elements of your browsing history. This option is
selected by default.
9. Browsing Privately
You can clear your personal
information at any time (see the preceding section), but if you want to
cover your tracks only for particular websites, a simpler solution is
to visit those sites in private browsing sessions. You can open a
private session by choosing Safety, InPrivate Browsing; by pressing Ctrl+Shift+P; or by choosing Open An InPrivate
Browsing Window on the New Tab page. Internet Explorer opens a new
window when you do this, without modifying your current session; thus,
you can keep private and nonprivate sessions open at the same time. As Figure 5 shows, changes to the address bar and application title bar make it easy to tell if a session is private.

While you browse
privately, neither your browsing history nor any data that you enter in
web forms is recorded. Be aware, though, that browsing privately is not
browsing anonymously. Sites you visit can record your IP address.
(Third-party anonymous browsing tools are available.)
Here are other points to note about InPrivate Browsing:
During a private session, session cookies are retained in memory but deleted at close.
During a private session, temporary internet files are stored on disk; they're deleted when you close the session.
InPrivate
Browsing disables toolbars and extensions by default; if you want them
enabled, choose Tools, Toolbars, and then clear the Disable Toolbars And
Extensions When InPrivate Browsing Starts check box.
