4. Using Scripts Wisely
Scripts are snippets of code, written in a scripting language such as JavaScript or VBScript, that run on the client computer (that is, your computer, not the web provider's) to enhance the functionality of a webpage. These should be distinguished from Active
Server Pages (webpages with the extension .asp or .aspx), which employ a
server-side scripting technology and don't, by themselves, represent a
security hazard.
Scripts are generally
harmless and are widely used in modern web design. However, security
experts sometimes advise users to disable active
scripting as a security measure. If you decide to take this extreme
step, be prepared for some of your favorite websites to stop working
properly.
If you're still determined to disable scripting, follow these steps:
Choose Internet Options from the Tools menu.
On the Security tab, click the Internet icon and then click Custom Level.
In the Settings list, locate Active Scripting (under the Scripting heading) and click Disable.
Click OK to save your settings, and then click OK to close the Internet Options dialog box.
To permit scripts to run on
specific sites after disabling them globally, you'll have to add the
sites—manually, one at a time—to the Trusted Sites zone. If globally
disabling scripts and enabling them site by site is too extreme but
you're still concerned about security risks from scripts, consider
choosing Prompt instead of Disable in the Settings list.
5. Identifying Deceptive (Phishing) Websites
A signature
feature of Internet Explorer is its capability to inspect websites and
block access to or provide a warning about those that appear suspicious.
These so-called phishing sites are designed by scammers to closely
resemble online commerce and banking sites. The scammer's goal is to
fool you into visiting the site (usually by enticing you to click a link
in an e-mail message) and then fill in sensitive information such as
your logon credentials, account numbers, and details about your
identity.
SmartScreen Filter, an updated version of the Phishing
Filter introduced with Internet Explorer 7, detects known and suspected
phishing sites and does its best to deter you from falling prey to such
sites. The feature does its detective work with the help of an allow
list, a set of rules, and a server-based block list that is continually
updated. The initial check is heuristic, looking at the content of the
page itself; if all the images are from a bank's website, for example,
but the submit button goes to a URL containing an IP address, red flags
go up.
If SmartScreen Filter
thinks you're headed to a dodgy page, it displays a bright, bold, red
warning before you ever get there. A banner-sized link provides
one-click egress to the safety of your home page; a smaller link lets
you disregard the warning and carry on. If you do proceed to a site that
SmartScreen Filter has flagged, your address bar remains blood red as a
warning.
When you first run
Internet Explorer, the program prompts you to turn SmartScreen Filter
on. If you declined then and have changed your mind, choose Safety,
SmartScreen Filter, Turn On SmartScreen Filter. Other options on the
SmartScreen Filter fly-out menu let you perform an ad-hoc check of a
site (which is useful if you do not have the filter turned on but
available even if you do) and report a site that appears suspicious to
you but has not been flagged by the filter.
SmartScreen's background
sniffing should not prove intrusive. You can, however, turn the feature
off altogether (return to the SmartScreen Filter fly-out menu) or
disable it for particular security zones. To turn it off for sites in
your Trusted Sites zone, for example, choose Tools, Internet Options and
click the Security tab. Select Trusted Sites, click Custom Level, and
then, under Use SmartScreen Filter, select Disable.
Note:
For more information about phishing and other hazards of the online world, see Microsoft's white paper A Safer Online Experience. You can safely download it at w7io.com/0603.
6. Managing Cookies
A cookie
is a small text file that enables a website to personalize its
offerings in some way. The website downloads the cookie to your hard
disk and then reads the cookie on your subsequent visits to the site. Cookies can be used for a variety of purposes,
such as recording logon information, shopping preferences, pages that
you have visited, searches that you have performed, and so on. In
general, cookies provide benefits to users as well as to web content
providers. They make the websites you visit more responsive to your
needs and preferences. To open the folder containing all stored cookies,
use the command shell:cookies.
Nevertheless, because cookies
can provide websites with personal information about you and because
some sites might not use this information in ways that you would regard
as beneficial, cookies
are a mixed blessing. A cookie can provide a website only with
information that you supply while visiting the site (a cookie can't
scurry around your hard disk, reading your address book and financial
records, for example), and this information can be read only by the site
that created the cookie. Nevertheless, because it's not always obvious
who's sending you a cookie and what purposes that cookie will serve, many people are understandably wary about allowing cookies on their systems.
In earlier versions
of Internet Explorer, your cookie management options were limited to
allowing all cookies, blocking all cookies, or being prompted every time
a site wanted to read or write a cookie. In practice, the second and
third of these options created so much inconvenience that most users
gave up and accepted all cookies. Now, thanks to the Platform for Privacy Preferences (P3P)
standard, Internet Explorer can block or admit cookies on the basis of
the cookies' content and purposes, in accordance with your preferences.
Sites that support P3P supply information about their use of cookies in
the form of a compact privacy statement—special
HTML tags embedded in the site's HTTP header that indicate what kind of
cookies are used and for what purposes. When you access a site,
Internet Explorer compares the site's compact privacy statement with
your expressed privacy preferences and then accepts, blocks, or
restricts the cookies.
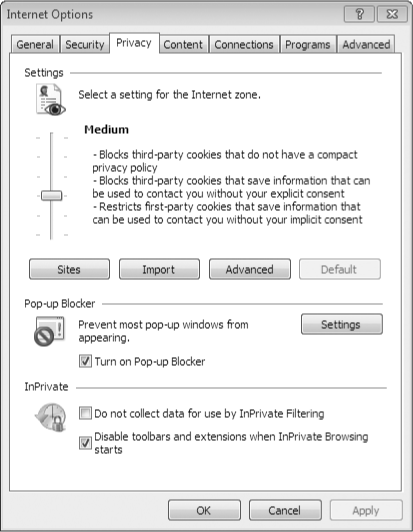
To express your preferences regarding cookies, open the Internet Options dialog box, click the Privacy tab (shown in Figure 2), and use the slider to choose one of the following settings:
Block All Cookies
High
Medium High
Medium
Low
Accept All Cookies
The default setting is Medium.
Note:
Your privacy setting
applies only to sites in the Internet zone. By default, all cookies are
accepted in the Trusted Sites and Local Intranet zones.
To make an informed choice, you need to understand the following terms:
Compact privacy statement Information in a website's HTTP header that indicates the source, purpose, and lifetime of cookies used by that site. (Some cookies, called session cookies,
are designed to be deleted when you leave a site. Other cookies have a
fixed expiration date—usually sometime in the next decade or beyond.)
Personally identifiable information
Information that a site could use to contact you, such as your name,
e-mail address, or home or work address; also, the credentials (name and
password) you use to log on to a site.
Explicit consent Giving explicit consent, also known as opting in, means that you have taken some kind of affirmative step to allow a site to use personally identifiable information.
Implicit consent To consent implicitly means not to have opted out—that is, not to have taken an affirmative step to deny a website permission to use personally identifiable information.
First-party cookie A cookie used by the site that you are currently viewing. First-party cookies are generally used to personalize your experience with a website.
Third-party cookie A cookie used by a site other than the one you're currently viewing—such as an advertiser on the site you're currently viewing.
Note:
Some websites will not function at all if you block their cookies.
If you find that a particular site you trust does not let you on with
your current privacy setting, you can make an exception for that site
and change your setting in Internet Explorer to accept all of that
site's cookies, regardless of your current privacy setting.
