In the digital era, Parkinson's Law has an
inescapable corollary: data expands to fill the space allotted to it.
Gargantuan hard disks encourage consumption, and digital media files
(not to mention Windows itself) supply plenty of bits to be consumed.
It's surprisingly easy to run low on disk space, and the consequences
can be deleterious to your system. If you run low on storage, Windows
might not have enough room to expand its page file in response to system
needs, or it might be unable to create temporary files. In addition,
essential features such as Windows Search and System Restore might stop
working properly. At that point, you start seeing ominous error messages
and (possibly) degraded performance.
To pare down on disk space
consumption, you can do any or all of the following:
Clear out
temporary files that you no longer need.
Uninstall
programs you don't need.
Uninstall
Windows features you don't need.
Delete documents you don't need.
1. Cleaning
Up with Disk Cleanup
The simplest way to make
room on any drive is with the help of the Disk Cleanup utility, Cleanmgr.exe. If you
click a "low disk space" warning, this tool opens automatically. To
begin working directly with a single local drive, right-click the drive
icon in the Computer window, choose Properties from the shortcut menu,
and then click Disk Cleanup on the General tab of the properties dialog
box. Alternatively, you can click All Programs on the Start menu, then
Accessories, then System Tools, and then Disk Cleanup.
Disk Cleanup begins by
calculating the amount of space it can recover. Then it presents its findings, categorized,
in a dialog box similar to the one shown in Figure 1.
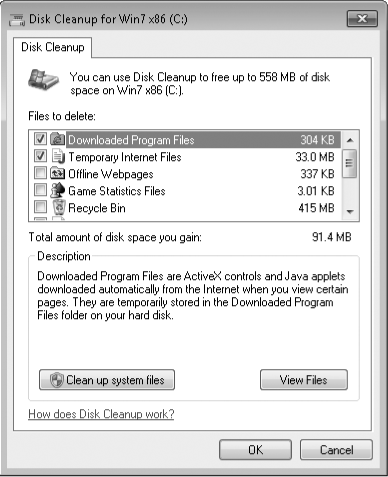
You can see at a glance
how much space you can recover by deleting a category of files. If
you're not sure what's included in a file category, select it in the
list and read the descriptive text. For some file categories, a View
Files button is available; click it to open a folder containing the file
category.
With the assistance
provided by the Description box, Disk Cleanup options are fairly
self-explanatory. For the most part, these options merely consolidate
functions already scattered throughout the Windows interface. For
instance, you can empty the Recycle Bin, clear out the Temporary Internet
Files folder, and purge files from the Temp folder. (Avoid cleaning out
the Downloaded Program Files folder, which contains generally useful
ActiveX and Java add-ins.) Removing the Hibernation file can
save a large amount of disk space—an amount equal to the amount of RAM
installed on your computer; choose this option only if you never
hibernate your system.
Warning:
Disk Cleanup includes one confusing option that can leave
an inordinate amount of wasted space on your hard disk if you don't
understand how it works. When you run Disk Cleanup, one of the available
options offers to delete Temporary Files; the accompanying Help text explains that
these are unneeded files in the Temp folder. Unfortunately, this option might
display a value of 0, even if your Temp folder contains hundreds of
megabytes of useless files. The reason? Although the Help text hints at
the answer, it doesn't clearly explain that this value lists only files
in your Temp folder that are more than one week old. If you want to
completely clean out this folder, you'll need to do so manually. Close
all running programs and type %temp% in
the Start menu search box; from the resulting Windows Explorer window,
delete everything you find. You might discover that some files are not
available for deletion until you restart your computer.
1.1.
Cleaning Up System Files
Provided you have
administrative credentials, you can add a few potentially large file
categories to the initial list of deletable items by clicking Clean Up
System Files. For example, if you performed a clean install of Windows 7
on a partition that you previously used for an earlier version of
Windows, you might be able to reclaim gigabytes of disk space by
eliminating the Windows.old
folder. These files appear under the heading Previous Windows
Installation(s). If you upgraded Windows Vista to Windows 7 (as opposed
to performing a clean install), you might be able to recover a sizable
chunk of disk space by deleting files under the heading Files Discarded By Windows
Upgrade.
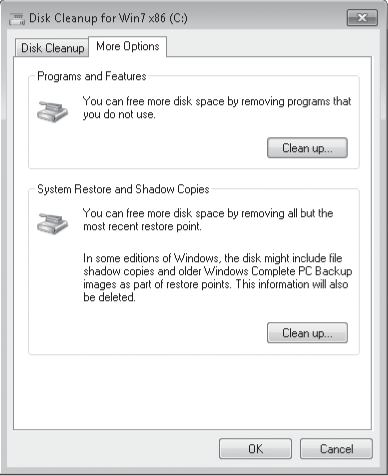
Clicking Clean Up System
Files also adds a More Options tab to the Disk Cleanup dialog box, as
shown in Figure 2.
The Clean Up button
under Programs And Features
takes you to the Uninstall Or Change A Program dialog box in Control
Panel, where you can remove Windows features and programs. The Clean Up button under System Restore And Shadow Copies lets you remove all but the most
recent System Restore checkpoints, shadow copies (previous file
versions), and Complete PC Backup images. This option can recover a
significant amount of space, but you should choose it only if you're
certain you won't need to restore a backup or roll back your
configuration to one of the saved versions you're about to delete.
While getting rid of programs you no longer use is always a good idea,
the option to eliminate all but the most recent restore point should be
considered a desperate measure. Restore points can sometimes provide a way to restore
stability to a system that has become unruly. Keep them if you can.
1.2.
Cleaning Up at the Command Line
Disk
Cleanup offers some cool command-line switches that are documented only in a pair of
obscure Knowledge Base articles. Through the use of these switches, you
can save your preferences and rerun the cleanup process automatically
using those settings.
To do so, you need to use the following switches with Cleanmgr.exe:
/Sageset:n Opens a
dialog box that allows you to select Disk Cleanup options, creates a
registry key that corresponds to the number you entered, and then saves
your settings in that key. Enter a number from 0 through 65535 in place
of n.
/Sagerun:n Retrieves the saved settings for the number
you enter in place of n and then runs Disk Cleanup without requiring any
interaction on your part.
To use these
switches, follow these steps:
Open
a Command Prompt window and type the command cleanmgr /sageset:200.
(The number after the colon is completely arbitrary; you can choose any
other number from 0 through 65535 if you prefer.) You must supply
credentials from a member of the Administrators group to begin this
task.
In the Disk Cleanup
Settings dialog box, choose the options you want to apply whenever you
use these settings.
Click OK to save your
changes in the registry.
Open Task Scheduler
from Control Panel, and start the Create Basic Task wizard. Follow the
wizard's prompts to name the task, and schedule it to run at regular
intervals. When prompted to select the program you want Windows to run,
type cleanmgr.exe
in the Program/Script box and type /sagerun:200 in the Add Arguments box.
Repeat
steps 1–4 for other Disk Cleanup options you want to automate.
|
Disk Cleanup
shortcuts can be tremendously useful for routine maintenance. For
instance, you might want to create a shortcut for Cleanmgr.exe with a
saved group of settings that automatically empties the Temporary
Internet Files folder and Recycle Bin and another that purges
installation files and system dump files. If you create a shortcut that
empties the Recycle Bin, it's best not to add it to your list of
Scheduled Tasks, where it can inadvertently toss files you later
discover you wanted to recover; instead, save this shortcut and run it
as needed.
|
