4. Working with Playlists
A playlist
is a customized list of digital media files that Windows Media Player
can play back as a unit, in either linear or random order. If you want
to combine tracks from multiple albums or rearrange the order of tracks
on a CD, you use a playlist. Windows Media Player 12 also supports (indeed, requires) using playlists for creating custom CDs and for synchronizing files with a portable device.
You can build a playlist
on the fly for a specific purpose—to cue up music for a party, for
example, or to burn a custom CD to play in the car. After the task is
done, you can clear the list or save it for reuse. Saved lists are
stored by default in the Playlists subfolder of the current user
profile's My Music folder. You can also create and save Auto Playlists, which are essentially saved searches whose results are updated automatically each time you open them.
|
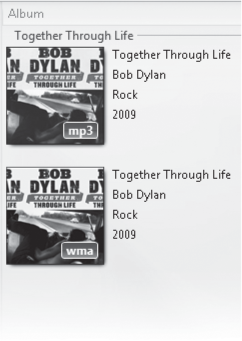
Your library
might contain multiple copies of the same album (or of different tracks
from a single album). If you download a group of tracks from the Zune
Marketplace in WMA format or from the iTunes Music
Store in AAC format, you might decide to make an MP3 copy for ease of
use with devices that don't support the original format. By default,
Windows Media Player sorts these duplicates for you, as shown here. If
you don't like this behavior, you can disable it by opening the Choose
Columns dialog box (shown in Figure 12-5) and clearing Include File Extension In Default Sort Order.
|
4.1. Creating and Editing Custom Playlists
The current playlist
appears in the list pane at the right of the player window. (If the list
pane isn't visible, click the Play tab; click the Play tab again to
hide the list pane if it's currently showing.) Use the
navigation pane, the search box, or another playlist to choose which
tracks you want to include, and then use any of the following techniques
to create a custom playlist:
Drag individual songs, albums, playlists, or artists from anywhere in the details pane and drop them in the list pane.
Select
one or more tracks, albums, or artists; right-click and then click Add
To, Play List. The shortcut menu also includes options to send the
current selection to the Burn List or Sync List or to add the selected
items to any existing playlist.
Double-click
any album. It begins playing, and its contents appear in the Now
Playing list in the list pane, where you can add or remove tracks or
rearrange the order of tracks on the album.
Select
one or more supported media files in Windows Explorer, and drag them
into the list pane; or right-click and then click Add To, Windows Media
Player List on the shortcut menu. Click the Play or Burn buttons in the
Windows Explorer toolbar to add the selected tracks to the current
playlist or burn list, respectively.
To remove tracks you've added to the playlist, select one or more items, right-click, and click Remove From List.
You can drag items up and
down in the list to change their order. When you're satisfied with their
arrangement, click Save List at the top of the list pane, enter a
descriptive name, and press Enter.
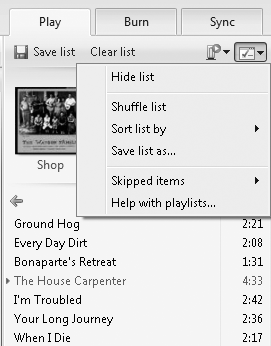
Use the drop-down List Options menu at the top of the list pane (shown in Figure 5)
to sort list items, randomly shuffle the list, or save the playlist as a
file in a location of your choosing. Use the Clear List button to start
fresh, removing the list contents with no warning.
Windows Media Player 12 introduces a nifty option
for handling items you skip while playing back an unsaved playlist.
This option might be useful if you've created a large playlist from a
diverse selection of albums and randomly shuffled its contents. As you
play it back, you skip individual tracks that don't fit with the flow of
the playlist. When you eventually click Save List, Windows Media Player
displays the dialog box shown next.
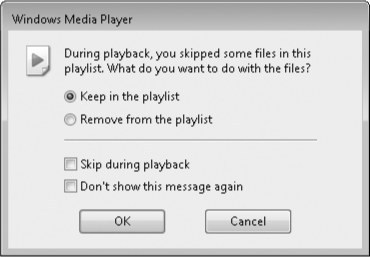
Note that skipped items within the list appear in gray. You can save the playlist exactly as it appears in the list pane or remove the skipped items before saving. The Skip During Play back option
doesn't affect the saved list; instead, it tells Windows Media Player
to remember which items you've skipped during the current playback
session and skip them if you replay the list. If you close or clear the
list, all indications of skipped tracks are discarded.
Saved playlists appear at the top of the navigation pane. By default, the Playlists section of the navigation pane shows only the five most recently used playlists. You can customize the navigation pane to show all playlists or none. (See Section 12.2.3 on Section 12.2.3 for instructions.) When you select a playlist from the navigation pane, the items that make up the list appear in the details
pane, where you can edit the properties of individual items or assign
star ratings. In this view, you can right-click and use the Remove From
List option on the shortcut menu to winnow the list down; you can also
sort by any heading and manually change the order of items in the
playlist. Any additions, deletions, or changes in track order that you
make to the list in the details pane are saved immediately.
4.2. Using Auto Playlists
Playlists you create
using Windows Media Player can retrieve results dynamically, based on
criteria you define. Unlike regular playlists, which are static and
define a list of specific tracks in a specific order, Auto Playlists are saved searches that return different results depending on the current contents of your library. You can use Auto
Playlists to find tracks that you've added recently but not yet rated,
for instance, or to create a playlist of tracks from a specific genre or
by a specific artist that you've also rated highly. Details of each
Auto Playlist you create are stored in an XML file in the default
Playlists subfolder. Copy that file to another computer and the Auto
Playlist will be available on that computer as well.
To create a new Auto
Playlist from any library view, click the down arrow to the right of
Create Playlist on the toolbar and then click Create Auto Playlist.
Enter a name in the box at the top of the New Auto Playlist dialog box
and then begin clicking to add criteria to your search. By default,
every new Auto Playlist includes Music In My Library as the first
criterion. Start with the first green plus sign and use drop-down lists
to define criteria. After you click OK to save the list, you can
right-click and choose Edit to adjust the criteria. In the example shown
in Figure 6,
we've created an Auto Playlist that includes songs that are performed
by a trio of our favorite female artists and are all rated 4 stars or
better.
Note:
If you used Windows Easy Transfer to migrate your Windows settings from Windows XP, your collection includes a group of preset Auto Playlists, all of which are stored in the My Playlists folder. Windows Media Player seamlessly combines the contents of these two lists in the library. In fact, selecting Playlists from the navigation pane shows all saved playlists from any folder in any monitored location.
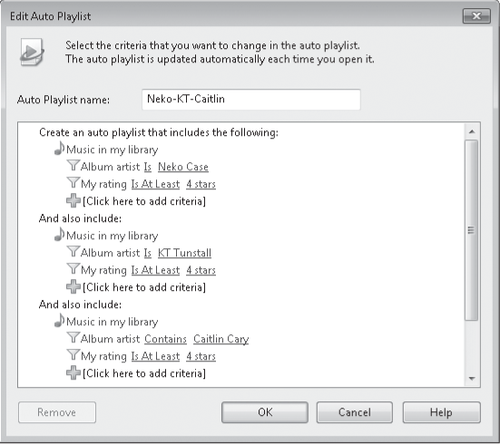
Note when creating an
Auto Playlist that all criteria within a single group must be satisfied
for the Player to add matching items to the playlist results. When you
create different groups of criteria, the Player combines them with a
logical OR. Thus, any track that matches all the criteria within any one
group gets added to the list. The group of criteria at the bottom of
the Auto Playlist window allows you to restrict the playlist itself to a
maximum size, number of items, or playing time.
|
The file name for a playlist doesn't match its display name
When you create a
playlist (regular or Auto), the text you enter before you first save the
list is used in two places. The playlist title appears between the
<title> and </title> tags in the XML file that contains the
playlist definition. The player also uses that text as the file name
that gets saved into the Playlists
folder. You can rename the saved playlist within Windows Media Player
(for an Auto Playlist you can also change its name in the Edit Auto
Playlist dialog box). In either case, however, your change is written
only to the XML file; the file name remains the same. To rename the file
itself, right-click the playlist name and click Open File Location;
then rename the file in Windows Explorer.
|
4.3. Importing and Exporting Playlists
When you click the Save
List button, your playlist is saved as an XML file in Windows Media
Playlist format, with a .wpl extension. You'll find the file itself in
the Playlists subfolder of
whatever folder is set as the save location in your Music library. If
you use the Save List As choice on the List Options menu, you can choose
M3U Playlist (.m3u) as an alternate format. This is a wise choice if
you suspect you'll play your playlists on a different device or in a
program that doesn't support the Windows Media Playlist format.
Windows Media Playlist
files use XML tags to specify the file name of each track in the list.
Each track also includes the Globally Unique IDs—the two long
alphanumeric strings—that define the track and its associated album. By
contrast, M3U files are plain text. In either format, the saved playlist
uses relative path references for each track that is saved on the same
drive as the Playlists folder. Any track stored on a different drive
(including shared network folders) is represented by its fixed file
path. When you move a playlist to a new computer, Windows Media Player
might have trouble locating the files you're trying to play if they're
in a different location than they were on the other machine.
