Windows
Media Player has been a part of Microsoft Windows for nearly two
decades. Through the years, Microsoft has steadily improved its capabilities,
polished its design, and tightened its links to other parts of Windows.
All editions of Windows 7 include Windows Media Player 12.
You can use Windows
Media Player to play sound and video files stored on a local disk
(including removable media such as flash drives, CDs, and DVDs), or
stream the output across a network (or over an internet connection) to
and from other computers, servers, or devices. You can rip
tracks from audio CDs (that is, copy them to your hard disk) in a broad
range of quality levels, create custom CDs using a CD or DVD drive that
has recording capabilities,
and download songs to a portable audio player, as long as it isn't an
iPod or a Zune. You can use the player as a jukebox to listen to all of
your favorite songs, in custom sequences that you devise (called
playlists) or in random order. If you have a DVD drive, you can use the
Player to screen your favorite movies and concert videos on a desktop or
portable PC.
Windows Media Player also
serves as the engine for other media-related features in Windows 7. For
example, when you use Windows Media Center to play music, view
pictures, or watch a video, Windows Media Player is actually doing the
work in the background.
The arrangement of the
basic building blocks in Windows Media Player hasn't changed much over
the past decade, although its visual design is greatly streamlined and
much more sophisticated in Windows 7. For the most part, you'll switch
between two primary views of Windows Media Player. The Player Library view, shown in Figure 1, is used to browse, search, and arrange your media library. It consists of five main elements, some of which might be hidden.
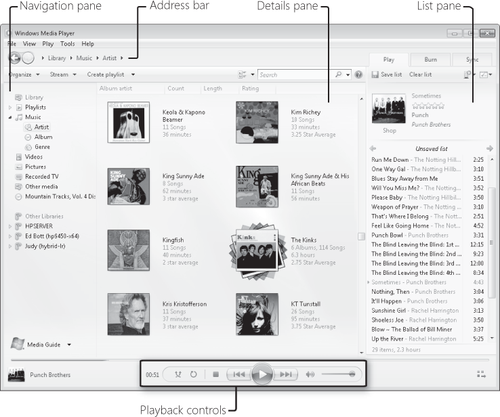
Address bar
Contains a breadcrumb trail that helps you find your current place in
the library. The Back and Forward buttons at the left of the Player taskbar work just as they do in Internet Explorer. Below the address bar is a toolbar whose contents change depending on the current selection. At the right of the toolbar is a search box.
Navigation pane
This customizable, resizable pane serves the same basic function as its
counterpart in Windows Explorer. You can choose any major node in the
media library, select removable media such as CDs and DVDs, work with
portable devices, and view any libraries that are available over the
network.
Details pane
The contents of this pane change, depending on the type of content
you've selected from the library and which view is applied. In Windows Media Player 12, the Now Playing option is no longer available for this pane.
List pane
This resizable pane displays the contents of the current playlist when
the Play tab is selected. The Burn and Sync tabs allow you to create or
edit a list of tracks to be burned to a CD (or DVD) or transferred to a
compatible portable device, respectively. An info box above the list
shows album art for the current track. Click any tab to show or hide its
associated list.
Playback controls
Manage playback of audio and video files, using DVD-style controls to
play, pause, fast-forward, and rewind files; this area also includes a
variety of special-purpose buttons that control volume and the
appearance of the Player. If a file is playing, details appear to the
left of the controls. The button to the right of the playback controls
allows you to quickly switch from Library view to Now Playing view.
|
Making the List pane wider
also makes it more informative. As you expand the pane's width, it
displays additional fields. When playing music, for example, the default
list shows the song title and playing time for each track on the list;
for most tracks, all or part of the artist name is also visible (in
gray). When you drag the left border of the pane to its maximum width,
the graphical one-to-five-star ratings appears on the list. Because the
rating field is "live," you can click to adjust each track's star rating
as you listen to an album or a playlist.
|
The toolbar beneath the address
bar offers access to Windows Media Player features and options specific
to the part of the library you're currently working with. General
options (including the ability to change the layout and choose which
columns are visible) can be found on the Organize menu.
The same options are also available via more conventional menus, which
are normally hidden. To make these menu choices visible temporarily in
the form of a cascading menu, tap the Alt key. To show or hide the menu bar with its traditional pull-down menus, press Ctrl+M or press Alt and click Show Menu Bar.
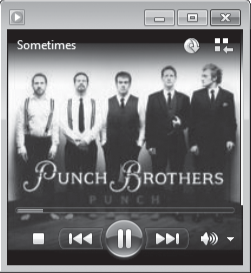
After you've begun playing an album or playlist, you can click the Switch To Now
Playing button in the lower right corner of the Player Library view.
That immediately changes the view to the minimal one shown here, with a
240-by-240 pixel album cover, basic playback controls, a display of the track/album name above the cover, and a Switch To Library button in the top right corner that takes you back to the full Player Library view.
The search
box allows you to search the library for any item in the currently
selected category. If you begin your search with a particular view
already selected, the text you enter in the search box filters that view
only. So if you select the Artist view under the Music heading in the
navigation pane and type Dylan
in the search box, you'll see all items where that name appears in the
Artist field. If you start from the main heading for the Music library,
however, the search results show matches for song titles and albums as
well.
|
The playback controls at the bottom of the Player window illustrate the universal advice for Windows
tinkerers: when in doubt, click and right-click. If you follow that
advice, you'll be amply rewarded. Clicking the icon in the lower left
corner while a music track is playing, for instance, cycles through a
tiny thumbnail of the album cover art, an icon that indicates whether
the track is playing from a local file or streaming from a network
server, and a miniature frequency
spectrum. Hover the mouse pointer over this region to see the bit rate
of the current track. Click the time indicator to cycle through
different views of elapsed and remaining time. Right-click the
Play/Pause button to choose slow, normal, and fast playback modes. If you're ripping a CD, a progress
indicator to the right of the playback controls tells you how many
tracks remain to be ripped; click the message to jump directly to the
track list from the CD.
|
The keyboard shortcuts Ctrl+1 and Ctrl+3 also allow you to switch between Player Library and Now Playing views. Ctrl+2 takes you to the decidedly retro Skin
view, a feature that never quite caught on; it continues to exist only
for backward compatibility, and we don't cover it in this book.
1. Playing Music
When you play back a music file or an audio CD in Windows Media Player, the playback controls look and function like those on common consumer devices, such as CD and DVD players.
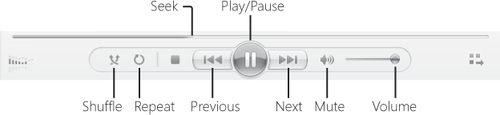
The oversized Play button becomes a Pause button (as shown here) while a track is playing. The Mute button is a toggle; click one time for silence, a second time for sound. The Next and Previous buttons move ahead and back one item within the current playlist. Click and hold the Next button to fast-forward through the current track. You can drag the Seek
slider in the blue progress bar just above the playback controls to
move to a different place within the item that's currently playing. For
example, to start the current track over again, drag the Seek slider all
the way to the left.
The Player plays the
current playlist—which might be an album from your library, a CD, or a
selection of tracks you've picked individually—in order, once, unless
you turn on Shuffle or Repeat (or both):
If you turn on
Shuffle by clicking the Shuffle button on the playback bar, by pressing
Ctrl+H, or by choosing Play, Shuffle, the Player moves through the
playlist in random order.
If
you turn on Repeat by clicking the Repeat button on the playback bar,
by pressing Ctrl+T, or by choosing Play, Repeat, the Player plays the
current playlist continuously—that is, it repeats the playlist each time
it finishes the final track.
Playing an audio CD in
Windows Media Player is almost as easy as playing it on any conventional
CD player: insert disc, close drive, enjoy music. The almost has to do with your CD (or DVD) drive's iAutoPlay settings. If you have set up your system so that the default Auto-Play action for audio CDs is Play Audio CD Using Windows Media Player, your disc starts playing
within a few moments after you insert it (provided that the Player is
not busy doing something else). If you haven't chosen a default AutoPlay
action for audio CDs, Windows displays the AutoPlay dialog box. To set
the AutoPlay default and begin playing the CD in one action, leave the
Always Do This For Audio CDs check box selected and click Play Audio CD
Using Windows Media Player.
2. Watching Videos and DVDs
Windows 7 Home Premium
and higher editions contain everything you need to watch standard DVDs
in Windows Media Player. For Starter and Home Basic editions, you need
to add a small but crucial software decoder before DVDs will play back
properly. (This same software is required to play back videos recorded
in MPEG-2 format.)
After all the requisite hardware and software is in place, playing a DVD movie in Windows Media Player is as transparently simple as playing an audio CD. If Windows Media Player is the AutoPlay application for
DVD movies, it will start automatically and begin playing your movie.
If it isn't, start Windows Media Player yourself. Then click Library,
click the icon for the DVD in the navigation pane, and click Play. You
can also click the Videos library in the navigation pane and choose a file saved in your Videos library.
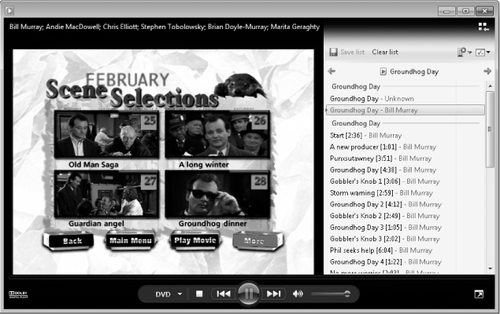
While your movie is
playing in Windows Media Player, playback controls appear at the bottom
of the Player, with title information and a Switch To Library button in a
black bar across the top, as shown in Figure 2.
Right-click anywhere in the Player window and use the shortcut menu to
show or hide the DVD title and chapter list. This list provides one
means of navigation within the movie—you can jump to a particular
chapter by double-clicking it on the Play tab of the list pane. You can
also get to the movie's own menu screens by clicking the DVD button (to
the left of the playback controls on the Navigation bar), or by clicking
the arrow to the right of the DVD button and choosing Root Menu or Title Menu.
Use the playback
controls to play or pause your movie, to fast-forward or rewind, or to
adjust the volume. To jump to the DVD menu (which typically includes
options for choosing the language of the soundtrack, adjusting audio
settings, and showing subtitles),
click the DVD icon at the bottom of the Now Playing screen, to the left
of the playback controls, or choose View, DVD Features. (Remember, the
traditional menus are normally hidden; to make them visible tap the Alt
key.) You can also adjust the soundtrack and subtitles from the Play menu, by choosing Audio And Language Tracks or Lyrics, Captions, And Subtitles.
To fully appreciate
the DVD playback experience, you probably don't want to see any part of
the Player except the portion that shows the movie itself. Click the
View Full Screen
button to switch from the Player window to a full-screen display. You
can also toggle between these two views by double-clicking the movie or
by pressing Alt+Enter.
In full-screen
mode, the playback controls along the bottom of your screen normally
fade from view after a few seconds and reappear whenever you move the
mouse. The controls remain visible when you cause them to reappear while
playback is paused. To switch back to a window, double-click the
playback window or press Alt+Enter again.
3. Customizing the Navigation Pane
If you previously used Windows Media Player 11 in Windows XP or Windows Vista, you'll find the navigation pane in Windows
Media Player 12 more consistent in its organization and certainly
easier to use. The top of the list contains your existing playlists,
followed by media libraries, arranged by category. Any currently
connected portable devices appear at the bottom of the navigation pane.
Shared libraries from other PCs or devices appear in a separate group
below your local libraries, with the list of available online stores at
the bottom of the pane.
If you find this
lengthy list overly cluttered (or, conversely, if you find that one or
more of your favorite options are missing), you can customize it. To see
all available options for changing which items are visible here, click
Organize and then click Customize Navigation Pane. This opens the dialog
box shown in Figure 3.
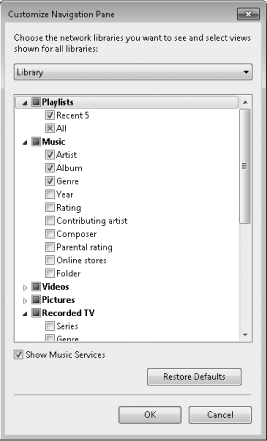
Each bold-faced entry in the list represents a top-level node in the navigation
pane. Underneath each heading is a list of available views. By default,
every top-level node is visible, but most views are hidden—only three
views under the Music heading are shown by default. If you don't want to
see a particular node (Other Media or Pictures, for example), clear the
check box to its left. If you want to see a particular view for a given
heading, including the ability to browse your Music library by folder,
select the box for that view.
To remove all
shared network libraries from the navigation pane, right-click the Other
Libraries heading and choose Hide Other Libraries. To hide the entry
for an individual user's library, right-click its name beneath the Other
Libraries heading and choose Remove From List. To restore the Other
Libraries hierarchy, open the Customize Navigation Pane dialog box,
choose Other Libraries from the drop-down list at the top of the dialog
box, and click Show Other Libraries.
The View
Options menu above the details pane, to the left of the search box,
allows you to customize the display of information in a given view, in
much the same way that Windows
Explorer works with files. In the default views of the Music library,
you can switch between Icon, Tile, and Details arrangements (or Expanded
Tiles if you select the main Music heading). The Details option
provides a plain list of albums, artists, or genres, with no album art
or thumbnails. You can also customize the list of columns visible in the
details pane: right-click the visible column headings and then click
Choose Columns, or click Organize, Layout, and then click Choose
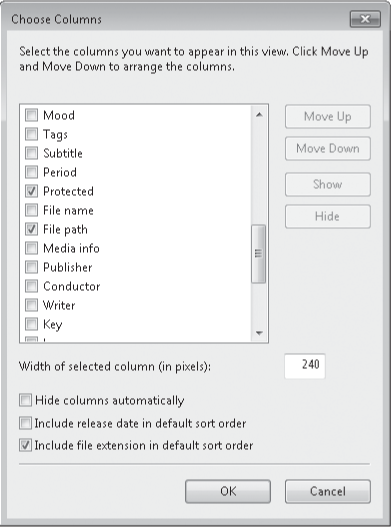
Columns. As Figure 4 shows, you can use this option to display a Yes/No field in the
Protected column (identifying tracks that are copy-protected with
Windows Media DRM) and show the File Path. Clicking a column heading to
sort on one of these fields allows you to quickly locate groups of media files that meet a common criterion.