3. Using Windows
Live Mail
Windows Live Mail is
the successor to Windows Mail, introduced with Windows Vista. Windows
Mail, in turn, replaced Outlook Express, the e-mail client and newsgroup
reader that was included with Microsoft Windows XP and other earlier
versions of Windows. Windows Live Mail provides numerous improvements
over its forebears. Among them
In
addition to Hotmail accounts, Windows Live Mail supports other popular
web-based e-mail systems, including Gmail and Yahoo! Mail. And Windows
Live Mail brings mail from
all these sources, as well as POP3 and IMAP e-mail
accounts, into a unified inbox.
You can
send high-resolution photos to e-mail
recipients—without
overloading the recipients' inboxes or clogging their slow internet
connection. Windows
Live Mail embeds photo thumbnails—optionally enhanced with caption
text, templates, and picture frames—in the message. If you create the
message while you're signed in to Windows Live Mail with a Windows Live ID, the photos
in the message can be linked to full-size images on a website. Windows Live Mail
also includes basic photo-editing tools for touching up photos before
mailing.
Content
feeds from sites that support Really Simple Syndication (RSS) go directly to
folders in your inbox.
Windows Live Mail is tightly integrated with other Windows
Live programs, including Windows Live Messenger (you can see when your contacts are online,
for example), Windows Live Writer (you can start a blog post from an
e-mail message), and Windows Live Photo Gallery (you can use it to view
photo attachments).
Windows Live
also incorporates contact-management and calendar functionality that
used to be supplied via separate applications in Windows Vista.
|
A Windows Live ID
isn't required for using Windows Live Mail. However, certain features
are available only with a Windows Live ID:
You must be
signed in to Windows Live to send photo e-mail messages—messages that
simultaneously send to your recipient thumbnail images and a link to
full-size images on a Windows Live server. Various instant
messaging functions—including voice calls and text messages to mobile
phones—are available only when you're signed in to Windows Live. You can publish a blog post from
Windows Live Mail only when you're signed in to Windows Live. You must be signed in to Windows
Live to view your online contacts list—the same one that you see if you
use a web browser to view your Hotmail account. If you're not signed in
to Windows Live, your local contacts list, which is completely
independent of the online list, appears.
|
3.1. Creating
a Mail Account
If you start Windows
Live Mail without already having established a mail account, the program
guides you through the steps necessary to create your first account. If
you need to create an additional account, or if you declined to set one
up at your first opportunity and are ready now to create your first
account, click the Mail icon in the lower left corner of the Windows
Live Mail window, and then click Add An E-Mail Account (near the bottom
of the Folder pane). In the ensuing dialog box (see Figure 3), you'll be asked to supply your e-mail address, password, and display name. This
dialog box gives you the chance to change the way your name is presented
to recipients of your e-mail messages. Provide your account logon
information, type your name as you want others to see it, and then click
Next.

Note:
The Remember Password
option in this dialog box is selected by default. If you're concerned
that someone else might try to use your computer to access your e-mail
account, clear the check box. You'll then be prompted for the password
the first time you send or retrieve mail in each Windows Live Mail
session.
If your e-mail account is with Hotmail, you're done! For
accounts with other e-mail services, the next steps vary, but the wizard
provides plenty of guidance. For example, if you're setting up a Gmail account and you haven't already enabled IMAP access in Gmail, the wizard provides a link to
detailed instructions for making this simple change. Windows Live Mail
knows the rest of the necessary configuration settings for well-known
mail services, such as Gmail and Yahoo!
Mail.
For accounts with
lesser-known services, the wizard asks you to provide details about your
mail server.
You'll need to supply server addresses for your inbound and outbound
mail. If you're not sure what to enter in this dialog box, contact your
internet service provider (ISP) or network administrator. Windows Live Mail
supports three server protocols for inbound mail: HTTP, POP3, and IMAP. After you've supplied the
logon information, click Next and then Finish. You're ready to use your
new account.
3.2. Creating
a News Account
Creating a newsgroup
account is similar to creating a mail account, except that you provide
the address of a Network
News Transfer Protocol (NNTP) server instead of mail servers. Click the
Newsgroups icon in
the lower left corner of the Windows Live Mail Window, and then click
Add A Newsgroup Account; a wizard then leads the way. On the first two
pages, provide your display name (the name that other newsgroup users
will see when you post or reply to messages) and your return e-mail
address. On the third page, supply the server details. If your news
server does not require you to log on (many do not), leave the My News
Server Requires Me To Log On option unselected. Most internet service
providers maintain an NNTP
server for use by their subscribers. If you're setting up access to a
private news server or if you subscribe to a commercial news server—that
is, a news server that does require a logon—select this option, and
then supply logon details on the ensuing page.
3.3.
Subscribing to an RSS Feed
With its
message-based system of displaying feeds, along with the ability to
search the content of all the RSS messages you receive, Windows Live
Mail is a reasonably good RSS feed reader. One weak spot is its process
for subscribing to feeds, which you do by clicking the Feeds icon in the
lower left corner of the Windows Live Mail window and then clicking Add
Feed. You then see a dialog box that asks for a single piece of
information: the URL of the RSS feed. Windows Live Mail doesn't offer to
visit the site or seek out the URL in any other fashion; you need to
know it already. For this reason, the better way to add RSS feeds is to set up
your subscriptions in Internet Explorer.
3.4. Setting
Security Options
Before you begin using Windows Live Mail, you
should open the menu (click the dropdown arrow on the menu button,
directly to the left of the Help button), choose Safety Options, and
then click the Security tab to review your security settings. Make sure
that the following options are selected:
Both are selected by
default, but it's a good idea to check anyway.
Windows
Live Mail shares the settings for the two most restrictive security
zones available
in Internet Explorer—the Internet zone and the Restricted Sites zone.
By setting Windows
Live Mail to follow the security restrictions observed in the
Restricted Sites zone, you get the maximum protection that you have set
for this zone in Internet Explorer. This setting goes a long way toward
warding off potential viruses and Trojan horses. If something does make
it past your defenses, the Warn Me option will provide protection
against viruses that replicate themselves by trying to hijack Windows Live Mail and its mail-sending
capabilities.
It's worth noting that ActiveX controls and scripts are always disabled
in Windows Live Mail, even if you've enabled them in the corresponding
security zone for Internet Explorer. Also, the Warn Me capability is
useless against modern viruses and worms that incorporate their own SMTP
server to send infected messages without getting involved with Windows
Live Mail.
3.5. Managing
Contacts
To get to the contacts
feature of Windows Live Mail, which is called Windows Live Contacts and
runs in a separate application window, click Contacts in the lower left
corner of Windows Live Mail—or press Ctrl+Shift+C.
Adding contacts is straightforward; click New, in the upper
left corner of Windows Live Contacts, and enter data. The contact form
is tabbed. Click Contact, right below Quick Add in the tab array at the
left side of the window, to get to the most essential part of the form.
Here you can enter several phone numbers and e-mail addresses. If your
contact has multiple e-mail addresses, use the Primary E-Mail Address
drop-down list to specify which one Windows Live Mail should use as
default.
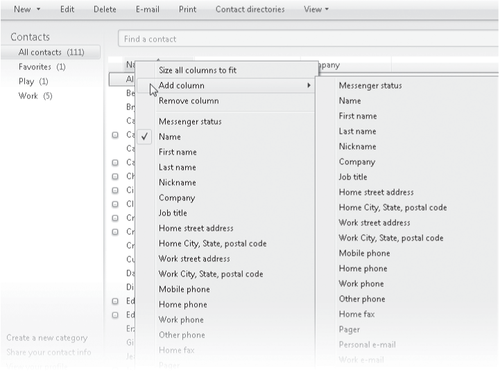
Windows Live
Contacts initially shows your contacts in a view comparable to Tiles in
Windows Explorer. If you prefer a list, choose View, List. Many columns
are available in addition to the few that are shown by default.
Right-click a column heading and choose Add Column to see the
possibilities:
|
Windows Live Contacts is integrated with other parts of
Windows Live; if you add a contact in Windows Live Messenger, for
example, that person will appear in Windows Live Contacts as well.
Windows Live Contacts is completely un-integrated with the Windows
Explorer Contacts
folder (which lives, by default, at %UserProfile%\Contacts). The latter
can be a useful repository of contact information if you do not use
Windows Live, but because Windows Live does not share its information
with this Windows Explorer folder, the redundancy can be a source of
confusion. If you already have contacts in %UserProfile%\Contacts but
don't plan to use the folder any more, you might want to import those
items into Windows Live Contacts. To do this, open the drop-down menu in
Windows Live Contacts and then choose Import, Address Book For Current
Windows User. Be aware that the import process will make no attempt to
deal with duplicate entries. You might want to scroll through your list
after importing and delete any duplications
you find.
Windows Live Contacts
can also import sets of data from Microsoft Outlook and from
comma-separated values (.csv) files, as well as individual business card
(.vcf) records.
|
3.6. Using
the Calendar
Windows Calendar, a separate application in
Windows Vista, has become a feature of Windows Live Mail in Windows 7.
To get to it, click Calendar in the lower left corner of Windows Live
Mail. The calendar feature is an easy-to-use scheduling application that
can display multiple calendars (yours and your spouse's, for example).
If you are signed in with a Windows Live ID, the calendar you work with
from within Windows Live Mail is synchronized with the Calendar web
service in Windows Live. In the latter context, on the web, you can
share your calendar with selected other users and subscribe to public
calendars (arts calendars, calendars of athletic events, notices of
public meetings, and so on); subscribed calendar information can be
updated automatically at specified time intervals. The web-service
calendar also includes to-do list and agenda functions that are absent
in the Windows Live Mail calendar.
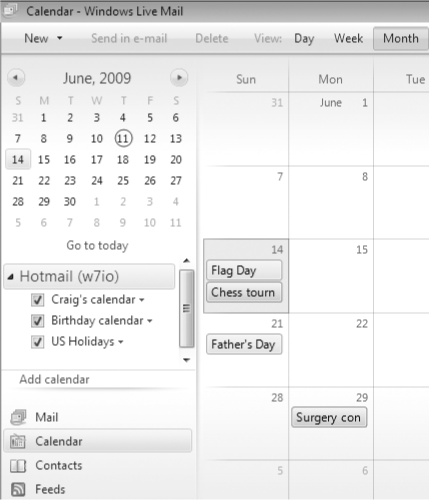
Initially, three
calendars are included: one for your appointments and events, a second
for birthdays that you have entered in your contacts records, and a
third for your country's holidays. The names of these calendars appear
in the left pane of the window, with check boxes:
Calendars are color-coded. If you don't like the default color
for a calendar, click its name and choose Properties. To hide a
calendar, clear its check box. To add a calendar, click the drop-down
arrow beside New, at the left edge of the toolbar, and then choose Calendar. To delete a
calendar, click its name and choose Delete (note that the birthday
calendar cannot be deleted; if you don't want it, hide it).
Entering an
appointment is straightforward: select the appropriate calendar
location, and click New on the toolbar. In the New Event form you'll
find, in addition to the customary date and time fields, a versatile set
of recurrence and reminder options. If you are signed in with your Windows Live ID, you
can specify that your reminders be sent to any combination of your e-mail
address, Windows Live Messenger, or your mobile device. To express your
wishes in this regard, open the menu (press Alt+M or click the Menus
icon) and choose Deliver My Reminders To.
