5. Creating Your Own MMC Consoles
Creating your own MMC console or modifying an existing one involves the following steps (not necessarily in this order):
Run MMC with no snap-in, or open an existing MMC console in Author mode.
Display the console tree if it's not already visible.
Add or remove snap-ins, folders, and, if appropriate, extensions (modules that extend the functionality of snap-ins).
Add taskpad views (customized pages that appear within the details pane of a snap-in), if appropriate.
Manipulate windows and other display elements to taste.
Add items to the Favorites menu if appropriate.
Name the console and choose an icon for it.
Choose Author mode or one of the three User modes, and further restrict user options if appropriate.
Use the File menu to save your .msc file.
5.1. Running MMC with No Snap-in
To run MMC with no snap-in, simply type mmc
on a command line. An empty, Author-mode MMC console appears. MMC is a
multiple-document-interface (MDI) application (the Console Root window
is a child window), although most of the consoles supplied with Windows
do their best to disguise this fact. You can create consoles with
multiple child windows, and those windows can be maximized, minimized,
restored, resized, moved, cascaded, and tiled, all within the confines
of the main MMC window.
5.2. Displaying the Console Tree
If the console tree is
not visible in the application you're creating or modifying, choose
Customize View from the View menu. In the Customize View dialog box
(shown earlier in Figure 2),
select the Console Tree check box. Alternatively, if the standard
toolbar is displayed, click the Show/Hide Console Tree button.
5.3. Adding Snap-ins and Extensions
The contents of a
console can consist of a single snap-in, or you can craft a
hierarchically organized, completely personalized,
everything-but-the-kitchen-sink management tool. To add a snap-in to
your application, follow these steps:
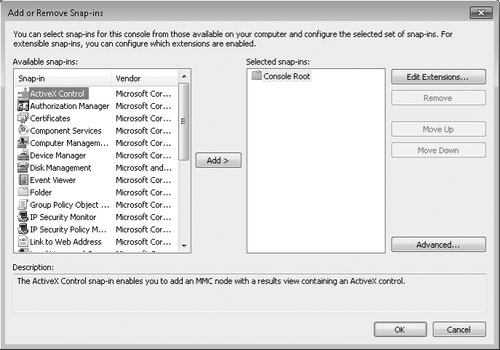
Choose File, Add/Remove Snap-In (or press Ctrl+M) to display the dialog box shown in Figure 3.
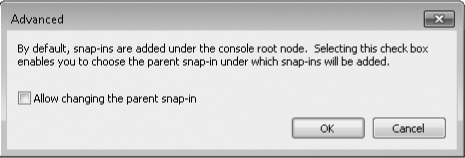
If you want a multilevel console tree, click Advanced, select Allow Changing The Parent Snap-In, and then click OK.
In
the Parent Snap-In list, select the parent of the new snap-in. The
parent can be Console Root or a folder or snap-in that you've already
added. (In a brand new MMC application, your only choice is Console
Root.)
In the Available Snap-Ins list, select the snap-in you want and click Add.
If the selected snap-in supports remote management, a dialog box similar to the one shown in Figure 4 appears.
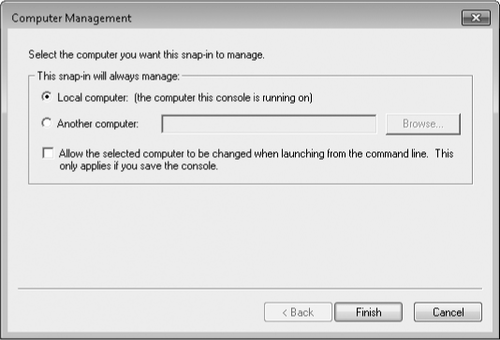
Select
Local Computer to manage the computer on which the console runs, or
supply the name of the computer you want to manage. Some snap-ins that
allow remote management let you specify the target computer at run time
by means of a command-line switch; select the check box to enable this
option.
Some
snap-ins come with optional extensions. You can think of these as
snap-ins for snap-ins—modules that provide additional functionality to
the selected snap-in. Some snap-ins comprise many extensions, and you
can optionally select which ones you want to enable or disable.
To
modify the extensions to a snap-in, select the snap-in in the Selected
Snap-Ins list in the Add Or Remove Snap-Ins dialog box shown earlier in Figure 3, and then click Edit Extensions. Select which extensions you want to use. Click OK.
Repeat steps 3 through 6 to add more snap-ins. Click OK when you're finished.
If
you added one or more folders as containers for other snap-ins, in the
console tree right-click the new folder, choose Rename, and supply a
meaningful name.
5.4. Adding Taskpad Views
A taskpad
is a customized page that appears within the details pane of a snap-in.
With it, you can create icons that encapsulate menu commands, command
strings, scripts, URLs, and shortcuts to Favorites items. Navigational
tabs at the bottom of a taskpad view make it easy for a user to switch
between the taskpad view and a normal view of the same data.
To create a taskpad
view, start by selecting an item in the console tree to which you want
to apply the view. As you'll see, when you create your taskpad view, you
have the option of applying it either only to the selected console-tree
item or to all items at the same outline level.
Next, right-click the
selected console-tree entry and choose New Taskpad View from the
shortcut menu. The New Taskpad View wizard appears. The sample table at
the right side of the wizard's second page makes the options rather
self-explanatory. The default choices work well in most situations.
The default selections in
the wizard's third screen apply the new taskpad view to all comparable
console-tree items and make the taskpad the default view for those
items. Moving on from this screen, you have the opportunity to assign a
name and some descriptive text to the new view.
In the wizard's final
screen, select Add New Tasks To This Taskpad After The Wizard Closes if
you want to create one or more task shortcuts. This selection summons a
new wizard that walks you through the process of creating
your first shortcut. On the final page of this wizard, select When I
Click Finish, Run This Wizard Again if you have additional shortcuts to
create.
5.5. Managing Windows
With the New Window
From Here command on the Action menu, you can create a new child window
rooted in the current console-tree selection. You might want to use this
command to create multiple-window applications. After you've created
your windows, you can use Window menu commands to tile or cascade them.
5.6. Controlling Other Display Elements
The Customize View command on the View menu allows you to hide or display various elements of the MMC visual scene, including taskbars, menus, and the navigational tabs that appear below taskpad views. Note that selections in the Customize View dialog box
take effect immediately—you don't need to click an Apply button or
leave the dialog box. Therefore, you can easily try each option and see
whether you like it.
5.7. Using the Favorites Menu
The Favorites menu allows
you to store pointers to places within your console tree. If you create a
particularly complex MMC console, you might want to consider using
Favorites to simplify navigation. To add a console-tree item to your
list of favorites, select that item and then choose Add To Favorites
from the Favorites menu.
5.8. Naming Your Console
To assign a name to your
console, choose File, Options. Your entry in the field at the top of the
Console tab in the Options dialog box will appear on the title bar of
your console, regardless of the file name you apply to its .msc file. If
you do not make an entry here, MMC replaces Console1 with the console's
eventual file name. Click Change Icon to select an icon for the
console. You can select an icon from any dynamic-link library (DLL) or
executable file.
Note:
You can rename Console Root (or any other folder in the console tree) by right-clicking it and choosing Rename.
5.9. Restricting User Control of Your Console
In the Console Mode list on the Console tab of the Options dialog box (choose File, Options), you can select among MMC's three User
modes. In any of these modes, users can't add or remove snap-ins,
modify taskpad views, or make other changes to the console. The
difference among the modes is how much of the console tree they're able
to see and whether they can open new windows.
User Mode—Full Access
Users have full access to the console tree and can open new windows,
using either the New Window From Here or Window, New Window command.
(Changes to the window arrangement can't be saved in User mode,
however.)
User Mode—Limited Access, Multiple Window
Users have access only to parts of the console tree that are visible.
(For example, if you create a hierarchically organized console, open a
new window from a node below the console root, and then close the
console root window before saving, users will be unable to reach the
console root and other nodes at or above the level at which the new
window was opened.) Users can open new windows with the New Window From
Here command, but the New Window command (which would provide access to
the console root) does not appear on the Window menu.
User Mode—Limited Access, Single Window
In this most restrictive mode, users have access only to parts of the
console tree that are visible. MMC operates in single-window mode,
essentially losing its MDI character; users can't open new document
windows, nor can they resize the single document window.
If you choose one of the three User modes, the two check boxes at the bottom of the Options dialog box become available. Your choices are as follows:
Do Not Save Changes To This Console With this check box cleared (its default), MMC
saves the state of your application automatically when a user closes
it. The user's selection in the console tree, for example, is preserved
from one use to the next. If you always want your users to see the same
thing each time they run the console, select this check box.
Allow The User To Customize Views
This check box, selected by default, keeps the Customize View command
available, allowing your users, for example, to hide or display the
console tree. Clear the check box if you want to deny users access to this option.
5.10. Saving a Console
The final step in the process of creating
an MMC console is, of course, to save the file. Choose File, Save As;
enter a file name in the Save As dialog box; and choose a location (the
default location is the Administrative Tools folder in the Start
Menu\Programs folder for your profile). Click Save. The resulting
console file is saved with the .msc extension.
