Logo
programming4us
programming4us
programming4us
programming4us
Home
programming4us
XP
programming4us
Windows Vista
programming4us
Windows 7
programming4us
Windows Azure
programming4us
Windows Server
programming4us
Windows Phone
 
programming4us
Windows 7

Microsoft Access 2010 : Using Reports to Print Information - Printing a Report

- Free product key for windows 10
- Free Product Key for Microsoft office 365
- Malwarebytes Premium 3.7.1 Serial Keys (LifeTime) 2019
1/6/2013 6:10:08 PM

Before you print your report, you can change the report margins, orientation, paper size, and several other important options. You accomplish this using the Page Setup feature.

Use Page Setup

Here’s how Page Setup works:
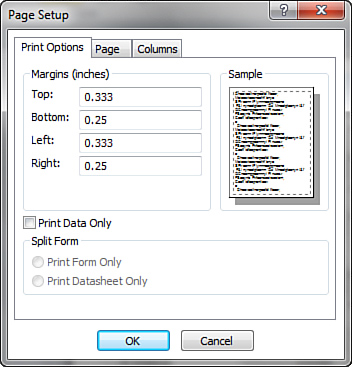
1.
While previewing the report, click the Page Setup button in the Page Layout group on the Print Preview tab of the Ribbon. The Page Setup dialog box appears (see Figure 1).


Figure 1. The Page Setup dialog box, where you select report settings.


2.
The Print Options tab allows you to modify the margins. The Page tab allows you to customize important settings such as the orientation, paper size and source, and the printer you want to use. The Columns tab allows you to designate column size and other information applicable for multicolumn reports. Select the desired options.

3.
Click OK to accept your changes.

If you prefer, you can use the appropriate Ribbon buttons to designate the settings available in the Page Setup dialog box. For example, you can easily switch from portrait to landscape using the Landscape tool available in the Page Layout group of the Print Preview tab of the Ribbon.


Sending Reports to the Printer

You can print the reports you create by using the context-sensitive menu. You can just right-click the report that you want to print, and then select Print. You can also print from Print Preview mode. You just click the Print button in the Print group on the Print Preview tab of the Ribbon. To print a report by using the context-sensitive menu, follow these steps:

1.
Click Reports in the list of objects in the Navigation Pane.

2.
Right-click the report you want to print.

3.
Choose Print.

4.
Complete the dialog box, entering information such as the number of copies that you want to print, the printer you want to print to, and so on.

5.
Click OK to complete the process.

The process of printing a report by using the Print button while previewing the report works like this:

1.
Click Reports in the list of objects in the Database window.

2.
Right-click the report you want to print, and then select Preview.

3.
Click the Print tool in the Print group on the Print Preview tab of the Ribbon. Once again the Print dialog appears, prompting you for additional information.
Other -----------------
- Microsoft Access 2010 : Using Reports to Print Information - Opening and Viewing a Report
- Programming Drivers for the User Mode Driver Framework - Driver Dynamic-Link Library and Exports
- Creating a Home Network : Setting Up a Wireless Network
- Creating a Home Network : Setting Up a Wired Network with a Router
- Creating a Home Network : Setting Up a Wired Network with an ICS Host
- Creating a Home Network : Creating a Wired LAN, Creating a Wireless LAN
- Microsoft Project 2010 : Setting Up a Project Budget - Assigning Accounting Codes
- Microsoft Project 2010 : Setting Up a Project Budget - Setting the Project Fiscal Year
- Microsoft Project 2010 : Setting Up a Project Budget - Reducing Project Costs
- Microsoft PowerPoint 2010 : Incorporating Motion Video - Placing a Video on a Slide
 
 
Top 10
- Microsoft Visio 2013 : Adding Structure to Your Diagrams - Finding containers and lists in Visio (part 2) - Wireframes,Legends
- Microsoft Visio 2013 : Adding Structure to Your Diagrams - Finding containers and lists in Visio (part 1) - Swimlanes
- Microsoft Visio 2013 : Adding Structure to Your Diagrams - Formatting and sizing lists
- Microsoft Visio 2013 : Adding Structure to Your Diagrams - Adding shapes to lists
- Microsoft Visio 2013 : Adding Structure to Your Diagrams - Sizing containers
- Microsoft Access 2010 : Control Properties and Why to Use Them (part 3) - The Other Properties of a Control
- Microsoft Access 2010 : Control Properties and Why to Use Them (part 2) - The Data Properties of a Control
- Microsoft Access 2010 : Control Properties and Why to Use Them (part 1) - The Format Properties of a Control
- Microsoft Access 2010 : Form Properties and Why Should You Use Them - Working with the Properties Window
- Microsoft Visio 2013 : Using the Organization Chart Wizard with new data
 
programming4us
Windows Vista
programming4us
Windows 7
programming4us
Windows Azure
programming4us
Windows Server