Saving Favorite Shapes
As you spend more time using Visio’s stencils and templates, you will come across shapes that you want to bookmark as favorites.
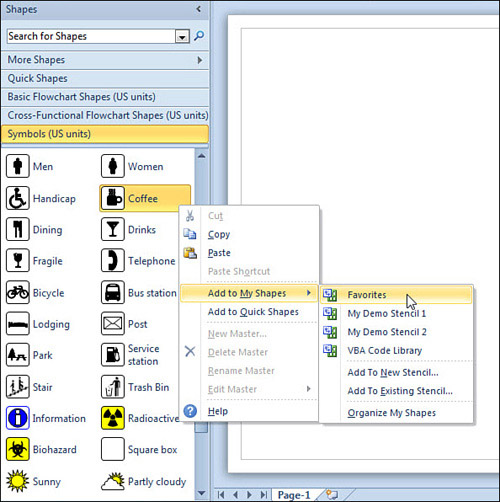
Just as you can save shapes from a Shape Search, you
can add any shape you see in any stencil to your favorites. To do so,
right-click a shape in the stencil, click Add to My Shapes, and then
select a stencil from the list. You can also choose to create a new
stencil if Favorites is getting overcrowded, or you need sets of
favorites for different diagram types.
Figure 8 shows the Coffee icon from the Symbols stencil being added to my Favorites stencil.
Managing and Organizing Your Favorite Shapes
In
the previous Let Me Try It, you briefly saw the My Favorites folder,
which you can quickly get to via More Shapes, My Shapes, Organize My
Favorites. This folder has special status in that its contents are shown
in the My Shapes and Add to My Shapes cascading menus.
Figure 9 shows the expanded More Shapes, My Shapes menu, along with the corresponding Explorer window.
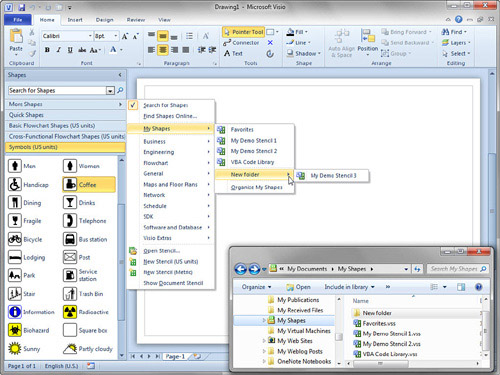
You can see that I’ve added a few stencils of my own
to the My Shapes folder: My Demo Stencil 1, My Demo Stencil 2, and VBA
Code Library. They also appear in the My Shapes menu.
Note that My Shapes can even contain subfolders. In Figure 2.15,
you can see that I’ve quickly added a new folder, named (cough) New
Folder. This contains the stencil named My Demo Stencil 3. This
capability is great for further organizing your Favorites because
subfolders just become another level of cascading menu inside the Visio
interface. If you have tons of favorites and custom stencils, you can
keep them sorted using subfolders but still have them handy via the My
Shapes menu.
If
you download or purchase Visio shapes from a third party, it’s a good
idea to put the files in the My Shapes folder. That way, they are easily
accessible from within Visio. Of course, you could put them in any
folder on your system, but then you need to browse to them.
Editing Existing Stencils
Using the various My Shapes mechanisms to add shapes
to stencils is quick and convenient. You can also drag masters from
stencil to stencil or even create new ones by dragging shapes you create
from the page onto a stencil. You can also delete shapes from stencils
by selecting them and then pressing the Delete key.
However, there are a few gotchas that might trip you up when you try to edit a stencil.
The first is that stencils normally open read-only.
If you want to edit a stencil, right-click on its caption bar and then
choose Edit Stencil. After you do this, a little red star shows up,
indicating that the stencil is now open for editing. If you make changes
to the stencil, a little disk icon appears in place of the red star.
This icon indicates that the stencil needs to be saved, which you can do
by clicking the disk icon.
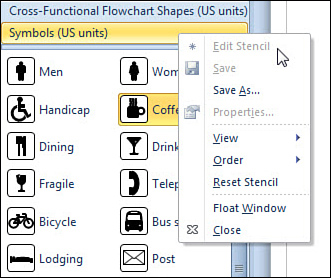
The second problem is that stencils that come from
Microsoft with your Visio installation cannot be edited, no matter what
you click. Figure 10 shows a fruitless attempt to make the Symbols stencil editable.
One work-around is to save a copy of the stencil and
then make changes. For instance, you could right-click the Symbols
caption, choose Save As, and then save it to your favorites as, say, “My
Symbols.” Now you can freely add and delete shapes from this stencil
using the methods just discussed.
Creating a Custom Master Shape and a Custom Stencil
All this talk of editing and managing shapes and
stencils might have you dreaming up your own custom libraries of shapes.
So let’s go over the basic steps for creating a new stencil with a new
master.
Creating a New Stencil with New Masters
1. | Create a new Blank drawing.
|
2. | Using the Rectangle and Ellipse tools, draw a few basic forms. Position them near each other or even overlapping.
|
3. | Format the shapes with crazy colors and line styles. Have fun, go crazy!
|
4. | Select the Pointer tool, and select all your shapes by dragging a selection rectangle around them.
|
5. | Group
them together by pressing Ctrl+G or right-clicking Group, Group. You
now have a single shape composed of several subshapes. You can save this
shape in a stencil to make it easy to reuse.
|
6. | Create
a new, blank stencil. Go to More Shapes, New Stencil. You should see a
new stencil window that has a name like Stencil1 or Stencil2.
|
7. | Drag
your grouped shape from the drawing page onto the stencil. You should
see a new master with a name like Master.1 or Master.2.
|
8. | Edit
the name of the master by right-clicking and choosing Rename Master.
Enter a name for your new shape, such as “My First Shape.”
|
9. | Notice
that the stencil now shows the disk icon in the upper-right corner.
This indicates that the stencil has been changed and should be saved.
Click the disk to save the stencil. The Save dialog appears, showing the
My Shapes folder by default. Enter a name for the stencil and click
Save. The new name of the stencil now shows in the stencil tab caption.
|
10. | You
can edit the properties for your stencil by right-clicking the stencil
tab and choosing Properties. There you can edit fields such as Title,
Subject, Author, Manager, Company, Language, Categories, Tags, and
Comments. Notice that if you customize the Title, it appears in the
stencil’s caption instead of the filename.
|
11. | You
can also edit the master shape itself. Double-click the master icon or
right-click and choose Edit Master, Edit Master Shape. You then see a
new window that shows just the innards of the master. Try changing a few
colors or adding some text. When you’re done, click the x to close the
master window. If you made any changes, you see the alert “Update My
First Shape?” Click Yes to accept your changes. Notice that the master
icon visually updates to reflect your alterations.
|
12. | Test your new master shape by dragging and dropping it onto the drawing page.
|
|
It’s a good idea to group shapes together before
dragging them to a stencil to create a new master. If you don’t, Visio
will group them when you drag them back to a drawing anyway.
It would be great if masters could deliver several
disjoint shapes at once. Preconfigured sets of furniture for office
cubicles would be a great example. But unfortunately masters can only
deliver a single shape.
If you need to get at the pieces of a master, you can
ungroup it once it hits the page. Visio will show you a warning that
you are “severing” it from its master. If you created the master with
the intention of ungrouping it, then all should be OK. But be warned:
masters that weren’t designed to be ungrouped might blow apart in
surprising and unexpected ways! So be prepared to undo.
|
Understanding the Document Stencil
When you drag masters into a drawing, not only do you
get a shape on the page, but you also get a copy of the master inside
the document itself. Every document has an “internal” or “local” stencil
called the document stencil. Working
with the document stencil is considered an advanced Visio topic, but I
think that understanding it helps avoid confusion down the road, and
deepens your understanding of Visio.
Working with the Document Stencil
1. | Start a new diagram using the Basic Flowchart template.
|
2. | On the Design tab, in the Themes group, click the left-most theme called No Theme to remove any theming from the drawing.
|
3. | Click
My Shapes and then choose Show Document Stencil from the bottom of the
menu. A blank stencil window appears with “Document Stencil” as its
title. This internal stencil holds copies of masters dragged into the
drawing, and belongs to the document itself. It isn’t a separate stencil
file.
|
4. | Move
the Document Stencil to the right side of the window by dragging its
stencil tab. See whether you can get it to dock to the right side of the
drawing window.
|
5. | In the Shapes window, click Basic Flowchart Shapes.
|
6. | Drag
the Decision shape onto the page. You see a diamond on the page as
expected, and a Decision master also appears in the Document stencil.
This is the local copy of the master!
|
7. | Drag
several more Decision shapes onto the page. Select one and resize it to
be narrower. Select another and type the text “A Decision.”
|
8. | Double-click
the Decision master in the Document stencil. A new window appears
showing just the diamond shape. This is the master editing window. (You
don’t have to enable the Document Stencil for editing, because it
belongs to the document that you are already editing!)
|
9. | Select the diamond and type “Yes or No?” for its text.
|
10. | Stretch the diamond and make it wider.
|
11. | Give
the shape a gaudy fill color such as red or orange. You can do this by
right-clicking and picking a color from the fill bucket drop-down.
|
12. | Close
the master editing window by clicking the “X” in the top-right corner
(make sure you don’t close the whole Visio application!).
|
13. | Accept the changes by clicking “Yes” when the warning: “Update ‘Decision’ and all of its instances?” appears.
Notice that the Decision shapes on the page have updated to reflect the
changes you made to the master. However the shapes that you edited on
the page before editing the master, don’t get every single change that
you made. The “A Decision” shape’s text is unchanged, and the narrower
shape didn’t become wider. Changes made to shapes on the page override
changes made to the master.
|
Clearly the Document stencil offers a lot of power
and potential for quickly changing your documents. But let me point out a
few caveats and common misconceptions.
The stencils that open with a template are
actually separate files. When a master from an “external stencil” is
dropped into a document, it is copied to the document stencil, as you’ve
just experienced. Only changes to the master in
the document stencil affect shapes in the drawing. Changes to the
original master in the original stencil do not affect dropped shapes.
If
you drag masters from various stencils onto a page and then delete
them, there are still copies of those masters in the document stencil.
This leads to mysterious file bloat: you could have a completely blank
document that has a huge file size because the document stencil is full
of masters that were dropped and then deleted. File, Info, Reduce File
Size can help you to detect and remove unused local masters.
Not
all changes that you make to Document stencil masters will propagate to
shapes on the page. If shapes have been modified on pages, those
changes take precedence over changes made inside the master, as you saw
in the excercise.
Editing
Document Stencil masters seems like a great way to replace shapes.
While this works to some extent, you could get some unexpected results.
Small changes to masters usually propagate just fine, but complete
replacement of the innards of a master can lead to surprises.
