Logo
programming4us
programming4us
programming4us
programming4us
Home
programming4us
XP
programming4us
Windows Vista
programming4us
Windows 7
programming4us
Windows Azure
programming4us
Windows Server
programming4us
Windows Phone
 
programming4us
Windows 7

Microsoft Visio 2010 : Importing Graphics (part 1) - Using Images as Shapes in Visio - Working with Images

- Free product key for windows 10
- Free Product Key for Microsoft office 365
- Malwarebytes Premium 3.7.1 Serial Keys (LifeTime) 2019
3/4/2014 1:05:26 AM
In today’s computing environment, no application is an island. You need to take advantage of the Web and the immense resources it offers. Fortunately, you can import bitmap images, vector art, and even CAD drawings into Visio.

1. Using Images as Shapes in Visio

Diagrams don’t have to be just black-and-white boxes and lines, and you don’t have to spend lots of time drawing objects that have already been created.

Importing Images

You can bring images into Visio in many ways. You can insert, copy/paste, drag from Windows Explorer, or import using File, Open. Using File, Open or Insert, Illustrations, Picture, brings up an open file dialog that lets you browse to a file. You see a file-type filter drop-down in the lower-right corner that tells you which image formats Visio supports:

  • Graphics Interchange Format (*.gif)

  • JPEG File Interchange Format (*.jpg;*.jpeg)

  • Portable Network Graphics (*.png)

  • Tagged Image File Format (*.tif; *.tiff)

  • Windows Bitmap (*.bmp;*.dib)

If you import using File, Open, you create a new document containing just the imported image. Using Insert, Picture adds it directly to the drawing you are editing, which is usually what you want.

Working with Images

After you import an image, you manipulate it as you would any other Visio shape. You can add text to it, resize it, rotate it, and format the line style of its outlining box.

When you select an image shape, you also see the contextual Picture Tools Ribbon tab. Its controls enable you to tweak the brightness and contrast of the image, compress its size within the Visio file, and crop the image to just the region you want to show. Figure 1 shows a photo of a sign from Hong Kong’s subway being edited with these tools.
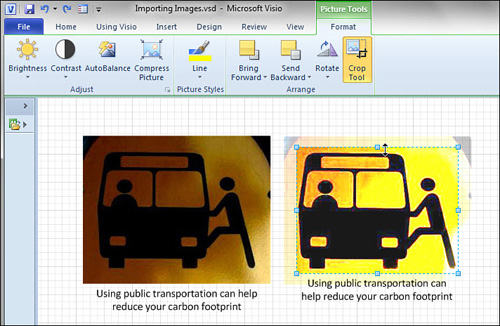
Figure 1. After using controls on the Picture Tools tab, the image at right has higher brightness and contrast than the original, and is clearer. The Crop tool is being used to remove excess detail around the edges. Note that imported images have text blocks conveniently located below the shape by default.

The Crop tool lets you focus on part of the image by changing the “viewport,” so to speak. When you crop an image, you are shrinking the portion of the image that is shown within the shape’s alignment box, not deleting portions of the picture. You can later uncrop to re-reveal these hidden parts.

For more image-related controls, click the dialog box launcher in the Adjust group on the Picture Tools tab. There you can tweak gamma, transparency, denoise, sharpen, and blur settings.

You can use images to create interesting and attractive backgrounds by lightening them with transparency and then blurring them.

Other -----------------
- Microsoft Visio 2010 : Using Special Shape Features (part 2) - Control Handles , Hyperlinks, Action Tags
- Microsoft Visio 2010 : Using Special Shape Features (part 1) - Right-Click Actions,Shape Data Fields
- Microsoft Visio 2010 : Working with Text (part 3) - Text Resizing Behavior
- Microsoft Visio 2010 : Working with Text (part 2) - Editing and Formatting Text
- Microsoft Visio 2010 : Working with Text (part 1) - Creating and Editing Text Blocks
- Microsoft Project 2010 : Fine-Tuning Task Details (part 11) - Inactivating Tasks
- Microsoft Project 2010 : Fine-Tuning Task Details (part 10) - Scheduling Summary Tasks Manually
- Microsoft Project 2010 : Fine-Tuning Task Details (part 9) - Viewing the Project’s Critical Path
- Microsoft Project 2010 : Fine-Tuning Task Details (part 8) - Setting Up a Recurring Task
- Microsoft Project 2010 : Fine-Tuning Task Details (part 7) - Entering Fixed Costs
 
 
Top 10
- Microsoft Visio 2013 : Adding Structure to Your Diagrams - Finding containers and lists in Visio (part 2) - Wireframes,Legends
- Microsoft Visio 2013 : Adding Structure to Your Diagrams - Finding containers and lists in Visio (part 1) - Swimlanes
- Microsoft Visio 2013 : Adding Structure to Your Diagrams - Formatting and sizing lists
- Microsoft Visio 2013 : Adding Structure to Your Diagrams - Adding shapes to lists
- Microsoft Visio 2013 : Adding Structure to Your Diagrams - Sizing containers
- Microsoft Access 2010 : Control Properties and Why to Use Them (part 3) - The Other Properties of a Control
- Microsoft Access 2010 : Control Properties and Why to Use Them (part 2) - The Data Properties of a Control
- Microsoft Access 2010 : Control Properties and Why to Use Them (part 1) - The Format Properties of a Control
- Microsoft Access 2010 : Form Properties and Why Should You Use Them - Working with the Properties Window
- Microsoft Visio 2013 : Using the Organization Chart Wizard with new data
 
programming4us
Windows Vista
programming4us
Windows 7
programming4us
Windows Azure
programming4us
Windows Server