You can add organization to your Visio documents by using layers to categorize shapes. A layer is a named category to which any number of shapes can be assigned.
Layers help you do things to entire categories of shapes at the click of a button. For example, you can
Hide and show shapes
Lock shapes from being moved, edited, and selected
Temporarily color shapes to emphasize (and find) them
Set shapes so that they print or not
Quickly select all shapes belonging to a particular layer
The neat thing about
layers is that unlike callouts and containers, they don’t have to
visually impact your diagram at all. You can assign shapes to layers,
use layer operations when you need them, and then return things to their
original state.
Basic Layer Skills
As with most things Visio, it
is easier to describe layers after you’ve created and manipulated a few
yourself. So let’s start by creating some layers and assigning shapes
to them.
Creating Layers
1. | Start with a new, blank drawing.
|
2. | Using the Rectangle tool, draw several rectangles; then use the Ellipse tool to draw several circles.
|
3. | Apply
a theme to the drawing to make it more interesting. In the Design tab,
click the second theme in the theme gallery (Basic Colors, Basic Shadow
Effects). Your shapes should now have a slight gray gradient fill.
|
4. | Switch back to the Pointer tool and then select all the rectangles.
|
5. | Go to the Layers drop-down in the Editing group on the Home tab.
|
6. | Click Assign to Layer in the drop-down list. Next, you will assign the rectangles to a new layer.
|
7. | In the Layer dialog, the New Layer should pop up automatically because you have no layers in this drawing.
|
8. | Enter the name Rectangular things
and then click OK. In the Layer dialog, Rectangular things should now
be checked, indicating the shapes will be assigned to that layer. Click
OK again to exit.
|
9. | Now select just the circle shapes.
|
10. | Click the Assign to Layer button again. The Layer dialog pops up.
|
11. | Click the New button to define a new layer; then enter Circular things in the text field. Click OK twice to get back to your drawing.
|
|
There is a trick that lets
you quickly add multiple layers at once, which is handy if you use
layers often and need to create many of layers at a time. When you click
the New button in either the Assign to Layer or Layer Properties
dialogs, you can type in a list of layers, separated by a semicolon. For
example, entering Walls;Furniture;Equipment in the Layer Name field creates three layers in one fell swoop.
|
You should now have a
bunch of shapes assigned to one of two layers: Rectangular things or
Circular things. Hold on to this document; we’ll take the layers for a
spin in the next exercise.
Manipulating Layers
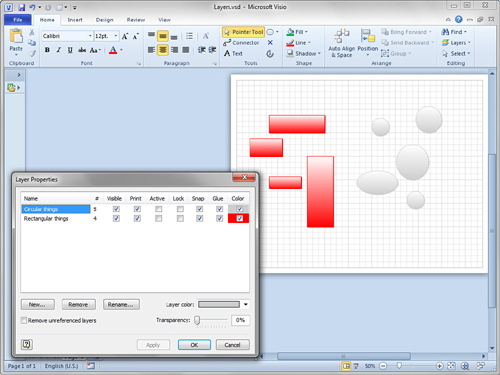
1. | Open the Layer Properties dialog by choosing Home, Editing, Layers, Layer Properties. You should see the dialog shown in Figure 3.18, which lets you control all the layers for a page.
|
2. | Note
the two layers you created earlier and the different columns. The #
column shows the number of shapes assigned to each layer.
|
3. | Uncheck
Visible for one of the layers; then click Apply. The shapes on that
layer should disappear. Apply lets you test settings without leaving the
dialog, whereas OK makes the changes and then exits the dialog. Recheck
Visible to bring them back.
|
4. | Check
Color for one of the layers; then select a color from the Layer Color
drop-down list in the lower-right of the form. Click Apply, and the
shapes on the corresponding layer should now be colored.
Figure 1
shows what happens when layers are colored. This coloring is actually
overlaid on your shapes. The formatting of the shapes themselves has not
actually changed. When you uncheck the color boxes, your original
formatting returns.
|
5. | Check
Lock for both layers; then click OK. The Layer Properties dialog
disappears, and you return to the drawing. Note that you can’t move any
of the shapes on the page, because you locked the layers to which they
are assigned.
|
6. | Return
to the Layer Properties dialog, remove all coloring, unlock all the
layers, and return all layers to the visible state. Your shapes return
to their natural state, unfettered by layer settings.
|
7. | You can easily select all members of a particular layer. To do this, choose Home, Editing, Select, Select by Type.
|
8. | In
the dialog, click the Layer radio button and then check Rectangular
Things. When you click OK, all the shapes on the Rectangular things
layer should be selected. This is a really handy feature for complex
drawings and just by itself is a good reason to assign shapes to layers!
|
|
The
name Layers might make you imagine transparent sheets that can be
stacked, each level showing through to the next. This is the way layers
work in many CAD and graphics illustration programs.
In Visio, layers have nothing to
do with Z-order (the order of shapes from back to front). You can’t move
one layer of shapes on top of another, because layers do not organize
shapes at discreet levels. A shape can be assigned to any layer and be
at any position, front-to-back-wise.
Visio shapes can belong to more
than one layer, as you might have noticed from the Assign to Layer
dialog. This capability makes it impossible to organize layers by
Z-order.
For this reason, I like to
say that Visio layers are “class, not glass.” They are for classifying
shapes into meaningful groups, but not for organizing them by level on
metaphorical sheets of invisible glass.
To mimic the way layers work
in other applications, you can create a system of background pages,
since you can create chains of backgrounds with backgrounds with
backgrounds. But managing and moving these can be a real pain, so I
wouldn’t recommend it beyond very simple cases.
|
Practical Application of Layers
You can see that layers offer an easy and flexible way to perform category-specific operations on shapes.
Locking shapes is a great way
to protect parts of a drawing from accidentally being edited while you
are working on other details. A great example of this is locking down
the walls, windows, and doors of an office plan while you’re working on
furniture arrangements. Just as in real-life, these features are mostly
immobile, whereas furniture can be rearranged more easily!
I like to use imported
images in my drawings—often as backgrounds. Assigning the image to a
layer and then locking it makes it much easier to work without
continually selecting the image by accident.
As diagrams get more
complex, making certain layers invisible can make your work a lot
easier. If you are laying out furniture for an office or home plan,
hiding layers for, say, switches, electrical outlets, and cabling
removes a lot of clutter while you work. Visio will also be more
responsive, since it has less to redraw every time you pan or zoom.
The
ability to hide and show layers is also helpful if your drawing has
many different audiences. The plumber, electrician, and facilities
manager can all use the same drawing but you can print out different
sets of layers for each of them.
With layer-coloring and
select-by-layer, calling attention to and finding specific types of
shapes are easy tasks. For large, complex drawings, these tools are
invaluable.
If you’ve made a bunch of
notes to yourself that you don’t want to share with contractors or other
consumers of the diagram, you can assign your callouts and other
annotations to a nonprinting layer. They are visible while you’re
editing (so you don’t forget about them), but they don’t appear in the
printed copies you send out into the field.
Visio Layers for Power Users
If you are excited about
layers and see them as a key feature that you will be using a lot, you
might be interested in a few fine points, some of which can be a bit
confusing:
Layer sets are per-page, not per-document. If you add pages to a document, you have to re-create layers on each page.
When you copy a shape, the new copy retains its layer membership.
If
a shape is assigned to a layer and is dropped on a page that doesn’t
contain that layer, the layer is added to the page. You can create
“layer set” shapes to make it easy to add a standard set of layers to
new pages. Just create a rectangle, assign it to every layer that you
need, and then drop it onto a new page. All layers are created
instantly.
The Layer
Properties dialog has an Active Layer column. If you check any active
layer boxes, new shapes added to the drawing page are automatically
assigned to active layers—if they don’t already belong to layers. Shapes
that are already assigned to layers keep their settings.
Shapes
can belong to multiple layers; this affects behavior when you check and
uncheck items in the Layer Properties dialog. Generally, it operates on
a “positive logic” principle: if something is checked for any of a
shape’s layers, that attribute takes hold. So if a shape belongs to two
layers, and one of them is locked, the shape is locked. To hide the
shape, you have to uncheck both layers’ visibility because a positive
value for either layer will result in a visible shape. I generally find
it easier and less confusing to limit my shapes to one layer as much as
possible.
The
exception to the previous point is layer coloring. If a shape belongs
to multiple layers and you want to color it via layers, all layer boxes
need to be colored and assigned the same color. For this reason, I find that multiple layers and layer coloring do not mix well.
If a shape is on a nonvisible layer, but the layer is set to print, the shape will
print, even though it is invisible in Visio. This can sometimes come as
a surprise. If you are a heavy layers user, get in the habit of
checking Print Preview before you print.
Many
of the shapes associated with the Office Layout template are assigned
to multiple layers. For instance, the Door shape is assigned to
“Building Envelope” and “Door,” the Wall shape is assigned to “Building
Envelope” and “Wall,” and the Oblong dining table is assigned to
“Movable Furnishings” and “Furniture.”
This
is great if you want to select shapes by varying degrees of
specificity. You can select all doors and walls by selecting shapes on
the “Building Envelope” layer, or just get the doors by selecting shapes
on the “Door” layer. Cool!
However,
if you want to hide shapes on these layers, you have to uncheck Visible
for two layers in each case. Assigning shapes to multiple layers has
its pluses and minuses.
Getting
to the layer dialogs via the Ribbon can become tedious if you do it
frequently. To make it easier, customize the Ribbon or Quick Access
Toolbar by adding a control called “Layer,” which you’ll see if you show
All Commands in the customization dialogs. The Layer control presents a
drop-down list of existing layers and lets you assign layers to
selected shapes much more quickly.
