Whereas transitions determine
how a slide (as a whole) enters the screen, animations determine what
happens to the slide's content after that point. You might animate a
bulleted list by having each bullet point fade in one-by-one, for
example, or you might make a picture gradually grow or shrink to
emphasize it. The effects you can create are limited only by your
imagination.
Animation gives you full
control over how the objects on your slides appear, move, and disappear.
You can not only choose from the full range of animation effects for
each object, but you can also specify in what order the objects appear
and what sound is associated with their appearance.
1. Animation: A First Look
The Animations tab provides many settings and shortcuts for creating animation events. An event
is an animation occurrence, such as an object entering or exiting the
slide. An event can also consist of an object on the slide moving around
in some way (spinning, growing, changing color, and so on).
Each animation event appears as a
separate entry in the Animation pane. You can display or hide the
Animation pane by choosing Animations => Animation Pane at any time.
When you animate bulleted
lists and certain other types of text groupings, the associated events
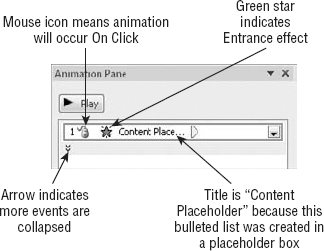
may be collapsed or expanded in the Animation pane. For example, in Figure 1, an animated bulleted list's events are collapsed.
Notice the following in Figure 1:
The event has a mouse icon to its left. That indicates that the animation is set to occur On Click.
It
has a green star on it. Green means entrance; this is an entrance
effect. (Yellow means emphasis, and red means exit effect.) A line
instead of a star means it is a motion path .
It has a double down-pointing arrow below it. That indicates that there are collapsed animation events beneath it.
|
To assign meaningful names to slide objects so it's easier to tell what you are working with when animating, choose Home => Select => Selection Pane. Then in that pane, you can edit each object's name.
|
|
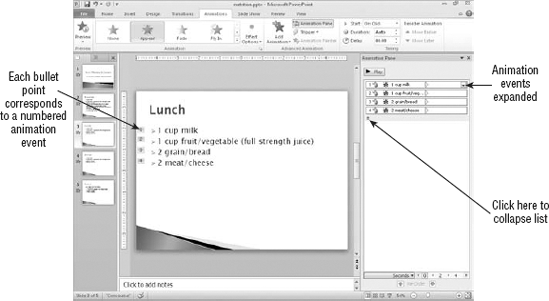
In Figure 2,
the events are expanded. To expand or collapse a group of events, click
the double up-pointing or down-pointing arrow. Notice the following in Figure 18-6:
Each event has a mouse icon to its left. That indicates that each one requires a separate mouse click to activate.
Each
bulleted list item on the slide has a number next to it that
corresponds to one of the numbered animation events in the Animation
pane.
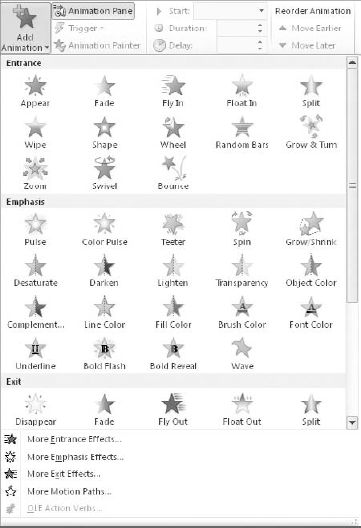
2. Choosing an Animation Effect
There are four categories of custom animation effects. Each effect has a specific purpose, as well as a different icon color:
Entrance (green):
The item's appearance on the slide is animated. Either it does not
appear right away when the rest of the slide appears, or it appears in
some unusual way (such as flying or fading), or both.
Emphasis (yellow): The item is already on the slide, and is modified in some way. For example, it may shrink, grow, wiggle, or change color.
Exit (red):
The item disappears from the slide before the slide itself disappears,
and you can specify that it does so in some unusual way.
Motion Paths (gray): The item moves on the slide according to a preset path.
Within each of these broad
categories are a multitude of animations. Although the appearance of the
icons may vary, the colors (on the menus from which you choose them,
and on the effects listed in the Animation pane) always match the
category.
Different effect
categories have different choices. For example, the Emphasis category,
in addition to providing movement-based effects, also has effects that
change the color, background, or other attributes of the object.
You can choose animation effects in any of these ways (all from the Animations tab) after selecting the object to be animated:
Click one of the animation samples in the Animations group.
Click the Add Animation button, and choose an effect from the menu that appears.
Click
the down arrow to open the gallery in the Animations group, and choose
an effect from the gallery that appears. (This menu is identical to the
one provided by the Add Animation button.) See Figure 3.
Click
the Add Animation button and then choose one of the "More" commands at
the bottom, depending on the type of animation you want. For example,
you might want More Entrance Effects. This opens a dialog box with a
full listing of the effects of that type as shown in Figure 4.
NOTE
Use the Animation
Gallery to change an existing animation, or to apply animation to an
object that is not already animated. Add Animation can be used to add
more animation to an object that is already animated, as well as to
animate objects that are not already animated.
3. Changing an Effect's Direction
After applying an animation, you can control its options with the Animations =>
Effect Options menu. The options that appear there depend on the effect
you have chosen. Some effects have a direction for entrance or exit,
for example.
