The Apple Macintosh is arguably the
computer of choice in the music, graphic arts, design, and publishing
worlds. Apple has even moved to the Intel processor platform, and you
can run Windows on a Mac, if you want to. But if you’re a Mac fan, you
probably don’t want to.
Although Macs used to live pretty much in a world
apart, it’s common now for both Macs and Windows computers to need to
coexist on the same network. However, Macs normally use a proprietary
file sharing system called AppleTalk File Protocol (AFP), while Windows
computers use a protocol called Server Message Block (SMB).
To link Macs and PCs on a network, either the
Macs must learn to “speak” SMB or the Windows computers must speak AFP.
Both solutions are possible. On a corporate network based on Windows
Server, your network administrator can install a component called
Services for Macintosh (SFM), which speaks AFP to make Windows-based
resources visible to Macs, and resources shared by Macs visible to
Windows users.
Microsoft appears to have lost interest in
providing support for Mac users in the home and small office.
Fortunately, Apple has stepped up and provided Windows-compatible
networking support as a standard part of OS X. You can also add Windows
networking support to older Mac OS computers. We
cover these options in the next several sections. First, though, let’s
talk about other issues that come up when Windows and Macs need to work
together.
Compatibility Issues
If you share files between Macs and Windows
computers on your network, there are some compatibility issues that you
should be aware of.
Resource Data Issues
The first issue arises because Mac files actually consist of two separate parts, called forks:
The data fork, which contains data, document text, program code, and so on
The
resource fork, which in applications contains language-specific strings
and dialog box layouts for programs, and in documents contains the
association information that links a document to the application that
created it
The two parts can be read and written to
completely independently. It’s as if each Mac file is composed of two
bundled but separate files.
Windows also supports this concept. On Windows, the separate parts are called streams
rather than forks. But, for reasons unknown, they’re not used for Mac
file sharing. When a Mac file is copied to a Windows shared folder, the
resource fork data is stored in a separate hidden file. If the Mac file
is named special.doc, the resource data is put into a file named ._special.doc. It’s invisible unless you enable the display of hidden files in Windows Explorer.
The problem is that if you move, edit, or
rename the main document or application file in Windows, the resource
file might be left behind or end up with the wrong name. Then, on the
Mac side, the Mac will no longer know what application to use to open
the document, or, in the case of an application program, the application
will not run. Thus, it’s best not to store Mac applications on Windows
shares if they will be renamed or moved.
After
a Windows user edits a shared file and a Mac user tries to open the
file, the Mac Finder may say it can’t find the application required to
open the document. What happened is that the file’s resource fork was
stripped out when the file was edited in Windows, so the file’s Type and
Creator codes are missing. The Mac user should drag and drop the file
onto the application’s icon or manually locate the application, then
resave the file. This will restore the association for future edits. The
Type and Creator codes can also be set using a Mac resource editor.
However, resource editing is tricky and best not done unless it’s an
emergency. Type and Creator codes are case sensitive. MSWD is not the same as MsWd or mswd. Case can often cause confusion if you must restore the codes after they were stripped on a trip through Windows or DOS. |
|
Filename Compatibility Issues
Mac filenames can have up to 255 characters and can contain any character except the colon (:).
Windows permits filenames up to 256 characters in length but has a longer list of unacceptable characters: the colon (:), backslash (\), forward slash (/), question mark (?), asterisk (*), quotation mark ("), greater-than symbol (>), less-than symbol (<), and pipe symbol (|).
Therefore, for files that will be shared, it’s best to avoid all of these characters when you name files on your Mac.
Multiple-Use Issues
Some Mac applications don’t properly install
themselves when they’re installed into a Windows shared folder. An error
occurs when more than one user tries to run the application at the same
time.
Application Concurrency Issues
When a Mac application is installed on a shared folder stored on a Windows computer, an “Unable to Open File” error occurs on Macs when more than one Mac user attempts to run the application concurrently.
Some
Mac programs fail to open their application executable files in the
proper file sharing mode. You can patch the problem by using a resource
editor program on the Mac:
1. | Obtain a copy of ResEdit. In the past we recommended that you download it from ResExcellence (www.resexcellence.com),
which was a terrific resource (pun intended) for all things resource
related. As of this writing, the site is not active, but we hope that
they get their act together to get it back on the air. For novice users,
a better resource editor program is File Buddy, from SkyTag Software (www.skytag.com).
| 2. | Start ResEdit or File Buddy. Select File, Get Info. In the dialog box that appears, you can select the application.
| 3. | Put a check in the Shared check box.
| 4. | If you’re using ResEdit, quit the application and choose Yes to save the changes. In File Buddy, click OK.
|
|
|
Working with Mac OS X
Mac
OS X comes with Windows-compatible networking support built in. This means that Macs
running OS X can connect directly to drives and folders shared by
Windows computers. You don’t even need to use the command line; the Mac
GUI manages the Samba client and server components for you.
Using Windows Shared Files on the Mac
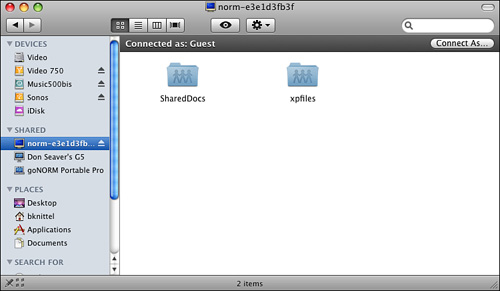
On OS X 10.5 and later editions, you can easily
browse folders shared by Windows computers from any Finder window. In
the left pane, under Shared, you can select a Windows computer from the
list of detected computers, and then browse into its shared folders, as
shown in Figure 1.
When you select a remote computer, OS X will attempt to connect to the
computer using your Mac account’s username and password so that it can
display a list of available shared folders. If this fails, you can use a
different account by clicking the Connect As button that will appear in
the upper-right corner of the Finder window.

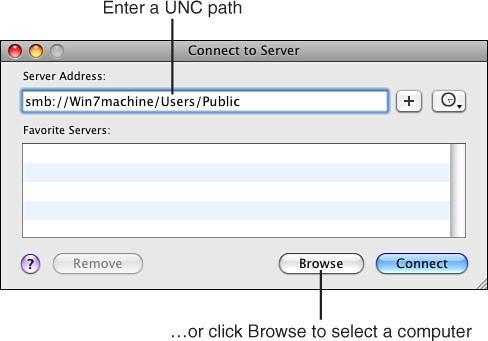
If you are using OS X 10.4 or earlier, or if
the Windows computer does not appear in the list of local computers that
the Finder displays under Shared, there is an alternative way to
connect. Select the Finder and choose Go, Connect to Server. The dialog
box shown in Figure 2 appears.

You can enter the UNC name of the shared folder directly, in the format smb://computername/sharename, where computername is the name of the Windows computer or its IP address, and sharename is the name of the shared folder. For example, the Public folder on a computer named MyVPC-U could be entered as smb://myvpc-u/public, or using the computer’s IP address, as something like smb://192.168.0.12/public. Click Connect to proceed.
You can click the + button to add the path to the Favorites list.
Click the Browse button to select from a list of detected Mac and Windows computers.
Whichever method you use, when you connect, a
login dialog box may appear. If you’re connecting to a Windows 7
computer on a home or small office network, the following applies:
If Password Protected Sharing is
enabled, or to access files that are shared only to specified user
accounts, choose Connect As Registered User. Enter a username and
password that is valid on the Windows 7 computer. (On a home or small
office workgroup network, you can ignore the Workgroup or Domain entry,
if it appears. Fill in just the Name and Password entries.) You will
connect with the file and folder access rights associated with this
account.
If you have disabled Password
Protected Sharing, select Connect As Guest; or, enter the username Guest
with no password. (Actually, you can enter any invalid
username, with any password.) This gives you the file and folder access
rights granted to Everyone. In most cases, this means that you will
have access to the Public folder but no other shared folders, unless the
person who shared the other folders explicitly granted rights to
Everyone.
If you are connecting to a Windows computer on a Windows domain network, enter a valid domain username and password.
When the Mac has made the network connection, the shared folder is displayed in a Finder window like any other folder.
To disconnect from the network share on OS X
10.5 or later, click the eject button next to the computer’s name under
Shared in the Finder window. On OS X 10.4, drag the shared folder
desktop icon to the trash, or locate it in the Finder and click the
Eject button.
Now, recall the point I made earlier about Mac files having two parts, or forks.
If you copy a file from a Mac to a shared Windows folder, Windows might
create an extra hidden file to contain the resource information for the
file. The resource file’s name will consist of a period and an
underscore followed by the name of the main file. Windows users need to
move and rename these files together; otherwise, Mac users will receive
errors when they try to access the files.
Note
When a Mac user opens a Window share, the Finder creates a file named .DS_Store and sometimes also one named ._.DS_Store. These hold Mac desktop information. Windows users should ignore these files, just as Mac users should ignore the file desktop.ini. |
Using Windows Printers on the Mac
If you are using a Mac, to use a printer that is shared by a Windows computer, follow these steps:
1. | On
the Windows computer, when you share the printer, be sure to use a
share name that’s no more than 12 letters long. If you use a longer
name, the printer might not appear in the list of printers on the Mac.
|
2. | On the Mac, open System Preferences and select Print & Fax.
|
3. | If the page is locked, click the lock icon and enter an administrator’s credentials.
Click the + button to add a printer.
On OS X 10.4, at the bottom of the Printer Browser dialog box, click More Printers.
|
4. | At
the top of the next Printer Browser dialog box, select Windows (on OS X
10.5 and later) or Windows Printing (on OS X 10.4), and underneath,
select the appropriate Windows workgroup name. In the computer list,
choose the name of the computer that is sharing the printer you want to
use.
|
5. | In
the Connect To dialog box, enter a username and password that is valid
on the Windows computer. If you turned off Password Protected Sharing on
Windows 7, you can select Connect As: Guest, or enter username Guest
with no password.
|
6. | Select
the desired shared printer in the list. Open the Print Using list (on
OS X 10.5 and later), or the Printer Model list (on OS X 10.4), and
select the correct printer manufacturer name and model. Finally, click
Add.
|
Note
In our testing we found
that there could be delays of up to a couple of minutes between printing
a document from the Mac and having the Windows printer start up. |
This adds the Windows printer to the list of available printers on your Mac.
Using Mac Shared Files on Windows
Mac OS X computers can share folders with
Windows computers over the network, thanks to the Samba file server
software that is installed as part of OS X.
To enable Windows-compatible file sharing on OS X 10.5 (Leopard), follow these steps:
1. | Open System Preferences and select Sharing. If the panel is locked, click the lock icon and enter an administrative password.
|
2. | If
File Sharing is not checked, check it. Select folders to share, and for
each selected folder, choose the user accounts that can access the
share. This much is standard for file sharing on the Macs. The next step
lets you use these same folders from Windows computers.
|
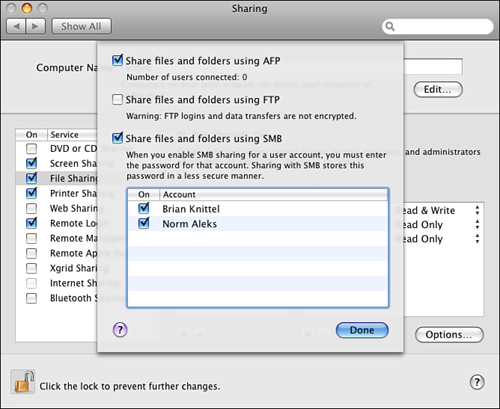
3. | Click Options, and check Share Files and Folders Using SMB, as shown in Figure 3.

|
Tip
To save yourself a world
of pain, create user accounts on your Mac and Windows computers using
the same account names (short names, in Mac parlance) and passwords on
both types of computers. From the Windows side, you cannot use or even
see a list of the folders or printers shared by the Mac unless you are
using a Windows account that matches up with one on the Mac and that has
been enabled on the Sharing page. |
To enable Windows-compatible file sharing on OS X 10.4 (Tiger), follow these steps:
1. | Open System Preferences and select Sharing. Check Windows Sharing.
|
2. | Click
the Accounts button and check the names of the accounts that you want
to permit to be used for Windows Sharing connections.
|
3. | Click Show All and select Accounts.
|
On Windows, you can use Mac shared folders just
as you use folders shared from any Windows computer. Macs appear in the
list of available computers in the Network folder, and you can open the
shared folders from those icons.
Note
When you open the Network folder icon for a Mac running OS X 10.4, or use the net view
command to view the items shared by a Mac running OS X 10.4, you will
see only shared folders and printers that you have permission to use. |
You can also specify a Mac shared folder
directly using its UNC pathname. By default, OS X 10.5 shares users’
Public folders, with share names based on each user’s full name. For
example, the path to my Public folder might be \\computername\brian knittel's public folder.
OS X 10.4 shares users’ entire home directories by default, using each
users’s short name, so on OS 10.4 my home directory’s UNC path might be \\computername\bknittel.
Using Mac Shared Printers on Windows
After
enabling Windows Sharing in System Preferences, you can share your
Mac’s printer(s) with Windows users by selecting Show All and then
clicking Print and Fax. View the Sharing tab, click Share These Printers
with Other Computers, and check the printers that you want to make
available to others.
To use a printer shared from a Mac on Windows, follow these steps:
1. | Set up accounts on both the Mac and on Windows, using the same account name and the same password on both computers.
|
2. | On the Mac, enable SMB File Sharing on the Mac . Then, enable Printer Sharing on the System
Preferences Sharing page. Select at least the printer that you want to
use from Windows.
|
3. | Follow the strange procedure that I describe next.
|
The strange bit is that you must trick Windows
into using a PostScript printer driver, no matter what type of printer
the Mac is really sharing. The Mac accepts only PostScript printer codes
and converts the PostScript to the appropriate codes for its installed
printer.
To connect to the Mac printer from Windows, follow these steps:
1. | Click Start, Devices and Printers, Add a Printer, Add a Network, Wireless, or Bluetooth Printer.
|
2. | Wait
for the desired Mac printer to appear in the list. Double-click it. If
requirements 1 or 2 from the previous list aren’t met, the printer won’t
appear.
It also won’t appear if the Mac is on a different subnet than
the Windows computer. In this case, click The Printer That I Want Isn’t
Listed, check Select a Shared Printer by Name, and then enter the
printer share name as \\ipaddress\sharename, where ipaddress is the IP address of the Mac and sharename is the name of the Mac printer.
|
3. | When the message “The server for the printer does not have the correct printer driver installed” appears, click OK.
|
4. | In
the Manufacturer list, select HP. In the Printers list, if the Mac
printer is a color printer, select HP Color LaserJet 2800 Series PS. If
the Mac printer is a black and white printer, select HP LaserJet 2300
Series PS. Then click OK. |