Task Scheduler
is a utility in Windows 7 that allows you to schedule actions to occur
at specified intervals. Windows 7 Task Scheduler can be accessed by
typing Task Scheduler into the Windows 7 search box. This launches the application, as shown in Figure 1.
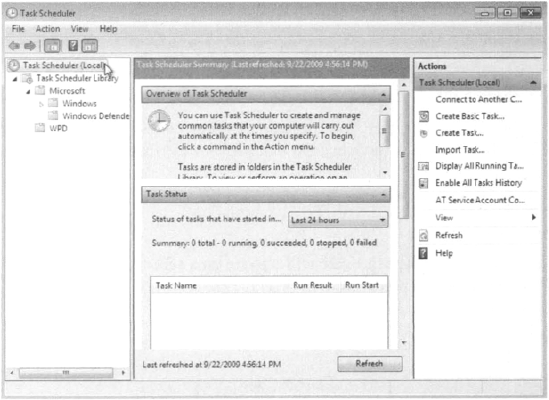
After Task Scheduler starts, you can create a scheduled task.
1. Creating a Scheduled Task
You can create a basic task
by selecting the Create Basic Task menu item in the Actions pane on the
right side of Task Scheduler, as shown in Figure 2.
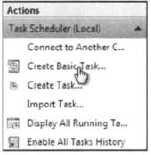
By creating a basic task, a
Task Manager Wizard lets you set any of your Windows programs to run
automatically at a specific time and at a set interval, such as daily,
weekly, or monthly. For example, you might schedule an application to
run daily at 2 a.m. Actions can be performed at the following events
(called triggers) available in the Task Manager Wizard:
Daily, or once every number of days (such as once every three days)
Weekly, or on certain days of the week, or every number of weeks (such as every four weeks on Monday)
Monthly, or on selected days of the month, or only on selected months
One time only
When the computer starts
When you log on
When a specific event is logged
If you've chosen a time
trigger, you configure the time/date when the action will occur. When a
trigger is activated, Task Scheduler can perform the following actions:
Start a program
Send an email
Display a message
Perform the following steps in Exercise 1 to set up a scheduled task to launch Windows 7 Calculator at a predetermined weekly time.
Click Start and type Task Scheduler into the Windows 7 search box, or choose Start => Control Panel => System and Security =>- Administrative Tools and then double-click Task Scheduler. In the Actions pane of the Task Scheduler window, select Create Basic Task. The Create Basic Task Wizard appears; type Monday s calculator as a name for your task and a description, and then click Next. Select how often you want the action to occur. For this example, select Weekly and click Next to continue. Specify that the action should occur every Monday at 9 a.m. and click Next. Select the St3rt A Program radio button and click Next. Browse for the Calculator application at C:\Windows\system32\calc.exe. Click Next. The final dialog box shows your selections for the scheduled task; click Finish.
|
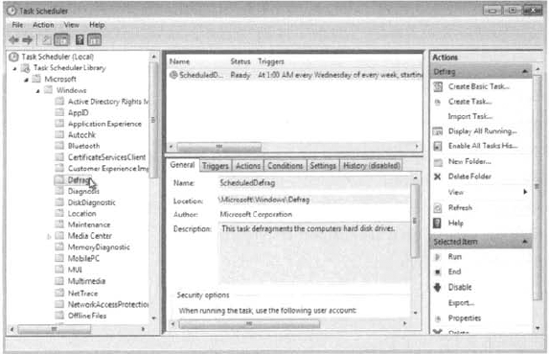
Select the Windows folder in
the left pane and then select the arrow to expand the folder's contents
and reveal a complete set of preconfigured tasks. Figure 3
shows the Windows folder expanded and the Defrag task selected. You can
view the Defrag task settings, edit the task, and even run the Defrag
task manually if you desire.
Task Scheduler also enables
you to run tasks manually by selecting the task and clicking Run in the
right pane. Select a task and click Disable to disable a task.
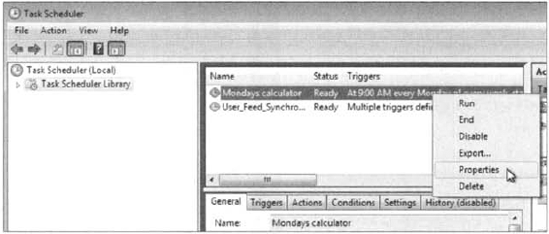
2. Managing Scheduled Task Properties
You can manage a scheduled
task through its Properties dialog box. To access this dialog box,
right-click the task you want to manage and choose Properties from the
context menu, as shown in Figure 4.
The scheduled task's Properties dialog box has six tabs for configuration, as follows:
General
Triggers
Actions
Conditions
Settings
History
Each options tab is described here:
General Tab On the General tab, you can configure the following options:
The description of the task
The username or group to be used to run the specified task
Whether the task is run when the user is logged off
Whether the task is hidden
Triggers Tab
The Triggers tab shows the schedule configured for the task. You can
click Edit to edit the trigger, which brings up the Edit Trigger dialog
box. You can also click New to create a new trigger or click Delete to
delete an existing trigger.
Actions Tab
The Actions tab shows the action that is configured for the task. You
can click Edit to edit the action, which brings up the Edit Action
dialog box. You can also click New to create a new action or click
Delete to delete an existing action.
Conditions Tab The Conditions tab shows the conditions associated with the task. The
options in the Idle section are useful if the computer must be idle
when the task is run. You can specify how long the computer must be idle
before the task begins and whether the task should be stopped if the
computer ceases to be idle. The options in the Power section are
applicable when the computer on which the task runs is battery powered.
You can specify that the task should not start if the computer is
running from batteries and choose to stop the task if battery mode
begins. You can also select whether to wake the computer in order to run
the task. The option in the Network section defines whether the task
starts when a particular network connection is available.
Settings Tab The Settings tab provides settings that affect the task's behavior as follows:
Whether the task can be run on demand
Whether the task should be restarted if it is missed
How often the task should be restarted if it fails
When to stop the task if it runs a long time
Whether you can force the task to stop
When the task should be deleted
What actions should occur if the task is already running
History Tab
The History tab shows historical information regarding the task,
including the task's start time, stop time, and whether the task
completed successfully. Once set up, the scheduled task should commence
at the appropriate time. If not, you might need to troubleshoot it.
3. Troubleshooting Scheduled Tasks
If you are trying to use
Task Scheduler and the tasks are not properly being executed, one of
the following troubleshooting options might resolve the problem:
If a scheduled task
does not run as expected, right-click the task and select Properties. In
the Task Scheduler Library, ensure that the task status is Ready. In
the task's Properties page, verify that the schedule has been defined on
the Triggers tab.
If
the scheduled task is a command-line utility, make sure that you have
properly defined the command-line utility, including any options that
are required for the utility to run properly.
Verify that the user who is configured to run the scheduled task has the necessary permissions for the task to be run.
Within the Task Status section, check the task status to see when the task last ran successfully, if ever.
Verify that the Task Scheduler service has been enabled on the computer if no tasks can be run on the computer.
Task Scheduler is a great
utility that you can use to run scheduled maintenance applications and
proactively maintain a Windows 7 system. If issues occur within Windows
7, you will use a different utility, called Event Viewer, to view these
events.
