The basic techniques for arranging data in folders
have changed in subtle but significant ways in Windows 7. This version
of Windows is far more reliable than its predecessors at recognizing the
settings you've applied to a folder and retaining those settings so
that they remain in place the next time you visit that folder.
You can adjust the display of any individual folder's contents by using the Change Your View menu, which appears on the right side of the toolbar throughout Windows Explorer. As Figure 1
shows, this menu is significantly changed from its Windows XP
predecessor and also offers one noteworthy change over its equivalent in
Windows Vista.
The choice at the bottom
of the list, Content, is new in Windows 7. It's intended primarily for
use with search results, and in the case of documents, it shows a fairly
lengthy snippet of text with the matching search terms highlighted.
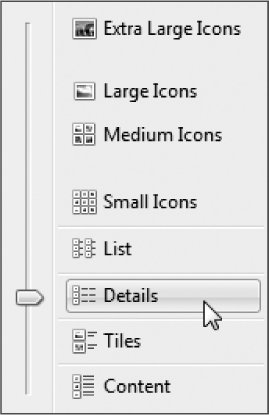
The three view options
above Content—Tiles, Details, and List—offer icons and text listings of a
fixed size and layout. The choices at the top of the menu allow you to
display the folder's contents as icons of varying sizes. In Windows 7, as in Windows Vista, this menu includes a slider that allows you to move smoothly between icon
sizes instead of being restricted to the predefined sizes. At medium
sizes and above, the operating system displays thumbnails—previews of
file or folder contents—if it finds something to display. This effect is
most noticeable in folders dedicated to digital media, where you'll
find cover art for albums and small but recognizable images of digital
photos.
The range of options for the various icon views is not infinite. Although there are four dis crete choices available on the Change
Your View menu, ranging from Small to Extra Large, the actual number of
sizes is 76. You can cycle smoothly through all 76 sizes by choosing
Small Icons from the View menu and then holding down the Control key as
you use the wheel on your mouse (or the Up Arrow key) to step upward
through the list. With each step, you'll see the icons shift to a new,
larger size (although at some of the smaller sizes the change is barely
perceptible).
Your other option to customize the display of objects in a file folder is to adjust the headings that are visible for that folder. In Windows 7, these headings
are visible only in Details view, although you can access them using a
right-click shortcut menu in other views. As we'll see in the next
section, these headings are key to sorting and grouping a folder's
contents and to arranging those contents.
Initially, all folders intended for the storage of user data (including those you create) are assigned one of five folder templates. These templates define the default headings that Windows Explorer considers appropriate for the content type. These headings are used atop columns
in the Details view and are available on the Sort By menu in all other
views. The logic is straightforward: you'll probably want to sort a
folder full of MP3 tracks by track number, but that column would be
superfluous in a folder full of Microsoft Office Word documents.
And the Date Taken column is extremely useful for filtering digital
photos but isn't much use with any other kinds of data.
Table 1
lists the default column headings available in each of these five
templates. It also lists additional headings that you can add easily by
right-clicking any heading in the Details view.
Table 1. Standard Folder templates in Windows 7
| Template | Default Headings | Additional Headings |
|---|
| General Items | Name, Date Modified, Type, Size | Date Created, Authors, Tags, Title |
| Documents | Name, Date Modified, Type, Size | Date Created, Authors, Categories, Tags, Title |
| Pictures | Name, Date, Tags, Size, Rating (in libraries) and Name, Date, Type, Size, Tags (in folders) | Date Created, Date Taken, Dimensions, Rating |
| Music | Name, [Track] #, Contributing Artists, Album | Type, Size, Date Created, Date Modified, Album Artist, Bit Rate, Genre, Length, Protected, Rating, Year |
| Videos | Name, Date, Type, Size, Length | Date Created, Date Modified, Media Created, Dimensions |
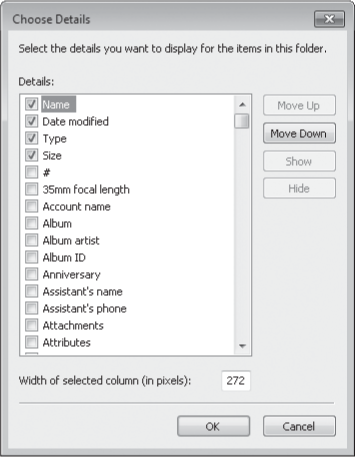
If the set of
default headings and additional headings isn't enough, you can choose
headings for other properties from an enormously long list in the Choose
Details dialog box. To display this dialog box, switch to Details view,
right-click the currently visible column headings and choose More from
the bottom of the menu. If column headings aren't visible, tap the Alt
key, choose View from the menu bar, and then click Choose Details. Using
this dialog box, shown in Figure 2,
you can show or hide headings by selecting or clearing check boxes; you
can also use the Move Up and Move Down buttons to change the order in
which headings appear.
Although the Choose
Details dialog box includes a Width Of Selected Column field, you'll
probably find it easier to make size adjustments directly, with the
mouse. Drag the divider between columns to adjust a column's width.
|
Not sure what folder
"type" you're in? Right-click a blank space in the folder and choose
Customize This Folder from the shortcut menu, or tap the Alt key to
reveal the menu bar, and then choose View, Customize This Folder. (If
this option isn't available, you're viewing a system folder whose
template can't be changed.) On the Customize tab of the properties
dialog box for the selected folder, look at the selection in the
Optimize This Folder For drop-down list, which shows the folder type
that's currently in effect.
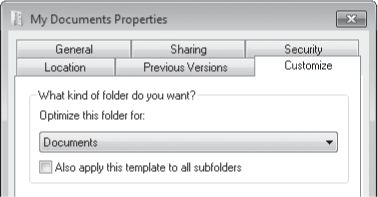
You can choose a different
value from this list to change the template for the current folder. By
default, your choice here applies only to the current folder; select
Also Apply This Template To All Subfolders if you want your changes to
ripple through to all child folders You cannot, however, create a new
template or rename an existing one.
|
|
The view controls
found in Windows Explorer are used in some parts of Control Panel and
Action Center as well. Many of the techniques for sorting, filtering, and grouping information that work in Windows Explorer work just as well in these Control Panel windows. Here are some examples:
The list of installed programs under the Programs
And Features headings is sorted alphabetically by default. This list is
much easier to manage if you right-click in any empty space and group
by the Publisher heading. You can also right-click the headings and
click More to add headings, including the version number. The full Problem
Reports list (from Action Center, click View Reliability History under
the Maintenance heading, and then click View All Problem Reports from
the bottom of the Reliability Monitor window) allows you to group
problem reports by source, summary, date, or status. Grouping by source
allows you to zero in on a particular issue and see how often it has
occurred over time; grouping by status allows you to see which reports
might require sending more information to Microsoft. Right-click any
heading and choose from the Group menu to change the display. The list of partnerships and sync results in the Sync
Center is useful in its default view, but if you use this feature
extensively you'll want to switch to Details view and check the list of
available headings. In particular, the Progress, Conflicts And Errors,
and Last Sync headings can provide valuable information at a glance.
|
1. Sorting, Filtering, and Grouping
1.1. Sorting, Filtering, and Grouping
Regardless of the
view settings you've chosen for a folder, you can adjust the way its
contents are displayed at any time by changing the sort order, filtering
the contents to include only selected items based on one or more
properties, and grouping and arranging the contents by a particular
heading. These arrangements are not saved as part of the view for a
folder, but the result can be dragged to the Favorites group in the
navigation pane and saved for recall.
In any view, these options
are available by right-clicking anywhere in the contents pane and
choosing a Sort By or Group By option. In most cases, however, these
actions are easier to accomplish using the column headings directly by
switching to Details view, which is also the preferred way to filter.
Sorting a Folder's Contents
To sort a folder in Details view, click the heading that you want to
use as a sort key. For example, to sort by Date Modified, click the Date
Modified heading. Click again on the same heading to reverse the sort
order. The current sort order is indicated by a faint blue highlight on
the column heading, with an up or down arrow above the heading name to
indicate whether the sort is in ascending or descending order.
In all other views,
right-click any empty space in the contents pane and select a value from
the Sort By menu. A bullet next to Ascending or Descending indicates
the current sort order; choose the other option to reverse the sort
order.
Filtering Folder Contents In Details view only, you can use headings to filter the contents
of a folder. If you rest your mouse pointer on a heading, a drop-down
arrow appears at the right. Clicking the arrow reveals a set of filter
check boxes appropriate for that heading; in some cases (the Type
heading, for example, as shown in Figure 3), the filter list is built on the fly from the contents of the current file list.
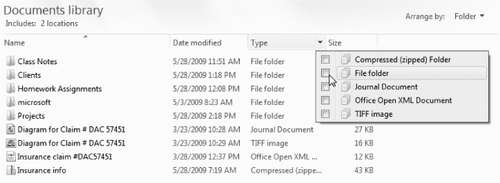
Select any check box to
add that item to the filter list; clear the check box for an item to
remove it from the filter. After you filter the list in Details view,
you can switch to any other view and the filter will persist. (Look in
the address bar to see the specific filter applied, and click the
previous breadcrumb to remove all filtering without switching back to
Details view.)
|
If you click a date
heading, the filter options display a date navigator like the one shown
below, with common date groupings available at the bottom of the list.
You can also click Select A Date Or Date Range and use the calendar to
filter the file list that way.
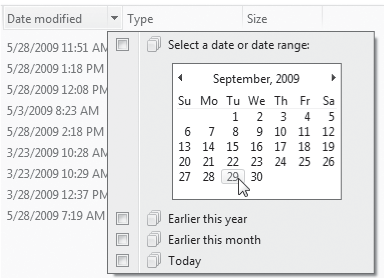
The date navigator is
much more powerful than it looks at first glance. Use the calendar to
zoom in or out and narrow or expand your view of the contents
of a folder or a search. Initially, the calendar shows the current
month, with today's date highlighted. Click the month heading to zoom
out to a display showing the current year as a heading with the current
month highlighted. You can then drag or hold down Ctrl and click to
select multiple months, as shown here:

Click the year to zoom
out again to show the current decade. Click once more to show the
current century. In any calendar view, you can use the arrows to the
left and right of the column heading to move through the calendar a
month, year, decade, or century at a time. To zoom back in, click any
month, year, decade, or century on the calendar control. This technique
is especially valuable with folders or search results containing
hundreds or thousands of files and folders.
|
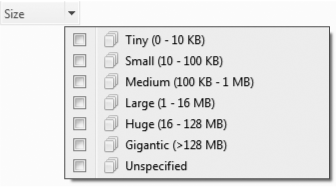
If you filter by Size,
you get a set of choices based on the file sizes that Windows deems
appropriate, given the current folder contents, as shown here:
A filter can use
multiple check boxes and multiple headings. So, for example, you could
filter a picture folder based on ratings as well as a "date taken"
value, resulting in a file list like this one:
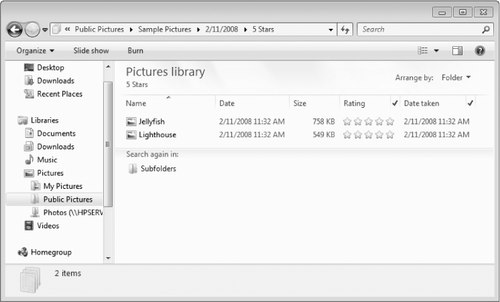
When a folder is filtered, check marks appear to the right of headings used for filtering
(see the Rating and Date Taken headings in the preceding illustration).
The values on which you have filtered (for example, the specific tags)
appear in the address bar.
When you select
multiple check boxes in the same heading, Windows Explorer displays
items that match any of the selected check boxes. When you select
filtering check boxes from two or more separate headings, however,
Windows Explorer displays only items that satisfy the criteria applied
to each heading (in Boolean terms, it uses the conjunction AND between
the headings).
|
Pressing Ctrl+N in
Windows Explorer opens a new window on the same folder. Ctrl+W closes
the current window. (These keyboard shortcuts function the same way in
Internet Explorer.) The following additional keyboard shortcuts work in
Windows Explorer:
Alt+Up Arrow—Go up one level. Alt+Right Arrow—Go forward. Alt+Left Arrow—Go back. Alt+D—Move the focus to the address bar, and select the current path. F4—Move the insertion point to the address bar, and display the contents of the drop-down list of previous addresses. Alt+Enter—Show properties of the selected file. Shift+F10—Open the shortcut menu for the current selection (which is the same as a right-click). F6—Cycle through the following elements: address bar, toolbar, navigation pane, file list, column headings (available in Details view only). Tab—Cycle through the following elements: address bar, search box, toolbar, navigation pane, file list, column headings (available in Details view only). F11—Toggle full-screen mode. Ctrl+Shift+N—Create a new subfolder in the current folder. Ctrl+Shift+E—Expands navigation pane to the current folder.
|
Filtering
a folder actually kicks off a specialized search, with the current
folder designated as the search scope. If the filtered folder contains
subfolders, you will see at the bottom of the list of results an
invitation to Search Again In Subfolders, which reruns the search in
those locations (and discards any results from the current folder).
Grouping Folder Contents If sorting and filtering don't give you enough ways to organize or locate files, try grouping. Grouping generates a display comparable to the one shown in Figure 4.
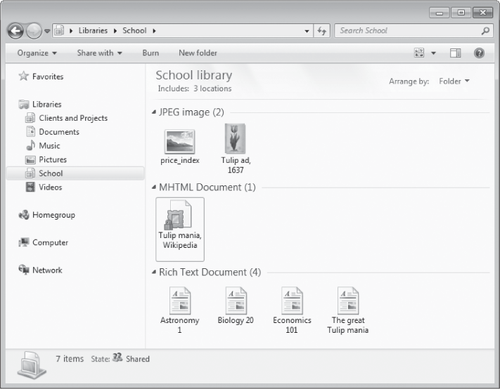
When you group, Windows Explorer collects all the items that have some common property, displaying each group under a heading that can
be expanded or collapsed in most views. List view offers a particularly
interesting perspective, with each group of results appearing under a
column heading. The grouped arrangement is saved as part of the custom
view settings for that folder; the next time you open the folder, it
will still be grouped.
To return a
grouped folder to its ungrouped state, right-click in the contents pane
(or tap Alt and then choose View from the menu bar). Then choose (None)
from the Group By menu.
