Before you can do anything with the sensors on a system, you need to know which sensors are installed. Fortunately, the SensorManager
class makes getting the list relatively easy. The Get Sensors example
described in the following sections shows how to use this class to query
the sensors on a system.
NOTE
The physical presence of a
sensor on your system doesn't mean that Windows will recognize it. As
with any piece of hardware, your sensor must come with an accompanying
driver. Unfortunately, many vendors haven't released a version of their
driver that works with the Windows 7 sensor functionality. For example,
the Dell D series Latitude comes with a light sensor, but there isn't a
Windows 7 driver for it, and therefore Windows 7 doesn't recognize the
light sensor.
1. Configuring the Get Sensors Example
This example begins with a Windows Forms application. You'll need to add a List button (btnList) to obtain a list of the sensors, and a list box (lstOutput) to output the results of the query. In addition, you'll need to add references to Microsoft.WindowsAPICodePack.DLL, Microsoft.WindowsAPICodePack.Shell.DLL, and Microsoft.WindowsAPICodePack.Sensors.DLL. You must also provide the following using statements:
using Microsoft.WindowsAPICodePack.Sensors;
using Microsoft.WindowsAPICodePack.Shell.PropertySystem;
2. Writing the Get Sensors Code
You can obtain a
considerable amount of information about the sensors on your system.
However, because the sensors vary quite a bit, writing generic code can
be difficult. There are a number of hurdles to overcome, and sometimes
you need to use generic types, such as Object,
that don't provide the best information while writing the code. Of
course, there are times when you'll need to take the generic approach
because you need to inventory the devices that a system can access. Listing 1 shows one approach to handling this situation.
Example 1. Displaying a list of installed sensors
private void btnList_Click(object sender, EventArgs e)
{
    // Define a variable to hold the sensor list.
    SensorList<Sensor> AllSensors;

    // The system will raise an error if there aren't
    // any sensors to query.
    try
    {
        // Obtain a list of all the sensors.
        AllSensors = SensorManager.GetAllSensors();
    }
    catch (SensorPlatformException SensorErr)
    {
        MessageBox.Show(SensorErr.Message,
            "Error Obtaining Sensors",
            MessageBoxButtons.OK,
            MessageBoxIcon.Error);
        return;
    }

    // Clear the previous entries.
    lstOutput.Items.Clear();

    // Display the total number of sensors.
    lstOutput.Items.Add("Number of Sensors: " + AllSensors.Count);

    // Display the sensor information.
    foreach (Sensor ThisSensor in AllSensors)
    {
        // Output common elements.
        lstOutput.Items.Add("Name: " + ThisSensor.FriendlyName);
        lstOutput.Items.Add("Category ID: " + ThisSensor.CategoryId);
        lstOutput.Items.Add("Type ID: " + ThisSensor.TypeId);
        lstOutput.Items.Add("Description: " + ThisSensor.Description);
        lstOutput.Items.Add("Device Path: " + ThisSensor.DevicePath);
        lstOutput.Items.Add("Manufacturer: "
            + ThisSensor.Manufacturer);
        lstOutput.Items.Add("Model: " + ThisSensor.Model);
lstOutput.Items.Add("Serial Number: "
            + ThisSensor.SerialNumber);
        lstOutput.Items.Add("Sensor State: " + ThisSensor.State);

        // Check the connection type.
        try
        {
            // The device may not have a physical connection, so
            // you must place this code in a try block.
            lstOutput.Items.Add("Connection Type: "
                + ThisSensor.ConnectionType);
        }
        catch
        {
            // The most common device lacking a connection is a software
            // device driver.
            lstOutput.Items.Add("Connection Type: Software Device");
        }

        // Determine whether the sensor provides a data report.
        if (ThisSensor.AutoUpdateDataReport)
        {
            // Output the common data.
            lstOutput.Items.Add("Automatic Data Update");
            lstOutput.Items.Add("\tMinimum Report Interval: " +
                ThisSensor.MinimumReportInterval);
            lstOutput.Items.Add("\tCurrent Report Interval: " +
                ThisSensor.ReportInterval);

            // Try updating the data.
            ThisSensor.TryUpdateData();

            // Process the data report if there is data available.
            try
            {
                lstOutput.Items.Add("\tData Report Source: " +
                    ThisSensor.DataReport.Source);
                lstOutput.Items.Add("\tData Report Timestamp: " +
                    ThisSensor.DataReport.TimeStamp);
                lstOutput.Items.Add("\tNumber of Report Values: " +
                    ThisSensor.DataReport.Values.Count);

                // Enumerate the values.
                foreach (Guid Key in ThisSensor.DataReport.Values.Keys)
                {
                    // Display the key.
                    lstOutput.Items.Add("\t\t" + Key);

                    // Obtain the values for the key.
                    IList<Object> ValueEntries;

                    if (ThisSensor.DataReport.Values.TryGetValue(
                        Key, out ValueEntries))
// Display the values associated with the key.
                    foreach (Object ValueEntry in ValueEntries)
                        lstOutput.Items.Add("\t\t\t" + ValueEntry);
                }
            }
            catch
            {
                lstOutput.Items.Add("\tNo Data Available");
            }
        }
        else
            lstOutput.Items.Add("No Automatic Data Update");

        // Get the sensor properties.
        IList<PropertyKey> SuppList = ThisSensor.GetSupportedProperties();

        // Display the sensor properties.
        lstOutput.Items.Add("Properties:");
        foreach (PropertyKey PropKey in SuppList)
        {
            try
            {
                // This call will error out on software devices in
                // most cases.
                object Property = ThisSensor.GetProperty(PropKey);

                // The actual output property type depends on the device.
                // You'll need to add special handling for each device type
                // you expect to see.
                lstOutput.Items.Add("\tKnown Property: " +
                    "Property ID: " + PropKey.PropertyId +
                    " Format ID: " + PropKey.FormatId);
            }
            catch
            {
                // Display the unknown property type information.
                lstOutput.Items.Add("\tUnknown Property: " +
                    "Property ID: " + PropKey.PropertyId +
                    " Format ID: " + PropKey.FormatId);
            }
        }

        // Add a space between items.
        lstOutput.Items.Add("");
    }
}
|
The application begins by retrieving a list of sensors on the system. You have to place the check within a try...catch block because the code will create a SensorPlatformException exception if there aren't any sensors installed on the system. The SensorManager.GetAllSensors()
method retrieves generic information about all the sensors on the
system.
The code begins displaying information by telling you how many sensors the system found using AllSensors.Count. This value will always be greater than 0 when the GetAllSensors()
method call succeeds. The number of sensors found on your system
depends in part on the number of Windows 7 device drivers you've
installed that provide sensor information. The AllSensors.Count
value is unlikely to reflect the actual number of sensors installed on
your system, since many hardware vendors haven't updated their drivers
to provide this information.
At this point, the code uses a foreach loop to begin processing each generic Sensor object in AllSensors.
Even though this is a generic object, you can still obtain considerable
information from it. The code begins by listing a number of elements
common to all sensors, such as the sensor name, description,
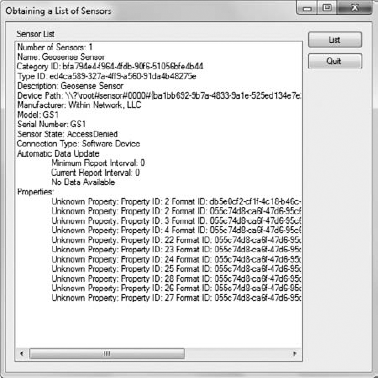
manufacturer, model, serial number, and so on. The State property tells you the status of the sensor. When a sensor is disabled, as shown in Figure 1, you're limited as to how much information the system will actually provide. In this case, the sensor simply outputs AccessDenied as its status to show that it has been disabled.
It's also possible to detect
the connection type. This is one of the first tricky pieces of data you
can obtain, because a sensor may not have a connection. The most common
reason for a lack of a connection is that the sensor is software-based
like the Geosense for Windows sensor. Trying to access the ConnectionType
property for a sensor that doesn't have a connection will raise an
exception that you must catch. In this case, the code doesn't perform a
lot of analysis; it simply assumes that the sensor is software-based.
The AutoUpdateDataReport
property tells you whether the sensor will automatically update its
data for you. When working with a generic sensor, you don't have many
options for interacting with the sensor. If the AutoUpdateDataReport is false, the best you can do is say that there isn't any data to process.
When the AutoUpdateDataReport property is true,
you can obtain some general information about how the sensor collects
data, such as the minimum allowable report interval and the current
report interval. Some sensors have to have a minimum report interval to
avoid data overruns, which result in lost data.
Because this is a generic
query of the sensor and not a specific interaction with it, you'll
probably want to see sample data, but you won't need specific data for
processing. The code calls ThisSensor.TryUpdateData()
to attempt to get a data update from the sensor. This call
automatically overwrites any existing data that the sensor might
possess, so you want to use this call carefully when you're actually
processing data.
If the sensor has data to
process, the code can retrieve the data source, the time that the data
was collected, and the number of values that the sensor can provide. A
call to any of these properties when there's no data present will cause
an exception that you must catch. In this case, the exception simply
indicates that there's no data to process.
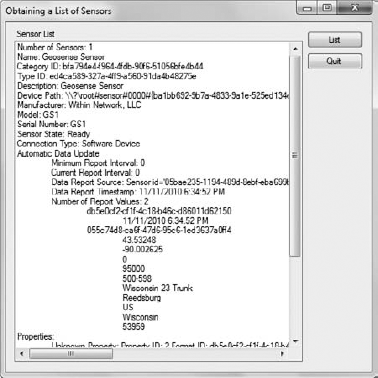
The DataReport property includes three sub-properties of interest. The Source property contains the source of the report information. The TimeStamp property tells you when the data was collected. The Values property is actually a collection of key/value pairs. The Key member is a Guid object that uniquely identifies a particular set of values. The Values member is an IList<Object> collection of values associated with the Key. For example, the Geospace for Windows sensor has a Key of {055c74d8-ca6f-47d6-95c6-1ed3637a0ff4} that represents the location information as shown in Figure 2. The associated Values
member contains a list of entries that define the location, including
longitude, latitude, city, state, and even ZIP code. However, you can't
access the Values member directly — doing so raises an exception.
Instead, the code uses the TryGetValue() method with the Key as the first argument and a buffer, ValueEntries, as the second argument. Notice that you must use the out keyword. The return from TryGetValue() is a Boolean that indicates success or failure. After the code obtains the values, it uses a foreach loop to display them.
In addition to the other
information you can obtain about sensors, each sensor has a list of
properties that it supports. The properties you obtain depend on the
sensor, and with a software sensor the properties are going to be an
unknown type for the most part unless you can get a matching list of
Globally Unique IDentifiers (GUIDs) from the vendor.
The example shows how to obtain a list of properties using the GetSupportedProperties() method. The output of this method is an IList<PropertyKey> object, SuppList. The code relies on a foreach loop to process SuppList. Each entry is a PropertyKey object, PropKey. The code next tries to determine the kind of property by calling GetProperty() with PropKey as the argument.
If there's a method to turn the PropKey
into a property value, the call succeeds. Otherwise, the code throws an
exception, and you must process it as an unknown property, as shown in
the example. Theoretically, even if the system can't find the PropKey, you should be able to provide custom processing of the property information using the vendor's documentation.
