Logo
programming4us
programming4us
programming4us
programming4us
Home
programming4us
XP
programming4us
Windows Vista
programming4us
Windows 7
programming4us
Windows Azure
programming4us
Windows Server
programming4us
Windows Phone
 
programming4us
Windows 7

Understanding the Windows 7 Deployment Process (part 4) - Using Windows System Image Manager

- Free product key for windows 10
- Free Product Key for Microsoft office 365
- Malwarebytes Premium 3.7.1 Serial Keys (LifeTime) 2019
9/19/2011 6:31:14 PM
4.1. Practice: Using Windows System Image Manager

Windows System Image Manager enables you to create distribution shares and answer files that help to automate the Windows 7 deployment process.

EXERCISE 1 Creating a Distribution Share

A Windows SIM distribution share provides a directory structure in which you can store device drivers and other files you want to deploy to a workstation.

  1. Click Start. Then click All Programs | Microsoft Windows AIK | Windows System Image Manager. The Windows System Image Manager console appears.

  2. Right-click Select A Distribution Share, and from the context menu, select Create Distribution Share. The Create A Distribution Share dialog box appears.

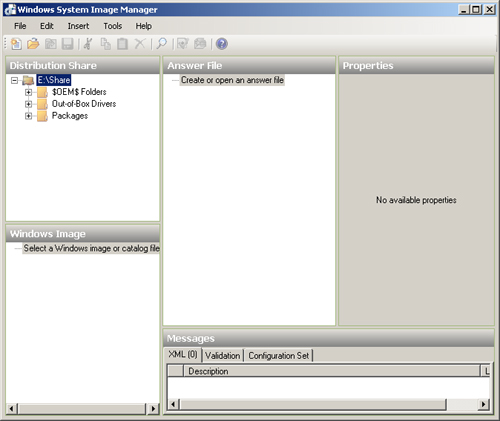
  3. Create a new folder on a local drive, select it, and click Open. The folder appears in the Distribution Share box, as shown in Figure 12.

    Figure 12. Creating a distribution share in Windows SIM


  4. Right-click Select A Windows Image Or Catalog File, and from the context menu, choose Select Windows Image. The Select A Windows Image dialog box appears.

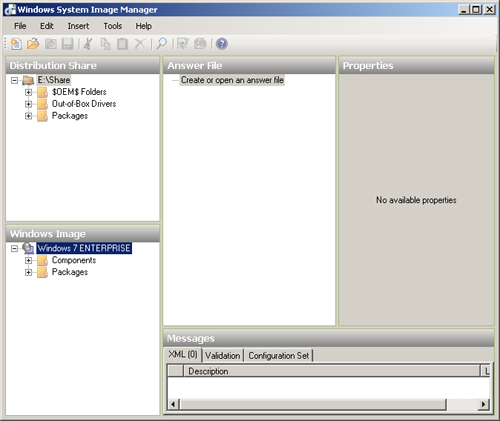
  5. Insert the Windows 7 installation disk into the DVD drive, browse to the Sources folder on the disk, select the Install.wim file, and click Open. The image appears in the Windows Image box, as shown in Figure 13. Depending on the installation disk you use, you might have to select a specific Windows 7 image from those on the disk.

    Figure 13. Selecting a Windows Image in Windows SIM


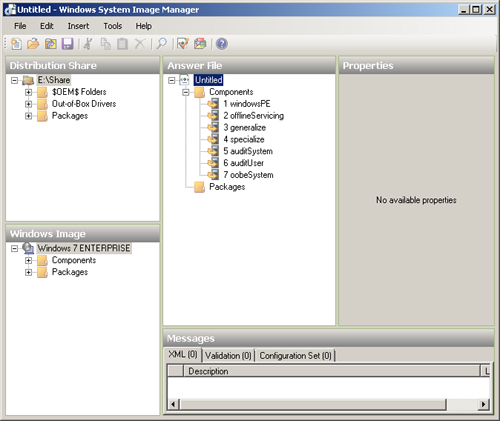
  6. Right-click Create Or Open An Answer File, and from the context menu, select New Answer File. The contents of the new answer file appear in the Answer file box, as shown in Figure 14.

Figure 14. Creating an answer file in Windows SIM


EXERCISE 2 Partitioning a Disk with an Answer File

When deploying Windows 7, you can use an answer file to automate the process of partitioning the disk on which you intend to install Windows 7.

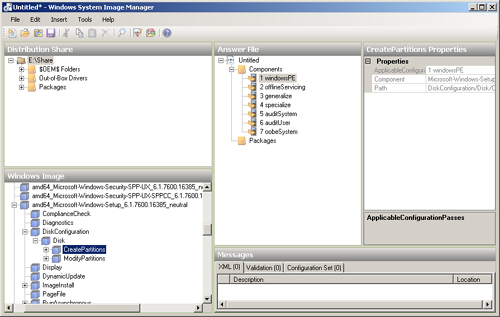
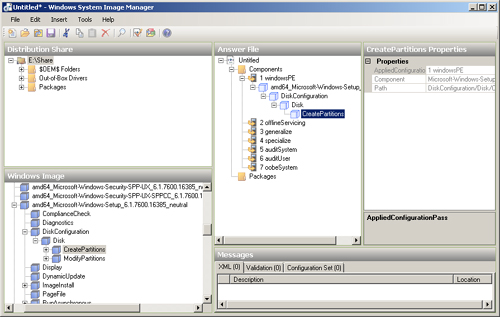
  1. In Windows SIM, in the Windows Image box, browse to the Microsoft-Windows-Setup_6.1.7600.16385_neutral\DiskConfiguration\Disk\CreatePartitions\CreatePartition container, as shown in Figure 15. The exact folder name varies depending on the Windows 7 version you are using.

    Figure 15. Locating Disk Configuration components


  2. Right-click CreatePartition, and from the context menu, select Add Setting To Pass 1 WindowsPE. The CreatePartition setting appears in the Answer File box, as shown in Figure 16.

    Figure 16. Adding components to an answer file


  3. Expand the ModifyPartitions container, right-click ModifyPartition, and from the context menu, select Add Setting To Pass 1 WindowsPE. The ModifyPartition setting appears in the Answer File box.

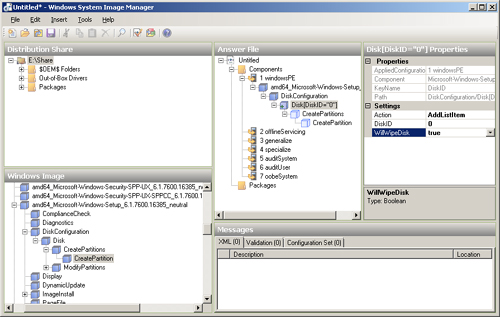
  4. In the Answer File box, select Disk.

  5. In the Disk Properties box, under Settings, configure the following settings, as shown in Figure 17:

    • DiskID = 0

    • WillWipeDisk = true

    Figure 17. Configuring Disk settings


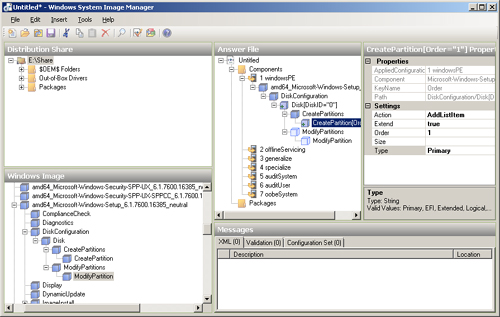
  6. In the Answer File box, select CreatePartition.

  7. In the CreatePartition Properties box, under Settings, configure the following settings, as shown in Figure 18:

    • Extend = true

    • Order = 1

    • Type = Primary

    Figure 18. Configuring CreatePartition settings


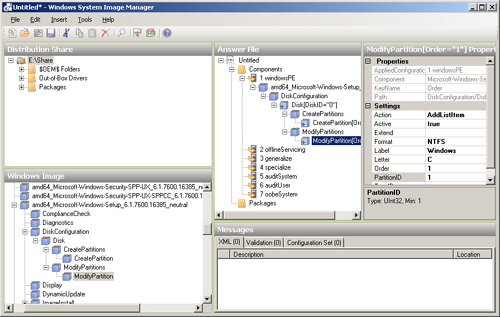
  8. In the Answer File box, select ModifyPartition.

  9. In the ModifyPartition Properties box, under Settings, configure the following settings, as shown in Figure 19:

    • Active = true

    • Format = NTFS

    • Label = Windows

    • Letter = C

    • Order = 1

    • PartitionID = 1

    Figure 19. Configuring ModifyPartition settings


  10. From the Tools menu, select Validate Answer File. The Messages box reads No Warnings or Errors.

Other -----------------
- Understanding the Windows 7 Deployment Process (part 1) - Windows 7 Deployment Basics & Using Windows Deployment Services
- Configuring Backups and Recovery : Safeguarding Your Computer and Recovering from Disaster & Using Advanced Boot Options
- Microsoft Word 2010 : Sharing Information Between Programs - Exporting and Importing Data
- Microsoft Word 2010 : Playing a Movie Using an ActiveX Control & Changing the Document Information Panel
- Microsoft Visio 2010 : Understanding Relative and Absolute Hyperlinks
- Microsoft Visio 2010 : Linking to Another Visio Page
- Microsoft PowerPoint 2010 : Setting Privacy Options
- Microsoft PowerPoint 2010 : Setting Macro Security Options & Changing Message Bar Security Options
- Microsoft Excel 2010 : Displaying Parts of a Table with AutoFilter & Creating Custom Searches
- Microsoft Excel 2010 : Analyzing Worksheet Data - Sorting Data in a Table
 
 
Top 10
- Microsoft Visio 2013 : Adding Structure to Your Diagrams - Finding containers and lists in Visio (part 2) - Wireframes,Legends
- Microsoft Visio 2013 : Adding Structure to Your Diagrams - Finding containers and lists in Visio (part 1) - Swimlanes
- Microsoft Visio 2013 : Adding Structure to Your Diagrams - Formatting and sizing lists
- Microsoft Visio 2013 : Adding Structure to Your Diagrams - Adding shapes to lists
- Microsoft Visio 2013 : Adding Structure to Your Diagrams - Sizing containers
- Microsoft Access 2010 : Control Properties and Why to Use Them (part 3) - The Other Properties of a Control
- Microsoft Access 2010 : Control Properties and Why to Use Them (part 2) - The Data Properties of a Control
- Microsoft Access 2010 : Control Properties and Why to Use Them (part 1) - The Format Properties of a Control
- Microsoft Access 2010 : Form Properties and Why Should You Use Them - Working with the Properties Window
- Microsoft Visio 2013 : Using the Organization Chart Wizard with new data
 
programming4us
Windows Vista
programming4us
Windows 7
programming4us
Windows Azure
programming4us
Windows Server