3. Using Windows 7 Automated Installation Kit
The Windows 7 Automated Installation Kit is a collection of tools and
documentation that enable you to perform all the tasks essential to a Windows 7
workstation deployment. The same can be said of Microsoft Deployment Toolkit 2010,
except that Windows 7 AIK does not include the planning and coordination framework
for complex, high-volume deployment projects.
The most important tools included in Windows 7 AIK are as follows:
Windows System Image Manager (Windows
SIM)
A graphical tool that creates distribution shares and answer files that
administrators can use to customize Windows 7 installations
ImageX.exe
A command-line tool that can capture, modify, and apply image files in
Windows Imaging format
Deployment Image Servicing and Management
(DISM.exe)
A command-line tool that can mount, edit, and upgrade image files in the
Windows Imaging format
Windows PE
Core operating system files used to create bootable media
System Preparation
(Sysprep.exe)
A command-line program that prepares Windows 7 workstations for imaging,
auditing, and deployment
Because Windows 7 AIK is a
set of free-standing tools, it is highly flexible in its deployment capabilities. The
basic deployment framework described earlier in this lesson applies, but with the
Windows SIM tool, you can customize and automate your reference computer and target
computer installations by creating answer files. Windows 7 AIK was largely created
with original equipment manufacturers (OEMs) in mind, and it defines in its
documentation two basic types of deployment:
Build-to-plan (BTP)
Intended for building workstations in a standard, uniform configuration,
the BTP deployment is one in which administrators build the reference
computer by using an answer file and create an image, which they deploy to
the target workstations unaltered.
Build-to-order (BTO)
Intended for customized workstation builds, a BTO deployment is one in
which administrators use an answer file to build the reference computer,
deploy the resulting image on the target computers, and then boot the
computers in audit mode to make further customizations.
The usefulness of these deployment types in an enterprise deployment depends on
the types of images you plan to create. If you create a separate, thick
image for each of your workstation configurations, you can deploy them to the target
computers as is, using BTP deployment. If you choose to create thin images, or a
single generic image that you plan to customize for each workstation type, you can
use the BTO method and customize the target computers after you deploy the
image.
The procedure for a BTO deployment of a bare-metal workstation using only the
Windows 7 AIK tools can consist of the following steps:
Install Windows 7 AIK on a build computer.
The build computer is where you will create your answer files by using
Windows SIM and your Windows PE boot media.
Create a distribution share by using Windows SIM, as shown in Figure 6.
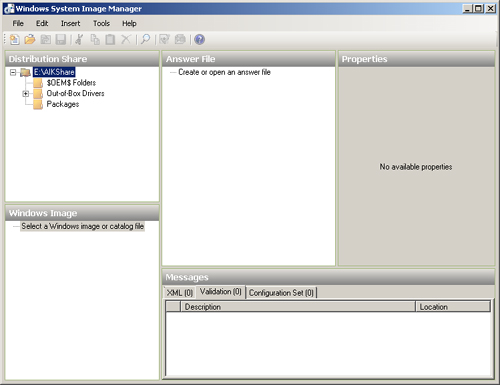
In Windows 7 AIK, a distribution share is a directory structure where you
store any device drivers and applications that you want to deploy using the
answer file. Unlike WDS and MDT 2010, this is not a deployment share where you
store the image files you intend to deploy to your reference and target
computers. Windows 7 AIK does not have a built-in deployment infrastructure.
You either have to manage the image distribution process manually or use WDS or
MDT 2010 to deploy your images.
Populate the distribution share.
Add the device drivers and applications you want to install using the answer
file to the appropriate directories in the distribution share, creating
subdirectories for each drive and application.
Create and validate an answer file for the reference computer by using
Windows SIM.
Using an answer file, you can add device drivers and applications to the
Windows setup procedure, as well as configure a multitude of operating system
settings. You must also add the appropriate settings for the software
components you stored in the distribution share, as well as any component
settings you want to use to configure the operating system installation on the
reference computer.
Note:
CREATING ANSWER FILES
For complete documentation of
the answer file creation process, see the Windows System Image Manager
Technical Reference help file. For complete documentation of all answer file
component and package settings, see the Unattended Windows Setup Reference
for Windows 7 help file. Both of these help files are supplied with the
Windows 7 AIK.
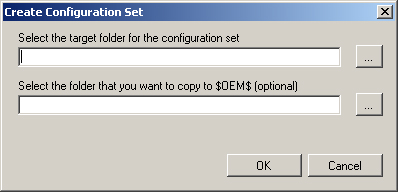
Create a configuration set using Windows SIM, using the interface shown in
Figure 7.
A configuration set is a self-contained version of the files from the
distribution share you referenced in the answer file, as well as the answer
file itself. After you have created the configuration set, copy it to a
removable medium, such as a USB flash drive.
Boot the reference computer by using a Windows 7 installation disk and
insert the removable medium containing the configuration set.
The Windows 7 Setup.exe program automatically searches the removable drives
on the system, locates the answer file, and installs Windows 7 on the reference
computer using your customizations.
Note:
INSTALLING THE REFERENCE COMPUTER OVER THE
NETWORK
If necessary, you can also install the reference computer by placing the
configuration set and the Windows 7 installation files on a network share.
After booting the reference computer with a Windows PE boot disk, you map a
drive letter to the share using the NET USE command and start the Setup.exe
file manually, specifying the path to the answer file on the command
line.
Switch the reference computer to audit mode and prepare it for image capture
using Sysprep.exe.
Running Sysprep.exe with the /generalize parameter
removes the computer-specific and user-specific settings from the installation,
and the /audit parameter switches it from out-of-box
experience (OOBE) mode to audit mode.
Create a Windows PE boot disk containing the ImageX.exe utility.
Windows 7 AIK includes the Windows PE boot files, but it does not provide a
means of deploying boot files over the network. Therefore, to boot your
workstations using only Windows 7 AIK tools, you must use the Copype.cmd batch
file to create a build directory, add ImageX.exe, and then use the Oscdimg.exe
program to package the build directory as a sector-based image file with an
.iso extension. Then, you must burn the boot image file to a removable medium,
such as a CD-ROM, DVD-ROM, or USB flash drive, using a third-party tool, which
Windows 7 AIK does not provide.
Boot the reference computer by using the Windows PE disk and capture an
image of the reference computer by using ImageX.exe.
Running ImageX.exe with the /capture command enables
you to capture an image of the system and save it to a Windows Imaging file on
a local disk, after which you can map a drive to your distribution share and
copy the image file there.
Boot the target computer by using the Windows PE disk and create a disk
partition by using the Diskpart.exe command line utility.
Windows Imaging files require you to create a formatted partition of
appropriate size before you can deploy them. When you install a workstation by
using the Windows Setup.exe program, you can configure the answer file to
create the partition. When you use ImageX.exe to deploy an image, you must
create the partition manually.
From the Windows PE command line, apply the captured reference computer
image to the target computer by using the ImageX.exe utility.
To access the image file from a network share, you must map a drive letter
to the share first, and then run ImageX.exe with the
/apply parameter, specifying the path to the image
file.
Restart the target computer and allow it to boot in audit mode and make any
additional configuration modifications.
Audit mode enables you to start the workstation without completing the
Windows Welcome user interface pages. You can then configure operating system
settings or install applications on the target computer to create a customized
configuration.
Switch the reference computer back to OOBE mode and prepare it for delivery
by using Sysprep.exe.
Running Sysprep.exe with the /oobe parameter switches
the computer from audit mode back to OOBE (Windows Welcome) mode. The
/generalize and /shutdown
parameters then leave the system ready for delivery to the end user.
This procedure describes one permutation of the
deployment process using the Windows 7 AIK tools. Depending on the number of
workstations you have to deploy and the degree of customization you require, you can
modify this procedure considerably. For example, you can conceivably omit the
reference computer installation entirely and use an answer file to install the target
workstations.
It is relatively rare for administrators to complete a large workstation
deployment with Windows 7 AIK alone. Many use WDS to deploy images over the network,
or MDT 2010 for a more integrated solution, or both. However, it is difficult to
deploy a large number of computers without using some of the tools in Windows 7 AIK,
so it is well worth familiarizing yourself with them.
