1. Safeguarding Your Computer and Recovering from Disaster
One of the worst events you will
experience is a computer that won't boot. An even worse experience is
discovering that there is no recent backup for that computer.
The first step in
preparing for disaster recovery is to expect that a disaster will happen
at some point and take proactive measures to plan your recovery before
the failure occurs. Here are some of the preparations you can make:
Keep your computer up-to-date with Windows Update.
Perform regular system backups.
Use current software to scan for malware (such as viruses, spyware, and adware) and make sure you have the most recent updates.
Perform regular administrative functions, such as monitoring the logs in the Event Viewer utility.
If you can't start
Windows 7, there are several options and utilities that can be used to
identify and resolve Windows errors. The following is a broad list of
troubleshooting options:
If you have recently
made a change to your computer's configuration by installing a new
device driver or application and Windows 7 will not load properly, you
can use the Last Known Good Configuration, roll back the driver, or use
System Restore to restore a previous system configuration.
If
you can boot your computer to Safe mode, and you suspect that you have a
system conflict, you can temporarily disable an application or
processes, troubleshoot services, or uninstall software.
If your computer will not boot to Safe mode, you can use the Startup Repair tool to replace corrupted system files.
If
necessary, you can use the Backup and Restore Center utility to restore
personal files from backup media and to restore a complete image of
your computer.
You
can also use Driver Rollback. If you install a driver that causes
issues on your system, you can use the Driver Rollback utility to return
the driver to its previous version.
Table 1
summarizes all of the Windows 7 utilities and options that can be used
to assist in performing system recovery.
Table 1. Windows 7 Recovery Techniques
| Recovery Technique | When to Use |
|---|
| Event Viewer | If
the Windows 7 operating system can be loaded through Normal or Safe
mode, one of the first places to look for hints about the problem is
Event Viewer. Event Viewer displays System, Security, and Application
logs. |
| Safe mode | This
is generally your starting point for system recovery. Safe mode loads
the absolute minimum of services and drivers that are needed to boot
Windows 7. If you can load Safe mode, you may be able to troubleshoot
devices or services that keep Windows 7 from loading normally. |
| Last Known Good Configu ration | This
option can help if you made changes to your computer and are now having
problems. Last Known Good Configuration is an Advanced Boot Options
menu item that you can select during startup. It loads the configuration
that was used the last time the computer booted successfully. This
option will not help if you have hardware errors. |
| Startup Repair tool | This tool can restore system files from the Windows 7 media. This option will not help if you have hardware errors. |
| Backup and Restore Center | You
should use this utility to safeguard your computer. Through the Backup
utility, you can back up and restore personal files on your computer.
You can also create and restore images of your entire computer. |
| System Restore | System
Restore is used to create known checkpoints of your system's
configuration. In the event that your system becomes misconfigured, you
can restore the system configuration to an earlier checkpoint. |
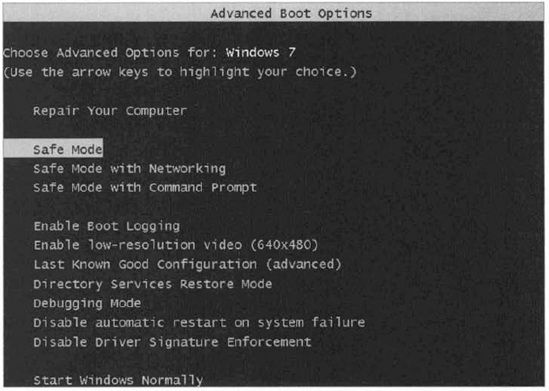
2. Using Advanced Boot Options
The Windows 7 advanced startup options can be used to troubleshoot errors that keep Windows 7 from successfully booting. Figure 1 shows the Advanced Boot Options screen.
NOTE
To access the
Windows 7 advanced startup options, start or reboot the computer and
press the F8 key after the firmware POST process, but before Windows 7
is loaded. This will bring up the Advanced Boot Options menu, which
offers numerous options for booting Windows 7.
These advanced sta rt up options ar e covered in th e follow ing three sections.
2.1. Starting in Safe Mode
When your
computer will not start, one of the fundamental troubleshooting
techniques is to simplify the configuration as much as possible. This is
especially important when you do not know the cause of your problem and
you have a complex configuration. After you have simplified the
configuration, you can determine whether the problem is in the basic
configuration or is a result of your complex configuration.
If the problem is
in the basic configuration, you have a starting point for
troubleshooting. If the problem is not in the basic configuration, you
should proceed to restore each configuration option you removed, one at a
time. This helps you to identify what is causing the error.
If Windows 7 will not load, you can attempt to load the operating system through Safe mode.
When you run Windows 7 in Safe mode, you are simplifying your Windows
configuration as much as possible. Safe mode loads only the drivers
needed to get the computer up and running.
The drivers that are
loaded with Safe mode include basic files and drivers for the mouse,
monitor, keyboard, hard drive, standard video driver, and default system
services. Safe mode is considered a diagnostic mode, so you do not have
access to all of the features and devices in Windows 7 that you have
access to when you boot normally, including networking capabilities.
A computer booted to Safe mode will show Safe Mode in the four corners of your desktop, as shown in Figure 2.

If you boot to Safe mode,
check all of your computer's hardware and software settings in Device
Manager and try to determine why Windows 7 will not boot properly. After
you take steps to fix the problem, try to boot to Windows 7 as you
normally would.
In Exercise 1, you will boot your computer to Safe mode.
If your computer is currently running, choose Start => Shutdown => Restart. During the boot process, press the F8 key to access the Advanced Boot Options menu. Highlight Safe Mode and press Enter. When Windows 7 starts, log in. You will see a Help And Support dialog box letting you know what Safe mode is. Exit Help And Support. You should see in the lower-right corner that a network connection is not available. Choose Start =>
Control Panel. Notice that most of the Control Panel icons are not
available. If you are having a problem with a driver, you can open
Device Manager and uninstall or roll back the driver. Don't restart your computer yet; you will do this as a part of the next exercise.
|
2.2. Enabling Boot Logging
Boot logging
creates a log file that tracks the loading of drivers and services.
When you choose the Enable Boot Logging option from the Advanced Boot
Options menu, Windows 7 loads normally, not in Safe mode. This allows
you to log all of the processes that take place during a normal boot
sequence.
This log file can be used to
troubleshoot the boot process. When logging is enabled, the log file is
written to \WINDOWS\Ntbtlog.txt. A sample of the Ntbtlog.txt file is
shown in Figure 3.

In Exercise 2, you will create and access a boot log file.
Start your computer. If it is already running, choose Start => Restart. During the boot process, press the F8 key to access the Advanced Boot Options menu. Highlight Enable Boot Logging and press Enter. When Windows 7 starts, log in. Choose Start => Computer and browse to C:\WIND0WS\Ntbt1og.txt. Double-click this file. Examine the contents of your boot log file. Shut down your computer and restart it without using Advanced Boot Options.
|
The boot log file is
cumulative. Each time you boot to Safe mode, you are writing to this
file. This enables you to make changes, reboot, and see whether you have
fixed any problems. If you want to start from scratch, you should
manually delete this file and reboot to an Advanced Boot Options menu
selection that supports logging.
2.3. Using Other Advanced Boot Options Menu Modes
In this section, you will learn about additional Advanced Boot Options menu modes. These include the following:
Safe Mode With Networking
This is the same as the Safe mode option but adds networking features.
You might use this mode if you need networking capabilities to download
drivers or service packs from a network location.
Safe Mode With Command Prompt
This starts the computer in Safe mode, but after you log in to Windows
7, only a command prompt is displayed. This mode does not provide access
to the desktop. Experienced troubleshooters use this mode.
Enable Low-Resolution Video (640x480)
This loads a standard VGA driver without starting the computer in Safe
mode. You might use this mode if you changed your video driver, did not
test it, and tried to boot to Windows 7 with a bad driver that would not
allow you to access video. The Enable VGA mode bails you out by loading
a default driver, providing access to video so that you can properly
install (and test!) the correct driver for your computer.
NOTE
Safe mode starts Windows 7 at a resolution of 800×600.
Last Known Good Configuration (Advanced)
This boots Windows 7 by using the Registry information that was saved
the last time the computer was successfully booted. You would use this
option to restore configuration information if you improperly configured
the computer and did not successfully reboot it. When you use the Last
Known Good Configuration option, you lose any system configuration
changes that were made since the computer last successfully booted.
Directory Services Restore Mode This option is used for domain controllers only and is not relevant to Windows 7.
Debugging Mode This runs the Kernel Debugger, if it is installed. The Kernel! Debugger is an advanced troubleshooting utility.
Disable Automatic Restart On System Failure
This prevents Windows from restarting when a critical error causes
Windows to fail. This option should be used only when Windows fails
every time you restart so that you are not able to access the desktop or
any configuration options.
Disable Driver Signature Enforcement This allows drivers to be installed even if they do not contain valid signatures.
Start Windows Normally
This boots to Windows 7 in the default manner. This option is on the
Advanced Boot Options menu in case you accidentally hit F8 during the
boot process but really warned to boot Windows 7 normally.
In the next section, you will look at using the Startup Repair tool.
