3. Protecting Clients from Spyware with Windows Defender
Windows Defender is a tool in Windows 7 whose purpose is to detect and remove spyware on a client system. By default, Windows Defender is configured to download
new spyware definitions regularly through Windows Update and then use these definitions
to scan for spyware on the local system. Often, you do not need to change this default
configuration, though in large networks you might want to disable some Windows Defender features through Group Policy.
Note:
USE WINDOWS DEFENDER IN SMALL NETWORKS
Windows Defender is a basic anti-malware program that is suitable
for use in small networks or as a temporary solution before an advanced anti-malware solution
is purchased. In large networks, you should use a centrally managed anti-malware solution
such as Microsoft Forefront Client Security.
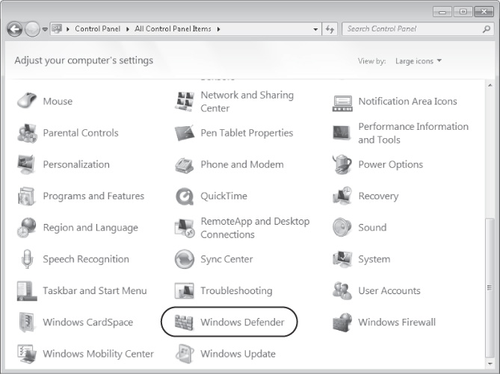
To view Windows Defender, open Control Panel, select View By Large Icons, and then scroll
down to click Windows Defender, as shown in Figure 7.
(Alternatively, you can click Start, type windows defender, and
select Windows Defender in the Start menu.)

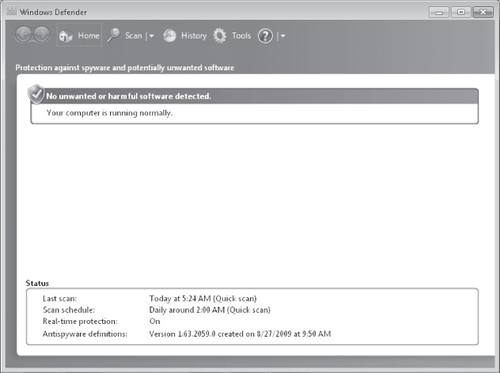
Windows Defender is shown in Figure 8.
By default, Windows Defender provides two types of protection:
Automatic scanning Windows Defender is configured by
default to download new definitions and then perform a quick scan for spyware at 2 A.M. daily.
Real-time protection With this feature, Windows Defender
constantly monitors computer usage in areas such as the Startup folder, the Run keys in the
registry, and Windows add-ons. If an application attempts to make a change to one of these
areas, Windows Defender prompts the user either to Permit (allow) or Deny (block) the
change.

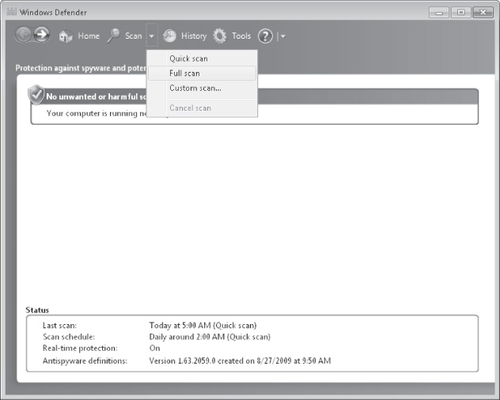
Besides providing this automatic functionality, Windows Defender also lets you perform a
manual scan of the system. You can start a manual scan by selecting Quick Scan, Full Scan, or
Custom Scan from the Scan menu, as shown in Figure 9.

These three scan types are described in the following list:
Quick Scan This type of scan scans only the areas of a
computer most likely to be infected by spyware or other potentially unwanted software. These areas include the
computer's memory and portions of the registry that link to startup applications. A quick
scan is sufficient to detect most spyware.
Full Scan This type of scan scans every file on the
computer, including common types of file archives and applications already loaded in the
computer's memory. A full scan typically takes several hours and can even take more than a
day. You need to run a full scan only if you suspect that a user's computer is infected with
unwanted software after the quick scan is run.
Custom Scan Custom scans begin with a quick scan and then
perform a detailed scan on the specific portions of a computer that you choose.
Note:
YOU CAN WORK ON A COMPUTER WHILE A SCAN IS IN PROGRESS
Although scans slow the computer down, a user can continue to work
on the computer while a scan is in progress. Note also that scans consume battery power on
mobile computers very quickly.
3.1. Handling Detected Spyware
If Windows Defender finds spyware or potentially unwanted software as a result of a scan, it displays a
warning and provides you with four options for each item detected:
Ignore This option allows the detected software to
remain untouched on your computer and stay detectable by Windows Defender whenever the next
scan is performed. This option might be appropriate when you need to research the software
that Windows Defender has found before you decide to remove it.
Quarantine This option isolates the detected software.
When Windows Defender quarantines software, it moves it to another location on your computer
and then prevents the software from running until you choose to restore it or remove it from
your computer. This option is used most often when the detected software cannot be removed
successfully.
Remove This option deletes the detected software from
your computer. You should choose this option unless you have a compelling reason not
to.
Always Allow The option adds the software to the Windows
Defender Allowed list and allows it to run on your computer. Windows Defender stops alerting
you to actions taken by the program. You should choose this option only if you trust the
software and the software publisher.
3.2. Configuring Windows Defender Through Group Policy
In an AD DS environment, it is recommended that you configure clients by using Group
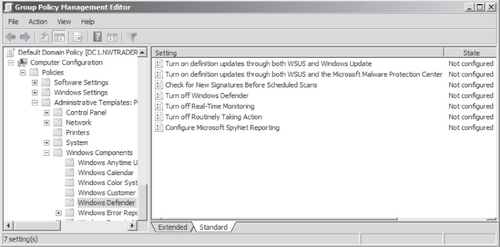
Policy instead of individually on each machine. To find the Group Policy settings for Windows Defender, open a GPO and navigate to Computer
Configuration\Policies\Administrative Templates\Windows Components\Windows Defender, as shown
in Figure 10.

The following seven policy settings for Windows Defender are available:
Turn On Definition Updates Through Both WSUS And Windows
Update If you enable or do not configure this policy setting and the Automatic Updates
client is configured to point to a WSUS server, Windows Defender obtains definition updates
from Windows Update if connections to that WSUS server fail. If you disable this setting,
Windows Defender checks for updates only according to the setting defined for the Automatic
Updates client—either by using an internal WSUS server or Windows Update.
Turn On Definition Updates Through Both WSUS And The Microsoft
Malware Protection Center If you enable or do not configure this policy setting and the Automatic Updates
client is configured to point to a WSUS server, Windows Defender checks for definition
updates from both WSUS and the Microsoft Malware Protection Center if connections to that
WSUS server fail. If you disable this setting, Windows Defender checks for updates only
according to the setting defined for the Automatic Updates client—either by using
an internal WSUS server or Windows Update.
Check For New Signatures Before Scheduled Scans If you
enable this policy setting, Windows Defender always checks for new definitions before it
begins a scheduled scan of the computer. When you disable or do not configure this setting,
Windows Defender does not check for new definitions immediately before beginning scheduled
scans.
Turn Off Windows Defender If you enable this policy setting, Windows Defender no longer performs any
real-time or scheduled scans. (However, users can still perform manual scans.) You should
enable this setting if you have implemented a more advanced anti-spyware solution such as
Microsoft Forefront Client Security. If you disable or do not configure this policy setting,
Windows Defender performs both real-time scans and any scheduled scans.
Turn Off Real-Time Monitoring If you enable this policy
setting, Windows Defender does not automatically prompt users to allow or block activity in
protected areas of the operating system. If you disable or do not configure this policy
setting, by default Windows Defender prompts users to allow or block potential spyware
activity on their computers.
Turn Off Routinely Taking Action If you enable this
policy setting, Windows Defender only prompts the user to choose how to respond to a threat
but not to take any automatic action. If you disable or do not configure this policy
setting, Windows Defender automatically takes action on detected threats after approximately
10 minutes.
Configure Microsoft SpyNet Reporting SpyNet is an online community that pools information about threats experienced
by its members. SpyNet learns from the user responses to these threats to determine which
threats are benign and which are malicious.
If you enable this policy setting and choose the "No Membership" option, SpyNet
membership is disabled, and no information is sent to Microsoft. If you enable this policy
setting and choose the "Advanced" option, SpyNet membership is set to Advanced, and
information about detected threats and the responses to those threats is sent to
Microsoft.
If you disable or do not configure this policy setting, SpyNet membership is disabled
by default, but local users can change the membership setting.
Note:
USING A BOOTABLE ANTIVIRUS CD
When a computer has become severely infected with malware, the
computer might run so slowly that it's difficult to perform an anti-malware scan. In this
case, it's a good idea to perform an offline scan from a bootable CD if you have one
available. By performing the scan outside of Windows, you avoid running the malware programs
that consume resources and slow down the system.
3.3. Best Practices for Using Windows Defender
To receive the security benefits of Windows Defender while minimizing the costs, follow
these best practices:
Before deploying Windows 7, test all applications with Windows Defender enabled to
ensure that Windows Defender does not alert users to normal changes that the application
might make. If a legitimate application does cause warnings, add the application to the
Windows Defender Allowed list.
Change the scheduled scan time to meet the needs of your business. By default,
Windows Defender scans at 2 A.M. If third-shift staff uses computers overnight,
you might want to find a better time to perform the scan. If users turn off their computers
when they are not in the office, you should schedule the scan to occur during the
day.
Use WSUS to manage and distribute signature updates.
Use antivirus software with Windows Defender. Alternatively, you might disable Windows
Defender completely and use client-security software that provides both anti-spyware and
antivirus functionality.
Do not deploy Windows Defender in large enterprises. Instead, use Forefront or a third-party client-security suite that can be managed more easily
in enterprise environments.