Displaying Parts of a Table with AutoFilter
Working
with a list that contains numerous records can be difficult—unless you
can narrow your view of the list. For example, rather than looking
through an entire inventory list, you might want to see records that
come from one distributor. The AutoFilter
feature creates a list of the items found in each field, which is
useful in tables and PivotTables. You select the items that you want to
display in the column field by using the column header list arrow and
AutoFilter menu. The column headers in a table now remain visible in
long lists for ease of use (New!). In the AutoFilter menu, you can use the Search box to quickly find what you want in a long list (New!). Then you can work with the filtered list.
Display Specific Records Using AutoFilter
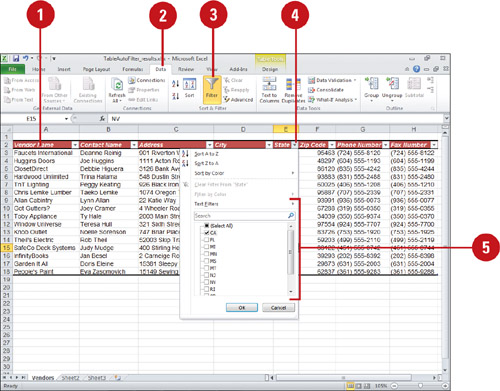
 Click anywhere within the table.
 Click the Data tab.
 If necessary, click the Filter button to highlight and turn it on.
 Click the column header list arrow where you want to set filter criteria.
 Select the filter criteria you want:
- Select Items. Select the items that records must match to be included in the table.
- Search. Enter search criteria, and then press Enter (New!).
- Built-in Filters. Point to <Column Name> Filters, and then select a filter option.

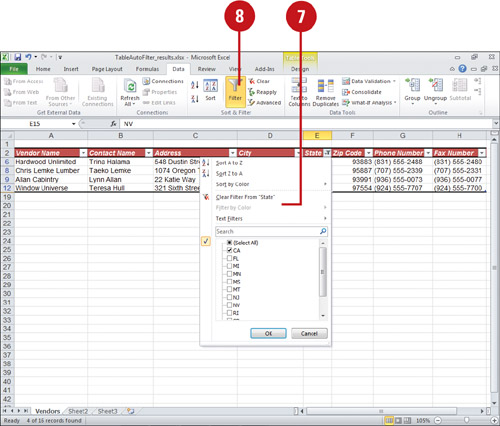
 Repeat steps 4 and 5 to filter out more records using other fields.
The list arrow displays an icon indicating the field is filtered.
 To clear a filter, click the list arrow of the field, and then click Clear Filter From <Column Name>.
- To clear all filters and redisplay all rows, click the Clear button.
- To reapply a filter, click the Reapply button.
 To turn off AutoFilter, click the Filter button to deselect it.

Creating Custom Searches
There
are many times you’ll want to search for records that meet multiple
criteria. For example, you might want to see out-of-stock records of
those orders purchased from a particular distributor. Using the
AutoFilter feature and the Custom command, you can create complex
searches. You can use logical operators to measure whether an item in a record qualifies as a match with the selected criteria. You can also use the logical conditions
AND and OR to join multiple criteria within a single search. The result
of any search is either true or false; if a field matches the criteria,
the result is true. The OR condition requires that only one criterion
be true in order for a record to qualify. The AND condition, on the
other hand, requires that both criteria in the statement be true in
order for the record to qualify.
Create a Custom Search Using AutoFilter
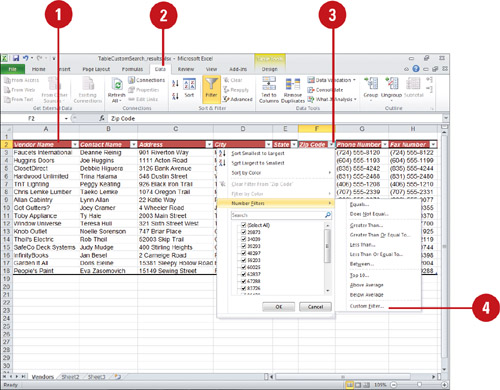
 Click anywhere within the table range.
 Click the Data tab.
 Click the list arrow next to the first field you want to include in the search.
 Point to <type> Filter, and then click Custom Filter to enable the command (a check mark appears).

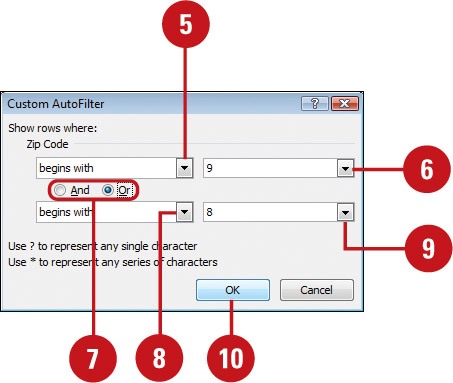
 Click the Field list arrow (on the left), and then select a logical operator.
 Click the list arrow (on the right), and then select a field choice.
 If you want, click the And or Or option.
 If you want, click the list arrow (on the left), and then select a logical operator.
 If you want, click the list arrow (on the right), and then select a field choice.
 Click OK.
The list arrow displays an icon indicating the field is filtered.
