Depending on the number of workstations you have to install, the requirements imposed
by your organization, and the tools at your disposal, the process of deploying Windows 7
can be simple or extremely complex.
1. Windows 7 Deployment Basics
In its simplest form, a
Windows 7 deployment consists of a user starting a computer and inserting an
installation disk into the DVD drive. After the user answers a few simple questions,
the Windows 7 setup program takes over and installs the operating system. The process
is completely automated until it is time for the user to provide an account name and
log on for the first time. The user then configures various settings and installs
various applications until the workstation has a working environment suitable for
specific tasks.
Although much of it is transparent to the user, this interactive installation
process is essentially the same as that performed in a complex Windows 7 deployment
on an enterprise network. The computer starts, loads the Windows Preinstallation
Environment (Windows PE), and applies a Windows Imaging file containing the operating
system to the computer’s local disk. The differences between an individual,
interactive installation, and an enterprise deployment include the following:
How the computer obtains the Windows PE boot files
The configuration of the Windows Imaging file containing the operating
system
How the computer interacts with the setup program
How the workstation receives the applications and configuration settings it
needs
The main object of an enterprise deployment is to install Windows 7 in a
standardized configuration on multiple computers with little or no interaction at the
workstation site. At its most basic level, an enterprise workstation deployment
consists of the following steps:
Build a deployment share.
Perform a reference computer installation.
Capture an image of the reference computer.
Boot the target computer by using Windows PE.
Apply the captured image containing Windows 7.
These steps are described in the following sections.
1.1. Building a Deployment Share
A deployment share, is simply a shared folder on a
Windows server where you store the Windows Image files and other software
components that computers on the network need to access during the various phases
of the deployment process. Although in a mass deployment, you can burn your
customized images to DVD-ROM discs and distribute them to the target workstations
that way, as in an individual installation, having the workstations access the
images over the network is far easier.
There are performance factors to consider when deploying images over the
network, however. Windows Imaging files are usually large, and hundreds of
workstations downloading them simultaneously can flood the network, slowing down
the deployment process and negatively affecting other users.
Windows Deployment
Services (WDS), Windows 7 Automated Installation Kit (AIK), and
Microsoft Deployment Toolkit (MDT) 2010 all provide mechanisms for creating
deployment shares and populating them with image files and other software
components. In WDS, you use the Windows Deployment Services console. In Windows 7
AIK, you use Windows System Image Manager (SIM), and in MDT 2010, you use
Deployment Workbench. You can also create a share manually and use it to
distribute your images, but these tools streamline the process
considerably.
Note:
DEPLOYMENT SHARES BY OTHER NAMES
Although WDS, Windows AIK, and MDT 2010 can all create shares and populate
them with deployment files, they refer to them by different names. MDT 2010
uses the term “deployment share,” while earlier versions of MDT and Windows 7
AIK refer to it as a “distribution share.” In WDS, you create a “remote
installation folder.” The names are different, as are the tools that you use to
create them, but the basic function is essentially the same.
1.2. Performing a Reference Computer Installation
A reference computer is a workstation, installed and configured in a lab, which
administrators use as a model for the workstations they plan to deploy on the
production network. By creating a reference installation and then capturing an
image of it, administrators can implement their own customized workstation
configurations without having to configure each computer individually.
Windows 7 installation disks have image files on them, which contain the basic
operating system files, but most administrators create their own customized images
for mass deployments. You can use the Microsoft deployment tools to automate the
process of installing and configuring a reference computer, but whether this is
necessary for a particular deployment project is a decision each administrator
must make individually.
For example, if you are planning a deployment of 500 workstations that are
completely identical, you need only one reference computer, and you might find it
easier to install and configure Windows 7 on the reference computer manually. If,
however, you are deploying 500 workstations using 20 different configurations, you
are not likely to want to perform 20 separate reference computer installations;
automating the process can save a lot of time and effort.
The Microsoft deployment tools provide two ways of automating a reference
computer installation. You can use the Windows SIM utility from Windows 7 AIK to
create an answer file, which the Windows setup program uses to configure the
installation process, or you can use Deployment Workbench from MDT 2010 to create
a task sequence and a boot image.
1.3. Capturing an Image of the Reference Computer
After you install and configure a reference
computer, you capture an image of it in Windows Imaging format, complete with all
of its applications and customized settings. This is the image that you will
deploy to your target workstations. Each of the Microsoft deployment tools has its
own way of creating images, as follows:
Windows 7 AIK includes the ImageX.exe utility, which you can use to
create images from the command line.
MDT 2010 creates boot images that include the Windows Deployment Wizard.
When you run the wizard on the reference computer, you select the task
sequence you want to use, and the wizard performs the Windows 7 installation
and automatically captures an image of the resulting workstation.
WDS enables you to create capture images, which when deployed on a
reference computer, boot the system and capture an image of it.
Whichever method you choose, the program can upload the image it creates back
to the deployment share for later distribution to the target workstations.
1.4. Booting the Target Computer by Using Windows PE
Your target computers are the production workstations on which you want to
deploy Windows 7. To install an operating system on any computer, you have to boot
the system first, and in the case of a new, bare-metal computer, there are no boot
files on the local disk. Windows PE is a stripped-down version of the Windows
operating system that you can use to start a computer without installing an
operating system to a local disk. During the default boot process, Windows PE
loads the entire operating system from the boot disk into memory using a RAM disk,
which is an area of memory to which the system assigns a drive letter and uses it
like a disk. After Windows PE is loaded, you can remove, disconnect, or reformat
the boot disk as needed to complete the installation.
The three Microsoft deployment tools support Windows PE in the following
manner:
Windows 7 AIK includes the Windows PE boot files and a script called
Copype.cmd that you can use to create a Windows PE build directory. Then,
you use a program called Oscdimg.exe to create a boot-disk image that you
can burn to a removable medium, such as a CD-ROM or USB flash drive, or
deploy over the network.
MDT 2010 automates the process of creating a Windows PE boot image, which
contains the Windows Deployment Wizard. As with the Windows 7 AIK boot
image, you can deploy Windows PE on a removable medium or over the
network.
WDS provides the ability to deploy Windows PE boot images over the
network to computers that support the Pre-Boot Execution Environment
(PXE) standard. Instead of reading the boot files from a
local device, such as a disk drive, the workstation connects to the WDS
server and downloads a boot image.
Note:
BOOTING THREE TIMES USING WINDOWS
PE
Windows
PE can play three roles in a workstation deployment process. You use it to boot
the reference computer, so you can install Windows 7. Then you use it to boot
the reference computer in preparation for capturing an image. Finally, you use
it to boot the target workstations, so you can install your custom images. In
each of these three instances, you can boot the computer from a disk or by
using a PXE boot.
1.5. Accessing the Image and Installing Windows 7
The final stage of the deployment process is the application of the image you
captured from the reference computer to the target computer. There are three ways
to do this, as follows:
ImageX.exe
Using ImageX.exe from the Windows PE command line, you can apply an
identical copy of the image to the hard disk on the target
computer.
Setup.exe
Using the standard Windows 7 setup program, you can install an image
with greater flexibility than ImageX.exe, by specifying an answer file,
modifying the disk configuration, or adding drivers and
applications.
WDS
Using Windows Deployment Services, target workstations running Windows
PE can select and download image files for installation.
6.2.1.6. Using Microsoft Deployment Tools
Windows 7 AIK, MDT 2010, and WDS are not three separate and independent sets of
tools that all perform the same tasks. Deploying a large number of Windows 7
workstations is not just a matter of choosing one package over the others. They
are, to be sure, three separate sets of tools, but they are all designed to work
together, and administrators can pick and choose among them at will.
For example, although you can complete a deployment using Windows 7 AIK on its
own, to use MDT 2010 you must also install Windows 7 AIK. In addition, you can use
the services provided by WDS alongside Windows 7 AIK and MDT 2010, as needed.
Although each of the three packages has its own procedures and documentation,
administrators often achieve their own synthesis between them, using the tools and
processes that best suit their environments and their temperaments.
The following sections examine the workstation deployment process as
implemented using each of these three packages; they might help you decide which
package works best for you at each stage of the process.
2. Using Windows Deployment Services
Unlike Windows 7 AIK and MDT 2010, which are stand-alone products largely devoted
to the design and creation of images, WDS is a service included in Windows Server
2008 R2 and Windows Server 2008 that is dedicated primarily to the task of deploying
images across the network. Using WDS, you can boot bare-metal reference and target
computers across the network without having to burn CDs or create bootable flash
drives. Once started, a reference or target computer can then download a workstation
image file from the WDS server and install it using the Setup.exe program.
2.1. Understanding WDS Communications
For a bare-metal computer to start without a local boot device, it must have a
network interface adapter that is compliant with the Pre-Boot Execution
Environment (PXE) standard. PXE includes a basic TCP/IP (Transmission Control
Protocol/Internet Protocol) client that includes support for the Dynamic Host
Configuration Protocol (DHCP). When the computer starts and finds no local boot
device, it transmits broadcast messages that search for a DHCP server on the
network.
The normal function of a DHCP server is to provide clients with IP addresses
and other TCP/IP configuration parameters. In this case, however, the DHCP server,
which can run on the same server as WDS, also supplies the client computer with
the location of the WDS server on the network. After the PXE network adapter has
configured its TCP/IP client, it connects to the WDS server and downloads a boot
image by using the Trivial File Transfer Protocol (TFTP).
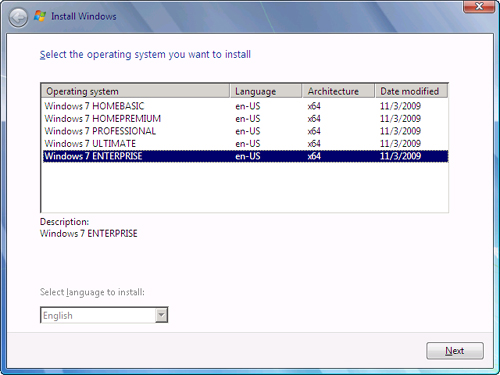
The boot image contains Windows PE startup files and a setup client that
enables the user at the reference or target computer to select and install a
workstation image from those stored on the WDS server, as shown in Figure 1.
2.2. Configuring a WDS Server
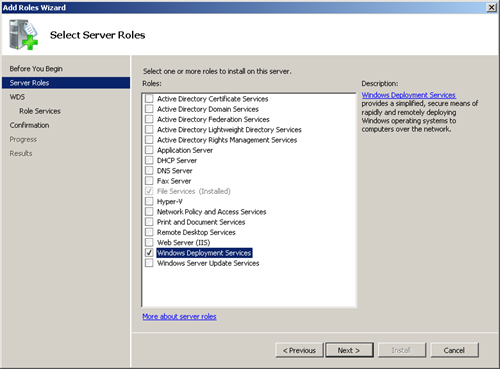
In Windows Server 2008 R2 and Windows Server
2008, WDS takes the form of a Windows Deployment Services role that you must
install with the Server Manager console, as shown in Figure 2. The server must be a
member of—or a domain controller for—an Active Directory Domain Services (AD DS)
domain, and there must be a DHCP server and a Domain Name System (DNS) server on
the network.
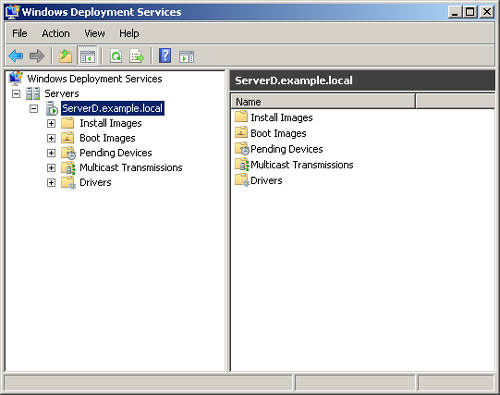
After you install the role, you configure WDS by using the Windows Deployment
Services console. During the configuration process, you specify the location of
the remote installation folder, which is the deployment share that computers on
the network use to obtain images. The configuration wizard shares the folder using
the share name REMINST, and it creates the directory structure that contains the
images and other files, as shown in Figure 3.
With the deployment share in
place, you can begin populating it with images. WDS requires you to add at least
one boot image and one install image. A boot image is a Windows Imaging file that
contains Windows PE boot files and the setup program that WDS uses on the client
desktop. An install image contains the installation files for an operating
system.
2.3. Using WDS as a Complete Deployment Solution
Every Windows 7 installation disk contains, in the Sources folder, a boot image
file called Boot.wim and an install image called Install.wim. These are the
default images containing the Windows PE boot files and the Windows 7 operating
system installation files, respectively. For a small deployment project, or one in
which you do not intend to create your own images, you can simply add the Boot.wim
and Install.wim images in the Windows Deployment Services console and proceed to
start your PXE-enabled workstations. This saves you from having to insert a DVD or
other distribution disk into the workstation drive, and it even enables you to
install Windows 7 on workstations with no DVD drives at all.
2.3.1. Using WDS with Non-PXE Clients
Not all computers have network interface
adapters that support PXE, but you can still use WDS to deploy install images
to computers that cannot download a boot image over the network. Using the
Windows Deployment Services console, you can convert the standard Boot.wim
image into a discover image.
A discover image contains boot files and also enables the client to locate
and connect to the WDS server. After the client connects to the server, the
process of selecting and installing an install image is the same as on a
PXE-compliant workstation.
Discover images do not offer much value to administrators deploying the
default Install.wim image because they might as well boot from the original
Windows 7 installation disk. However, when you are deploying customized images,
creating generic boot CDs containing a discover image can be much easier than
burning a lot of individual images to DVDs. You also might find it a valuable
alternative when deploying to older workstations that have CD, but not DVD,
drives.
2.3.2. Capturing Images with WDS
WDS does not provide tools for creating customized reference computer
installations; for this, you must use MDT 2010 and/or Windows 7 AIK. However,
you can use WDS as an alternative to the ImageX.exe utility to capture an image
of a reference computer. With the files in the Boot.wim image from a Windows 7
disk or the WinPE.wim boot image from Windows 7 AIK, you can use WDS to create
a capture image. A capture image is a bootable image that launches the Windows
Deployment Services Image Capture Wizard on the reference computer. Using the
wizard, you can select the volume you want to capture and automatically upload
the install image back to the WDS server.
6.2.2.3.3. Deploying Images by Using Multicasts
For large-scale workstation deployments, one of the most useful features in
WDS is its ability to deploy images by using multicast transmissions.
Multicasting is a feature of the Internet Protocol (IP) that enables one system
to transmit data to multiple destinations simultaneously. This is sometimes
called a one-to-many transmission.
Using unicasts—also called one-to-one transmissions—deploying an image to 10
computers requires the WDS server to transmit the same file 10 times to 10
different IP addresses. Because image files can be several gigabytes in size,
this method can consume a large amount of network bandwidth. Deploying hundreds
of workstations can therefore bring even the fastest network to a
standstill.
In WDS multicasting, the server transmits the image file only once, to a
special multicast group address. The workstations to be deployed, on connecting
to the server, join the group and begin receiving the transmission. When you
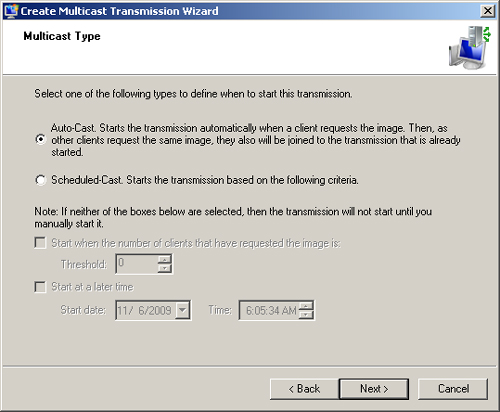
configure a WDS server to use multicasting, you select an image file and
specify how you want to initiate the transmission. Multicasts can start
automatically when the first client requests the image, you can start them
manually, or you can schedule them to start at a specific time, using the
interface shown in Figure 4.
Note:
NEW IN WINDOWS SERVER 2008 R2
WDS
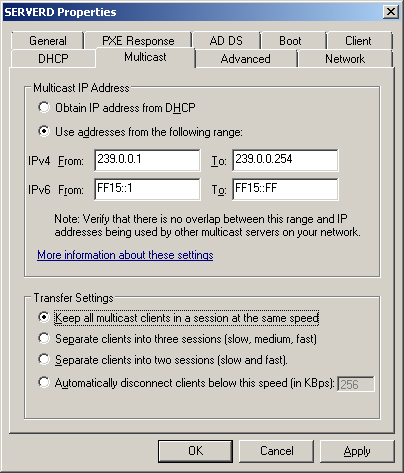
In Windows Server 2008 R2, WDS has additional multicasting capabilities,
such as support for IPv6 multicasts. You can also configure WDS to
automatically disconnect clients that are running below a specified network
transmission speed, or you can split the transmission into two or three
sessions, running fast and slow, or fast, medium, and slow, using the
Transfer Settings options shown in Figure 5. These options
enable you to prevent one workstation from affecting the others in the
multicast.
2.4. Using WDS with Windows 7 AIK or MDT 2010
Whenever you have to deploy images to
workstations on your network, no matter what means you used to create those
images, you can deploy them using WDS. Using WDS frees you from having to create
boot disks and installation disks, and it also enables you to take advantage of
its multicasting capabilities, thereby reducing the impact of the network
deployment process on your network.
When you use Windows 7 AIK or MDT 2010 to deploy workstations, you have to boot
them several times. First, you have to boot your reference computer to install
Windows 7. Then, you have to boot the reference computer again to capture an image
of it. Finally, you have to boot the target workstations to deploy your images on
them. You can use WDS to perform any of these boots, and as long as your
workstations are PXE-compliant, you do not ever have to burn a boot disk. You can
use the Boot.wim image from a Windows 7 installation disk, the WinPE.wim image
provided with Windows 7 AIK, or a customized boot image created using MDT
2010.
If you create your install images manually, using the tools in Windows 7 AIK,
you can deploy them using WDS, just as you would the standard Install.wim image.
If you use MDT 2010, you can boot your workstations by using WDS, but because MDT
2010 creates its own deployment share, there is no need to use WDS to deploy the
install images.