An application may begin by performing an inventory
of a system looking for particular sensors. However, in order to perform
useful work, the application will eventually need to look for a
specific sensor. For example, if you want to obtain location
information, you'll need to locate a Location
sensor. The following sections move on to the next step by using the
Geosense for Windows sensor, working directly with the sensor to obtain
location information.
1. Understanding the Geosense for Windows Data
If you're going to work with a
specific sensor, it's a good idea to know what type of information
you'll receive. This means knowing the values that you'll obtain from
the DataReport.Values property. The Geosense for Windows sensor outputs two keys. The first contains a timestamp. The second contains a list of 10 values, as shown in Table 1.
Table 1. Geosense for Windows Sensor Data
| ELEMENT | DATA TYPE | DESCRIPTION |
|---|
| 0 | Double | Latitude |
| 1 | Double | Longitude |
| 2 | Double | Altitude |
| 3 | Double | Accuracy (a value of 0 means that the accuracy level is unknown) |
| 4 | String | Street Number |
| 5 | String | Street |
| 6 | String | City |
| 7 | String | Region |
| 8 | String | State |
| 9 | String | Postal Code |
2. Configuring the Get Location Example
This example begins
with a Windows Forms application. You'll need to add a series of
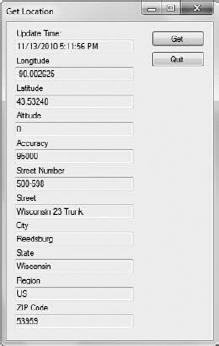
textboxes to hold the data results, as shown in Figure 1, and a Get button (btnGet) to output the results of the query. Name the textboxes: txtLatitude, txtLongitude, txtAltitude, txtAccuracy, txtStreetNumber, txtStreet, txtCity, txtRegion, txtState, and txtZIP.

In addition, you'll need to add references to Microsoft.WindowsAPICodePack.DLL, Microsoft.WindowsAPICodePack.Shell.DLL, and Microsoft.WindowsAPICodePack.Sensors.DLL. You must also provide the following using statements:
using Microsoft.WindowsAPICodePack.Sensors;
using Microsoft.WindowsAPICodePack.Shell.PropertySystem;
3. Initializing the Sensor
Before you can use the sensor, you need to create an object to access it. The code in Listing 1
creates a global object used to access the Geosense for Windows sensor.
It also performs some initialization tasks for working with the sensor.
Example 1. Configure the sensor for use
// Storage for the location sensors.
SensorList<Sensor> LocationSensors;

// Storage for the Geosense for Windows sensor.
Sensor Geosense;

public frmMain()
{
    // Perform the standard initialization.
    InitializeComponent();

    // Obtain a list of location sensors.
    LocationSensors =
        SensorManager.GetSensorsByCategoryId(SensorCategories.Location);

    // Access the Geosense sensor.
    if (LocationSensors.Count == 1 &&
        LocationSensors[0].FriendlyName == "Geosense Sensor")
        Geosense = LocationSensors[0];
    else
        foreach (Sensor ThisSensor in LocationSensors)
            if (ThisSensor.FriendlyName == "Geosense Sensor")
                Geosense = ThisSensor;

    // Verify that we found the sensor.
    if (Geosense == null)
    {
        MessageBox.Show("Geosense for Windows sensor not installed!" +
            "\nClosing Application");
        Environment.Exit(1);
    }

    // Set an event handler for state changes.
    Geosense.StateChanged +=
        new StateChangedEventHandler(Geosense_StateChanged);

    // Set an event handler for data updates.
    Geosense.DataReportChanged +=
        new DataReportChangedEventHandler(Geosense_DataReportChanged);
}
|
The SensorList<Sensor> object, LocationSensors, contains a list of specific sensors. In this case, it contains those sensors used to obtain location data. The Sensor object, Geosense, contains the reference to the Geosense for Windows sensor.
The form's constructor begins with the usual call to InitializeComponent(). It then obtains a collection of location sensors by calling SensorManager.GetSensorsByCategoryId() with an argument of SensorCategories.Location. Notice how this call differs from the SensorManager.GetAllSensors() method call shown in Listing 1 of this article. The output is specific, and only the location sensors will appear in the output collection, LocationSensors.
The presence of a location
sensor doesn't mean that you've found the Geosense for Windows sensor.
The code performs two different checks for the sensor using an if...else structure. In the first case, there's only one sensor available, so the code checks its FriendlyName property value, which must be "Geosense Sensor". In the second case, the code uses a foreach statement to check all the sensors returned for a sensor that has a FriendlyName property value of "Geosense Sensor". In both cases, the result is to set Geosense to a reference of the sensor.
The code verifies that the Geosense for Windows sensor is present by checking Geosense for a null value. If the value is null, the code outputs an error message and exits using the Environment.Exit() method. This approach allows the example to return an error code of 1 in this case.
When the sensor does exist, the code creates event handlers for the two events that the sensor supports: StateChanged and DataReportChanged. Remember that you can use the IDE to help you create the event handlers. Press Tab after typing +=
to create the remainder of the event handler statement. Press Tab a
second time to create the event handler methods. This process is quick
and easy.
4. Creating and Handling Sensor Events
After you create a
reference to the Geosense for Windows sensor, you can begin interacting
with it. The first step is to check the sensor and then initiate a
request, as shown in Listing 2.
Example 2. Perform sensor updates as needed to check the position
private void btnGet_Click(object sender, EventArgs e)
{
    // Verify that the Geosense sensor is on.
    if (Geosense.State != SensorState.Ready)
    {
        MessageBox.Show("Please enable the Geosense sensor.");
        return;
    }

    // Perform an update.
    Geosense.UpdateData();
}
|
The code begins by checking the Geosense.State property. If this property doesn't have a value of SensorState.Ready, the code displays an error message and exits without initiating a request. Otherwise, it initiates a request by calling Geosense.UpdateData().
As previously mentioned, the Geosense for Windows sensor supports two events. Listing 3 shows the handlers for these events.
Example 3. Use events to respond to sensor changes
void Geosense_DataReportChanged(Sensor sender, EventArgs e)
{
    // Create a location Guid.
    Guid Location = new Guid("{055c74d8-ca6f-47d6-95c6-1ed3637a0ff4}");

    try
    {
        // Update the timestamp.
        txtTime.Text = Geosense.DataReport.TimeStamp.ToString();

        // Update the location.
        txtLatitude.Text =
            Geosense.DataReport.Values[Location][0].ToString();
        txtLongitude.Text =
            Geosense.DataReport.Values[Location][1].ToString();
        txtAltitude.Text =
            Geosense.DataReport.Values[Location][2].ToString();
        txtAccuracy.Text =
            Geosense.DataReport.Values[Location][3].ToString();
        txtStreetNumber.Text =
            Geosense.DataReport.Values[Location][4].ToString();
        txtStreet.Text =
            Geosense.DataReport.Values[Location][5].ToString();
        txtCity.Text =
            Geosense.DataReport.Values[Location][6].ToString();
        txtRegion.Text =
            Geosense.DataReport.Values[Location][7].ToString();
        txtState.Text =
            Geosense.DataReport.Values[Location][8].ToString();
        txtZIP.Text =
            Geosense.DataReport.Values[Location][9].ToString();
    }
    catch
    {
    }
}

void Geosense_StateChanged(Sensor sender, EventArgs e)
{
    MessageBox.Show(
        "Geosense state changed to: " + Geosense.State.ToString());
}
|
The Geosense_DataReportChanged() event handler is the more important of the two event handlers for this example. In this case, the code begins by creating a Guid object, Location, which uses the GUID shown in Figure 1 of this article to access the location data values shown in Figure 1 of this article.
The output code begins by displaying the time of the data report using the TimeStamp property. It then displays all the data values listed in Table 1 on-screen by accessing each of the DataReport.Values[Location] entries in turn. Figure 2 shows typical output from this example. Of course, your display will show the data for your location.
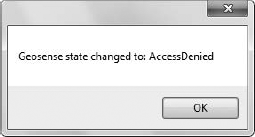
The Geosense_StateChanged()
event handler responds to changes in the Geosense for Windows sensor
state. You can use this event handler to ensure that the user doesn't
turn off the sensor between calls. In this case, the event handler
simply displays a message box with the new sensor status, as shown in Figure 3. The only two states available appear to be Ready and AccessDenied.