In movie mythology, blobs are
ever-growing creatures that consume everything in their path. In Azure,
blobs just seem to be the same. A blob, or binary large object,
is an Azure storage mechanism with both streaming and random read/write
capabilities. Blob Storage is accessed via a .NET client library or a
rich REST API, and libraries for a number of languages, including Ruby
and PHP, are available. With the addition of the Windows Azure Content
Delivery Network, blobs have become a very functional and powerful
storage option.
Blobs in the Azure ecosystem
Blobs are one of the three
simple storage options for Windows Azure, and are designed to store
large files in binary format. There are two types of blobs block blobs and page blobs. Block blobs are designed for streaming, and each blob can have a size of up to 200 GB. Page blobs
are designed for read/write access and each blob can store up to 1 TB
each. If we're going to store images or video for use in our
application, we'd store them in blobs. On our local systems, we would
probably store these files in different folders. In our Azure account,
we place blobs into containers, and just as a local hard drive can
contain any number of folders, each Azure account can have any number of
containers.
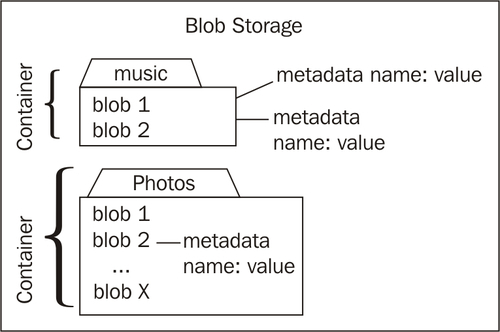
Similar to folders on a hard
drive, access to blobs is set at the container level, where permissions
can be either "public read" or "private". In addition to permission
settings, each container can have 8 KB of metadata used to describe or
categorize it (metadata are stored as name/value pairs). Each blob can
be up to 1 TB depending on the type of blob, and can also have up to 8
KB of metadata. For data protection and scalability, each blob is
replicated at least three times, and "hot blobs" are served from
multiple servers. Even though the cloud can accept blobs of up to 1 TB
in size, Development Storage can accept blobs only up to 2 GB. This
typically is not an issue for development, but still something to
remember when developing locally.
Page
blobs form the basis for Windows Azure Drive a service that allows
Azure storage to be mounted as a local NTFS drive on the Azure instance,
allowing existing applications to run in the cloud and take advantage
of Azure-based storage while requiring fewer changes to adapt to the
Azure environment. Azure drives are individual virtual hard drives
(VHDs) that can range in size from 16 MB to 1 TB. Each Windows Azure
instance can mount up to 16 Azure drives, and these drives can be
mounted or dismounted dynamically. Also, Windows Azure Drive can be
mounted as readable/writable from a single instance of an Azure service,
or it can be mounted as a read-only drive for multiple instances. At
the time of writing, there was no driver that allowed direct access to
the page blobs forming Azure drives, but the page blobs can be
downloaded, used locally, and uploaded again using the standard blob
API.
Creating Blob Storage
Blob Storage can be used
independent of other Azure services, and even if we've set up a Windows
Azure or SQL Azure account, Blob Storage is not automatically created
for us. To create a Blob Storage service, we need to follow these steps:
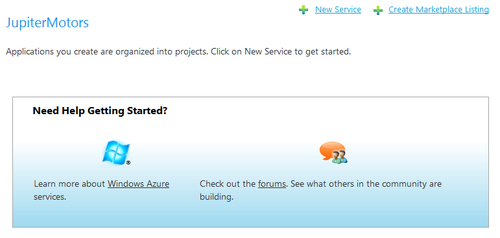
1. Log in to the Windows Azure Developer portal and select our project.
2. After we select our project, we should see the project page, as shown in the next screenshots:
3. Clicking the New Service link on the application page takes us to the service creation page, as shown next:
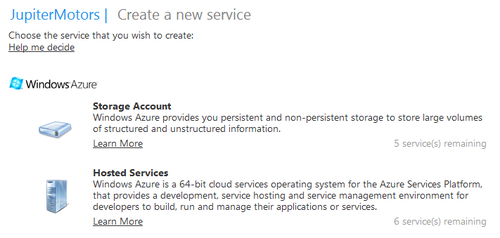
4. Selecting Storage Account
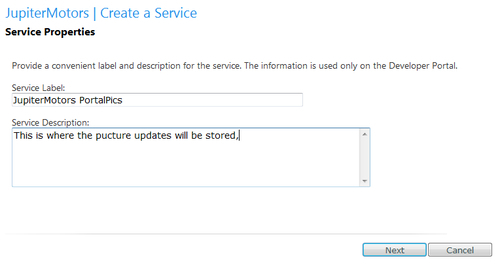
allows us to choose a name and description for our storage service.
This information is used to identify our services in menus and listings.
5. Next, we choose a unique name for our storage account. This name must
be unique across all of Azure it can include only lowercase letters and
numbers, and must be at least three characters long.

6.
If our account name is available, we then choose how to localize our
data. Localization is handled by "affinity groups", which tie our
storage service to the data centers in different geographic regions. For
some applications, it may not matter where we locate our data. For
other applications, we may want multiple affinity groups to provide
timely content delivery. And for a few applications, regulatory
requirements may mean we have to bind our data to a particular region.
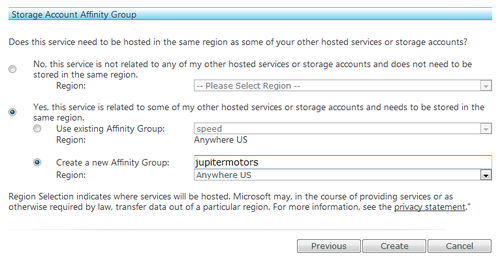
7. Clicking the Create
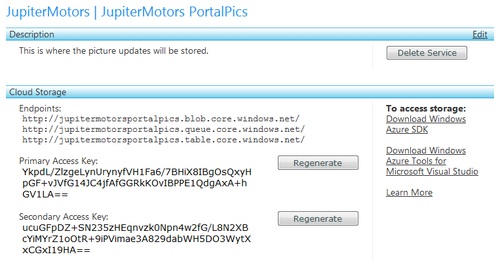
button creates our storage service, and when complete, a summary page
is shown. The top half of the summary page reiterates the description of
our service and provides the endpoints and 256-bit access keys. These
access keys are very important they are the authentication keys we need
to pass in our request if we want to access private storage or
add/update a blob.
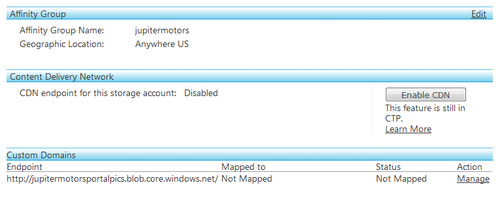
8.
The bottom portion of the confirmation page reiterates the affinity
group the storage service belongs to. We can also enable a content
delivery network and custom domain for our Blob Storage account.
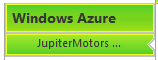
9. Once we create a service, it's shown on the portal menu and in the project summary once we select a project.
10. That's it! We now have our storage services created.

We're now ready to look at blobs in a little more depth.
