In this example, you’ll use the SharePoint
client object model instead of the server object model. Whereas the
server object model provides a way for you to interact with SharePoint
on the server, you can use the SharePoint client object model to
interact with SharePoint from a remote client such as a .NET Framework application, JavaScript, or in the case of this exercise, Silverlight.
The exercise assumes that you’ve created an external list that points to the StoreInformation table in the Customers database. The external list name should be called Stores_From_Azure. Before starting this exercise, you’ll also need to download the Bing Maps Silverlight control and SDK. You can download these items from http://www.microsoft.com/downloads/en/details.aspx?displaylang=en&FamilyID=beb29d27-6f0c-494f-b028-1e0e3187e830.
Note:
More Info If you’d like to learn more about the Bing Maps Silverlight Control SDK, there is an interactive SDK at http://www.microsoft.com/maps/isdk/silverlight/.
1. Integrating Silverlight, SQL Azure, Bing, and the SharePoint Client Object Model
Right-click the Visual Studio solution, and select Add | New Project. Select the installed Silverlight templates, and click Silverlight Application. Provide a name for the project (such as Bing_LOB_UI), and click OK. Right-click
the newly created project, and select Add Reference. Click the Browse
tab (or you might have them listed on the Recent tab), and add the
Microsoft.SharePoint.Client.Silverlight.dll and the
Microsoft.SharePoint.Client.Silverlight.Runtime.dll to the project by
navigating to the folder system (that is, C:\Program Files\Common
Files\Microsoft Shared\Web Server
Extensions\14\TEMPLATE\LAYOUTS\ClientBin) and adding the libraries to
your project. Right-click
the project, and select Add Reference. Click the Browse tab, and
navigate to the install location of the SDK (that is, C:\Program
Files\Bing Maps Silverlight Control\V1\Libraries), select
Microsoft.Maps.MapControl.dll, and click OK. Right-click MainPage.xaml, and select View Designer. Add the bolded code as per the following code snippet: <UserControl x:Class="Bing_LOB_UI.MainPage"
xmlns="http://schemas.microsoft.com/winfx/2006/xaml/presentation"
xmlns:x="http://schemas.microsoft.com/winfx/2006/xaml"
xmlns:d="http://schemas.microsoft.com/expression/blend/2008"
xmlns:mc="http://schemas.openxmlformats.org/markup-compatibility/2006"
mc:Ignorable="d"
d:DesignHeight="500" d:DesignWidth="1000"
xmlns:sdk="http://schemas.microsoft.com/winfx/2006/xaml/presentation/sdk"
xmlns:m="clr-namespace:Microsoft.Maps.MapControl;
assembly=Microsoft.Maps.MapControl">
<Grid x:Name="LayoutRoot" Height="500" Width="1000">
<Grid.Background>
<LinearGradientBrush EndPoint="0.5,1" StartPoint="0.5,0">
<GradientStop Color="Black" Offset="0"/>
<GradientStop Color="White" Offset="1"/>
</LinearGradientBrush>
</Grid.Background>
<Grid.RowDefinitions>
<RowDefinition/>
</Grid.RowDefinitions>
<Rectangle Margin="361,50,28,22" Stroke="Black" Fill="#FF6D6D76"
Opacity="0.9" />
<m:Map x:Name="MainMap" CredentialsProvider="12345"
AnimationLevel="Full"
Mode="AerialWithLabels"
ZoomLevel="5"
Center="38.000,-95.000" Margin="361,50,28,22">
<m:Map.Children>
<m:MapLayer x:Name="Pushpins"/>
<m:MapLayer x:Name="TooltipLayer">
<Canvas x:Name="Tooltip" Visibility="Collapsed" Opacity="0.9">
<Rectangle x:Name="ContentPopupRectangle" Fill="DarkBlue"
Canvas.Left="0" Canvas.Top="0" Height="100" Width="300"
RadiusX="10" RadiusY="10"/>
<StackPanel Canvas.Left="10" Canvas.Top="10">
<TextBlock x:Name="StoreTooltipText" FontSize="12"
FontWeight="Bold" >
</TextBlock>
<TextBlock x:Name="StoreTooltipDescription"
Foreground="White"
Width="275" FontSize="8" FontWeight="Bold"
TextWrapping="Wrap"/>
</StackPanel>
</Canvas>
</m:MapLayer>
</m:Map.Children>
</m:Map>
<sdk:Label Foreground="BlanchedAlmond" x:Name="lblViewStoreTitle"
FontWeight="Black" Width="150" HorizontalAlignment="Left"
Margin="20,28,0,0" Content="View Store Records"
VerticalAlignment="Top"/>
<!--<ListBox HorizontalAlignment="Left" x:Name="lstbxAzureStoreRecords"
Height="398" Margin="18,50,0,0" VerticalAlignment="Top"
Width="321"/>-->
<ListBox x:Name="lstStores" Width="325" Height="375" Margin="17,68,658,57">
<ListBox.ItemTemplate>
<DataTemplate>
<Border Margin="5" BorderThickness="1" BorderBrush="Black"
CornerRadius="4" HorizontalAlignment="Stretch">
<Grid Margin="3">
<Grid.RowDefinitions>
<RowDefinition></RowDefinition>
<RowDefinition></RowDefinition>
<RowDefinition></RowDefinition>
</Grid.RowDefinitions>
<TextBlock x:Name="txtblckStoreName" Width="275"
FontFamily="Arial"
FontSize="10" FontWeight="Bold"
Text="{Binding StoreName}">
</TextBlock>
<TextBlock x:Name="txtblckStoreAddress" Grid.Row="1"
FontFamily="Arial"
FontSize="8" Text="{Binding StoreAddress}">
</TextBlock>
<TextBlock x:Name="txtblckStorePhone" Grid.Row="2"
FontFamily="Arial"
FontSize="8" Text="{Binding StorePhone}"></TextBlock>
</Grid>
</Border>
</DataTemplate>
</ListBox.ItemTemplate>
</ListBox>
<Button Content="Zoom" HorizontalAlignment="Left" x:Name="btnZoomOnStore"
Margin="20,466,0,12" Width="75"
d:LayoutOverrides="Height"
Click="btnZoomOnStore_Click"/>
<sdk:Label Content="Store Locations" FontWeight="Black"
Foreground="BlanchedAlmond"
HorizontalAlignment="Left" Margin="361,28,0,0" Name="lblMap"
VerticalAlignment="Top" Width="150" />
</Grid>
</UserControl>
Note that you’ve added the controls listed in the following table in your Visual Web Part UI. | Control Type | Control Name |
|---|
| Map | MainMap | | Rectangle | ContentPopupRectangle | | TextBlock | StoreTooltipText | | TextBlock | StoreTooltipDescription | | Label | lblViewStoreTitle | | Label | lblMap | | Listbox | lstStores | | TextBlock | txtblckStoreName | | TextBlock | txtblckStoreAddress | | TextBlock | txtblckStorePhone | | Button | btnZoomOnStore |
The UI code is broken out into two major areas. The Silverlight Bing
Maps Control is located to the right of the UI, and you can see that,
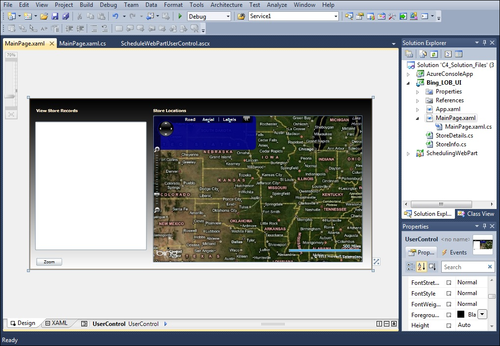
given your predefined center point and zoom level, the map has a default starting position. On the left is the listbox, where you’ll use data-binding to bind TextBlock text properties to the custom object you’ll build dynamically within the Silverlight application—essentially reading the SQL Azure data, which is represented in the SharePoint external list. When you click a specific record in the listbox and click the Zoom button, the Bing Map will then center and zoom in on that particular store. When you’ve added the UI code, the UI in Visual Studio should look similar to the following image.

Right-click the project, and select Add | Class. Provide a name for the class (such as StoreDetails), and add the following bolded code: ...
using Microsoft.Maps.MapControl;
namespace Bing_LOB_UI
{
public class StoreDetails
{
public Location StoreLocation { get; set; }
public string StoreName { get; set; }
public string StoreAddress { get; set; }
public string StorePhone { get; set; }
public string StoreHours { get; set; }
}
}
Right-click the project, and select Add | Class. Provide a name for the class (such as StoreInfo), and add the bolded code as shown in the following code snippet: ...
namespace Bing_LOB_UI
{
public class StoreInfo
{
public string StoreName { get; set; }
public string StoreAddress { get; set; }
public string StorePhone { get; set; }
public string Latitude { get; set; }
public string Longitude { get; set; }
}
}
Right-click MainPage.xaml and select View Code. Add the bolded code as shown here to the XAML code-behind: using System;
using System.Collections.Generic;
using System.Linq;
using System.Net;
using System.Windows;
using System.Windows.Controls;
using System.Windows.Documents;
using System.Windows.Input;
using System.Windows.Media;
using System.Windows.Media.Animation;
using System.Windows.Shapes;
using Microsoft.Maps.MapControl;
using Microsoft.SharePoint.Client;
namespace Bing_LOB_UI
{
public partial class MainPage : UserControl
{
ClientContext clientContext = null;
Web web = null;
List<StoreDetails> storeDetailsList = new List<StoreDetails>();
List<StoreInfo> listOfStoreSummaries = new List<StoreInfo>();
IEnumerable<ListItem> bcsStoreList;
MapLayer OtherStores = new MapLayer();
public MainPage()
{
InitializeComponent();
this.Loaded += new RoutedEventHandler(MainPage_Loaded);
}
void MainPage_Loaded(object sender, RoutedEventArgs e)
{
GetListsDataFromSharePoint();
}
private void GetListsDataFromSharePoint()
{
GetSPListData();
}
private void GetSPListData()
{
using (clientContext = new ClientContext("http://blueyonderdemo"))
{
web = clientContext.Web;
clientContext.Load(web);
var bcsListFromAzure = web.Lists.GetByTitle("Stores_From_Azure");
CamlQuery query = new CamlQuery();
IQueryable<ListItem> bcsListItems = bcsListFromAzure.GetItems(query);
bcsStoreList = clientContext.LoadQuery(bcsListItems);
clientContext.ExecuteQueryAsync(OnStoresRequestSucceeded,
OnRequestFailed);
}
}
private void OnStoresRequestSucceeded(object sender,
ClientRequestSucceededEventArgs e)
{
Dispatcher.BeginInvoke(FillStoreList);
}
private void OnRequestFailed(object sender, ClientRequestFailedEventArgs e)
{
Dispatcher.BeginInvoke(() =>
{
MessageBox.Show("Error: " + e.Message);
});
}
private void FillStoreList()
{
storeDetailsList.Clear();
foreach (var x in bcsStoreList)
{
StoreDetails objStoreDetails = new StoreDetails();
objStoreDetails.StoreName =
x.FieldValues.ElementAt(3).Value.ToString();
objStoreDetails.StoreAddress =
x.FieldValues.ElementAt(4).Value.ToString();
objStoreDetails.StorePhone =
x.FieldValues.ElementAt(5).Value.ToString();
objStoreDetails.StoreHours =
x.FieldValues.ElementAt(8).Value.ToString();
objStoreDetails.StoreLocation = new Location(
Convert.ToDouble(x.FieldValues.ElementAt(6).Value.ToString()),
Convert.ToDouble(x.FieldValues.ElementAt(7).Value.ToString()));
storeDetailsList.Add(objStoreDetails);
StoreInfo objStoreSummary = new StoreInfo();
objStoreSummary.StoreName =
x.FieldValues.ElementAt(3).Value.ToString();
objStoreSummary.StoreAddress =
x.FieldValues.ElementAt(4).Value.ToString();
objStoreSummary.StorePhone =
x.FieldValues.ElementAt(5).Value.ToString();
listOfStoreSummaries.Add(objStoreSummary);
}
lstStores.ItemsSource = listOfStoreSummaries;
AddStoresToMap();
}
private void AddStoresToMap()
        {
            Pushpins.Children.Clear();

            for (int i = 0; i < storeDetailsList.Count; i++)
            {
                string description = "Store: " + storeDetailsList[i].StoreName
                                 + "\nAddress: " + storeDetailsList[i].StoreAddress
                                 + "\nPhone: " + storeDetailsList[i].StorePhone
                                 + "\nHours: " + storeDetailsList[i].StoreHours;

                CreatePushpin(storeDetailsList[i].StoreLocation, description);
            }
        }

        private void CreatePushpin(Location location, string description)
        {
            Pushpin pushpin = new Pushpin();
            pushpin.Width = 7;
            pushpin.Height = 10;
            pushpin.Tag = description;
            pushpin.Location = location;
            Pushpins.AddChild(pushpin, location, PositionOrigin.Center);

            pushpin.MouseEnter += new MouseEventHandler(Shape_MouseEnter);
            pushpin.MouseLeave += new MouseEventHandler(Shape_MouseLeave);
        }
private void Shape_MouseEnter(object sender, MouseEventArgs e)
{
if (sender.ToString() == "Microsoft.Maps.MapControl.Pushpin")
{
Pushpin content = sender as Pushpin;
Canvas.SetZIndex(content, 500);
StoreTooltipText.Text = content.Name;
StoreTooltipDescription.Text = content.Tag.ToString();
}
else
{
MapPolygon storeContent = sender as MapPolygon;
Canvas.SetZIndex(storeContent, 500);
StoreTooltipText.Text = "ID: " + storeContent.Name;
StoreTooltipDescription.Text = storeContent.Tag.ToString();
}
Point point = e.GetPosition(MainMap);
Location location = MainMap.ViewportPointToLocation(point);
MapLayer.SetPosition(Tooltip, location);
MapLayer.SetPositionOffset(Tooltip, new Point(25, -50));
Tooltip.Visibility = Visibility.Visible;
}
private void Shape_MouseLeave(object sender, MouseEventArgs e)
{
UIElement content = sender as UIElement;
Canvas.SetZIndex(content, 100);
Tooltip.Visibility = Visibility.Collapsed;
}
private void btnZoomOnStore_Click(object sender, RoutedEventArgs e)
{
    Location locationFilter = new Location();
    StoreInfo tempStoreRecord = new StoreInfo();

    tempStoreRecord = (StoreInfo)lstStores.SelectedItem;
    string storeNameFilter = tempStoreRecord.StoreName;

    var locationData = from store in storeDetailsList
                       where store.StoreName == storeNameFilter
                       select store;

    foreach (var item in locationData)
    {
        locationFilter = item.StoreLocation;
    }

    MainMap.SetView(locationFilter, 10);
}
}
}
There’s a lot of code here, but let’s break it out into three parts: Retrieval of SQL Azure data from external list
To retrieve the SQL Azure data from the SharePoint external list, you use the two custom objects that you created (StoreDetails and StoreInfo). You could optimize the code with one object, but I wanted to keep their usage separate; that is, the StoreDetails is used for the map and the StoreInfo is used to populate the listbox. For example, in the following code snippet, you’ll note that you’re first calling the GetSPListData method, which is where you’re using the SharePoint client object model to set the context for your SharePoint site, getting a reference to the Stores_From_Azure external list, getting the items from the list, and then loading the items into an IQueryable set of list items (bcsListItems). You then use the FillStoreList method to populate List collection objects that will be used to display the data in the listbox and in the map: ...
private void GetSPListData()
{
using (clientContext = new ClientContext("http://blueyonderdemo"))
{
web = clientContext.Web;
clientContext.Load(web);
var bcsListFromAzure = web.Lists.GetByTitle("Stores_From_Azure");
CamlQuery query = new CamlQuery();
IQueryable<ListItem> bcsListItems = bcsListFromAzure.GetItems(query);
bcsStoreList = clientContext.LoadQuery(bcsListItems);
clientContext.ExecuteQueryAsync(OnStoresRequestSucceeded,
OnRequestFailed);
}
}
...
private void FillStoreList()
{
storeDetailsList.Clear();
foreach (var x in bcsStoreList)
{
StoreDetails objStoreDetails = new StoreDetails();
objStoreDetails.StoreName =
x.FieldValues.ElementAt(3).Value.ToString();
objStoreDetails.StoreAddress =
x.FieldValues.ElementAt(4).Value.ToString();
objStoreDetails.StorePhone =
x.FieldValues.ElementAt(5).Value.ToString();
objStoreDetails.StoreHours =
x.FieldValues.ElementAt(8).Value.ToString();
objStoreDetails.StoreLocation = new Location(
Convert.ToDouble(x.FieldValues.ElementAt(6).Value.ToString()),
Convert.ToDouble(x.FieldValues.ElementAt(7).Value.ToString()));
storeDetailsList.Add(objStoreDetails);
StoreInfo objStoreSummary = new StoreInfo();
objStoreSummary.StoreName =
x.FieldValues.ElementAt(3).Value.ToString();
objStoreSummary.StoreAddress =
x.FieldValues.ElementAt(4).Value.ToString();
objStoreSummary.StorePhone =
x.FieldValues.ElementAt(5).Value.ToString();
listOfStoreSummaries.Add(objStoreSummary);
}
lstStores.ItemsSource = listOfStoreSummaries;
AddStoresToMap();
}
The map is the Bing
functionality that you’ll use to create pushpins and overlay each of
the store records (as pushpins) within. It’s a great way to create
dynamic applications within SharePoint
that require some level of geo-services—think sales territory, customer
locations, and so on. For example, the following code snippet shows how
you’re iterating through each of the items you’ve read from the
external list and added to the storeDetailsList List collection, and then calling the CreatePushpin
method to add a new pushpin for each of those records pulled from the
external list. You set specific properties for the pushpin as it is
added to the map. Note that you can also use String.Format to create the description string, as you can see in the following example: string description = String.Format("{0}", storeDetailsList[i].StoreName);
The MouseEnter and MouseLeave events handle the displaying of the tooltip object: private void AddStoresToMap()
{
Pushpins.Children.Clear();
for (int i = 0; i < storeDetailsList.Count; i++)
{
string description = "Store: " + storeDetailsList[i].StoreName
+ "\nAddress: " + storeDetailsList[i].StoreAddress
+ "\nPhone: " + storeDetailsList[i].StorePhone
+ "\nHours: " + storeDetailsList[i].StoreHours;
CreatePushpin(storeDetailsList[i].StoreLocation, description);
}
}
private void CreatePushpin(Location location, string description)
{
Pushpin pushpin = new Pushpin();
pushpin.Width = 7;
pushpin.Height = 10;
pushpin.Tag = description;
pushpin.Location = location;
Pushpins.AddChild(pushpin, location, PositionOrigin.Center);
pushpin.MouseEnter += new MouseEventHandler(Shape_MouseEnter);
pushpin.MouseLeave += new MouseEventHandler(Shape_MouseLeave);
}
The last piece is the zooming of the store in the map after you click a specific record and click the Zoom button. The btnZoomOnStore_Click
event triggers the re-centering of the map to focus on the store you
clicked in the listbox. For example, the following code snippet shows
that when you do this, you’re creating a new Location object (an object specifically required by the Bing Map) and a new StoreInfo object. Because you data-bound the listbox to the in-memory custom class (that is, StoreInfo), you can cast the selected item in the listbox as a StoreInfo object and then query it using a simple LINQ statement. This gives one result you can then use to zoom in on by calling the SetView method—another member of the Bing Maps API:private void btnZoomOnStore_Click(object sender, RoutedEventArgs e)
{
Location locationFilter = new Location();
StoreInfo tempStoreRecord = new StoreInfo();
tempStoreRecord = (StoreInfo)lstStores.SelectedItem;
string storeNameFilter = tempStoreRecord.StoreName;
var locationData = from store in storeDetailsList
where store.StoreName == storeNameFilter
select store;
foreach (var item in locationData)
{
locationFilter = item.StoreLocation;
}
MainMap.SetView(locationFilter, 10);
}
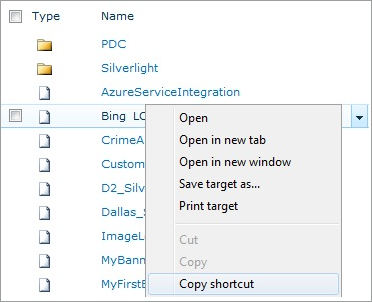
Now that you understand the code, let’s jump back into the Visual Studio project. You’re now ready to deploy the Silverlight application to SharePoint. To do this, navigate to your SharePoint site, add the XAP file to a document library,
and copy the shortcut of the newly added XAP file by right-clicking the
file and selecting Copy Shortcut, as shown in the following image.

Navigate to (or create) a SharePoint
webpage, and select Site Actions and Edit Page. Click the Insert tab,
select Web Part, and select the Media And Content Web Part group. Click
the Silverlight Web Part, and click Add. Paste the shortcut to the XAP file in the URL field in the Silverlight Web Part dialog box, and click OK.
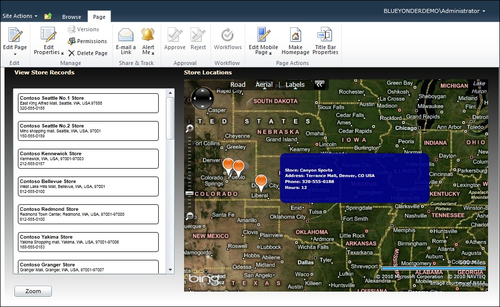
When you’ve added the Silverlight Web Part, the page load will trigger the MainPage_Loaded event, which will use the client object model to load the SQL Azure data from the external list and create pushpins (using the Bing
Maps API) and add to the Silverlight-based Bing Map. The application
will also load a subset of the data from the external list and data-bind
it to an internal custom object. In Figure 1,
you can see that the listbox on the left side of the Silverlight
application has each of the stores from SQL Azure loaded into the listbox
control, and on the right, each of the pushpins has been loaded as
well. Also note that when you move the pointer over a pushpin, you’ll
get additional metadata about the store.

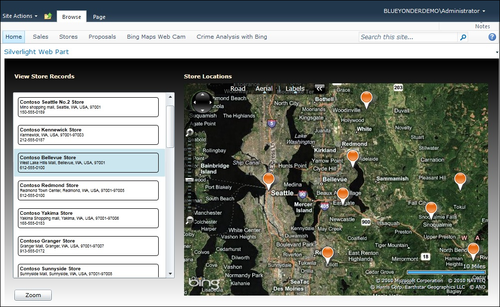
When you select one of the records in the listbox and then click the Zoom button, this will reposition the store from the listbox at the center of the Bing Map, as shown in Figure 2—where the Contoso Bellevue Store has been selected from the listbox and now is centered in the map.

This application was more
complex than the first two exercises; however, it shows that there are
some interesting applications that can be built from integrating Windows
Azure and SharePoint. Furthermore, when you add Bing Maps functionality, there is an additional dynamic element that can also be integrated within your application.
|