When integrating SQL Azure with BCS, you first need to create a new table in
SQL Azure that you can expose in SharePoint by using the BCS. To do
this, you’ll need to have your Windows Azure account up and running . If you do not have your Windows Azure account and developer key, make sure you acquire those first.
1. Create a SQL Azure Database
1.1. Create a SQL Azure Database
Click
Hosted Services, Storage Accounts, & CDN, and then select New
Storage Account. Map to a subscription, provide a namespace for your
storage account, select a region, and click Create. Click the Firewall
Rules accordion control to manage your firewall rules. Note that you’ll
need to ensure that you have the firewall of your machine registered
here so you can access the SQL Azure database. For demo purposes, create
a firewall rule that is open for your machine name—for example, MyServer with the rule 0.0.0.0-255.255.255.255.
Note:
You may also need to open outbound TCP 1433 on your machine. For more information on this, see http://msdn.microsoft.com/en-us/library/ee621782.aspx.
Click the Database tab in your portal, and then select the subscription where you want to create a new database. Create
a new database by clicking Create. Provide a name, and then select the
edition (which will auto-populate the amount of storage available for
you). Note that you’ll use the Web edition, which is a smaller, low-cost
database. Be
sure to make note of the server name and admin user name. You can
manage and reset the admin password by clicking Reset Admin Password. You may want to take some time at this point to explore the Windows Azure developer portal a little more. After you create your SQL Azure database, navigate away from the portal and open SQL Server 2008 R2 Management Studio. When
prompted, provide the name of your server, and enter the logon
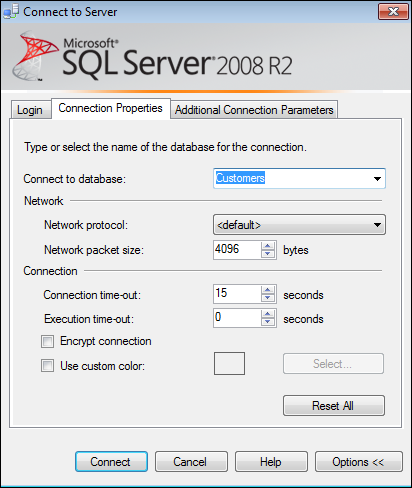
information. Also, click the Options button to expose the Connection
Properties tab, and select Customers (or whatever you named your SQL Azure database). Then click Connect.

When SQL Server connects to your SQL Azure database, click the New Query button as illustrated in the following image.

You now have a query window with an active connection to your account. Note that you can also create a new database here via SQL
scripts if you wanted. You created a database through the Windows Azure
developer portal, but you can also create a database through script.
For example, the following script creates a new database called Customer. You type this script in the query window and then click the Execute Query button: Create Database Customers
Now that you have the Customer database, you need to create a table called CustomerData. To do this, type the following SQL script and click the Execute Query button: CREATE TABLE [CustomerData](
[CustomerID] [int] IDENTITY(1,1)NOT NULL PRIMARY KEY CLUSTERED,
[Title] [nvarchar](8)NULL,
[FirstName] [nvarchar](50)NOT NULL,
[LastName] [nvarchar](50)NOT NULL,
[EmailAddress] [nvarchar](50)NULL,
[Phone] [nvarchar](30)NULL,
[Timestamp] [timestamp] NOT NULL
)
You’ll
now want to create a set of records for your new database table. To do
this, type the following SQL script, (adding different data in new
records as many times as you’d like): INSERT INTO [CustomerData]
([Title],[FirstName],[LastName],[EmailAddress],[Phone])
VALUES
('Dr', 'Ties', 'Arts', '[email protected]','425-555-0101'),
('Mr', 'Rob', 'Barker', '[email protected]','205-555-0128')
Eventually,
you will have a number of records. To view all of the records you
entered, type the following script and click the Execute Query button
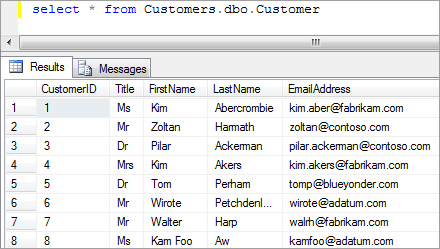
(where in this script Customers is the database name and CustomerData is the table name): Select * from Customers.dbo.CustomerData
The following image illustrates a sampling of the results you would see upon entering this SQL script in the query window.

Close the SQL Server 2008 R2 Management Studio, because you are now done adding records.
Note:
More Info For more in-depth information on SQL Azure, visit the Azure Channel 9 Learning Center at http://channel9.msdn.com/learn/courses/Azure/. From here, you can download a training kit in which you’ll find deeper technical information and tutorials on SQL Azure.
Now that you’ve created a new SQL Azure database called Customer, and a CustomerData
table with some records in it, you can move on to the SharePoint part
of this exercise. This is where you’ll configure SharePoint to connect
to SQL Azure and
expose the data as an external list, from which you’ll be able to
create, read, update, and delete (CRUD) records. To enable the
connection between SharePoint and SQL Azure, you’ll first need to secure
the connection to SQL Azure by using the Secure Store Service and an application ID.
|