The ability to create new database objects is
good, but for a number of applications we'll need to migrate an existing
database. For an on-premise SQL Server, to move a database, we'd
commonly use a backup and restore, or detach and reattach neither of
those options are available to us in SQL Azure. However, many of the
other options we might use, such as DAC Packs or SSIS, are available to
us in Azure. An overview of how to migrate applications and data to SQL
Azure can be found at http://msdn.microsoft.com/en-us/library/ee730904.aspx.
Manually scripting objects and data
Before any scripts
are manually created, there are a few scripting options we need to
change to ensure our objects are created correctly on SQL Azure. In
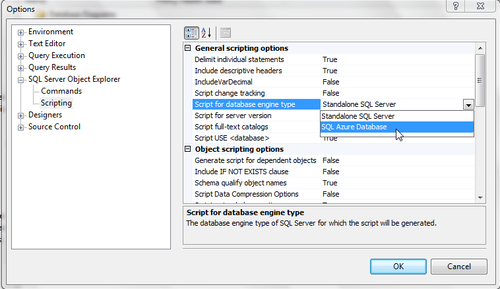
SSMS, the settings we need to change can be found at Tools | Options | SQL Server Object Explorer | Scripting. The first setting we need to change is, setting the Script for database engine type option to the SQL Azure Database option, as seen in the following screenshot. Changing this setting will change some other settings and disable others.
By default, dependent objects
will not be scripted. This may need to be set to "True" depending on the
needs and database schema. Likewise, triggers and indices will not be
scripted by default. If these are necessary, we need to enable these
settings too.
For complete control over
the migration process, we can create scripts for specific objects and
data by using SSMS, then running these scripts into our SQL Azure
database. For large databases, this can be a time-consuming process.
Using this method will script foreign keys, so it may be necessary to
create tables in a particular order, or tweak the scripts to run table
first, and then defaults and foreign keys.
A related option is to use the Generate Script Wizard (GSW). To use the GSW, right-click on the database name and choose Tasks | Generate Scripts.
The table scripts are not created in a relational manner, so we need to
ensure we run the scripts in the proper order. The output is a .sql file, which we can execute against a database instance.
SQL Azure Migration Wizard
The SQL Azure Migration
Wizard is a community project that can be used to migrate objects and
data from SQL Server 2005/2008 databases. The project can be found at http://sqlazuremw.codeplex.com/.
Because there may be incompatibilities between the older SQL Server
versions and SQL Azure, it is recommended that a test migration be
performed into a local SQL Server 2008 (or higher) database, and then
migrated into SQL Azure.
The SQL Azure Migration
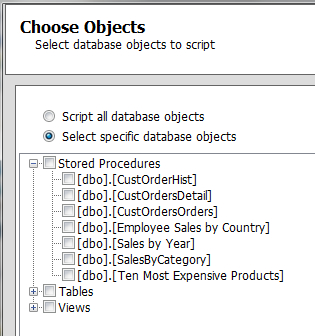
Wizard allows us to migrate an entire database, or to select specific
objects to migrate, as seen in the next screenshot. The output is T-SQL
scripts that can be executed in SQL Azure to make the necessary changes.
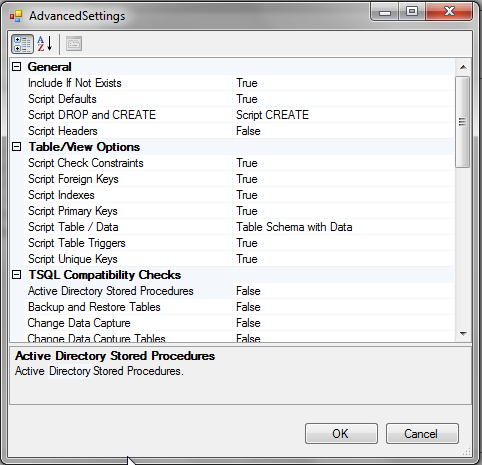
We have a great deal of control over the migration settings, including
migrating only tables, only data, or tables and data by changing the Script Table / Data setting. It's a good idea to fully review these setting before generating the SQL scripts.
SQL Server Integration Services (SSIS)
We can migrate tables and
data using the SQL Server Import and Export Wizard, or create an SSIS
package from scratch. SSIS packages do not execute on SQL Azure, they
can only create connections to SQL Azure database and perform the
functions as programmed. If we plan on using SSIS, we will need an
on-premise SQL Server instance to host the packages.
SQL Server Import and Export Wizard
The SQL Server Import and Export Wizard (http://msdn.microsoft.com/en-us/library/ms140052.aspx)
can be used to migrate tables and data between an on-premises SQL
Server and SQL Azure. At the end of the wizard, we have the option of
saving the package created by the wizard so that we can use it again. To
launch the wizard, right-click on a database in an on-premise instance
and choose Tasks | Export Data
(at the time of writing, the Import wizard cannot be launched by
clicking on a SQL Azure database, so we have to export from our
on-premise instance).
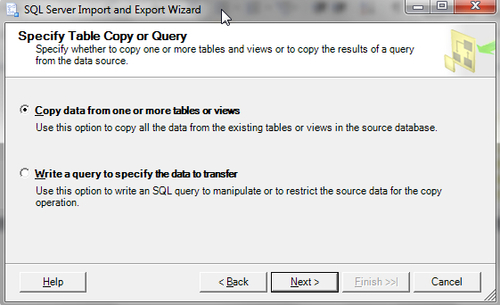
We can choose to migrate all the
data in one or more tables, or write a query to migrate a limited data
set from a single table, as seen in the next screenshot:
We can also set options to create tables, enable identity insert, and more, by choosing the Edit Mappings button from the Select Source Tables and Views screen. These are important options to consider if we want to save the package produced by the wizard.
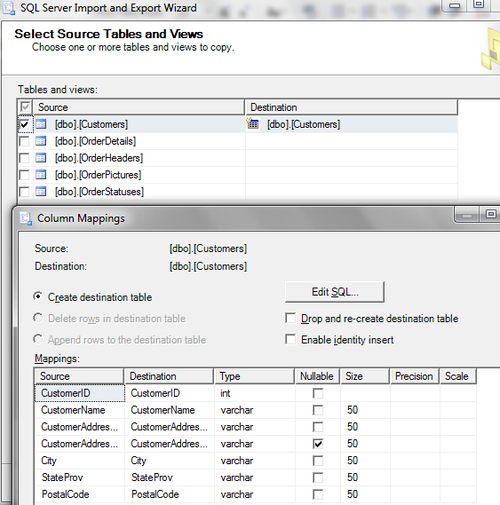
Although views can be
selected, the view definition is not migrated. The view is treated as a
table in the source database, and a table will be created in the target
database with the same name as the view, containing the data in the view
at the time the package was run. View definitions should be migrated
with some other technique to ensure they are migrated correctly.
At the end of the wizard, we
can choose to save the SSIS package as well as execute it. Be careful
while saving the package, as everything we asked the package to do will
be saved, and some of the settings we chose may be a good idea for a
first time (such as creating tables) but not a subsequent run (as the
tables exist, they cannot be created and the package will fail).
Creating packages from scratch
We can create SSIS
packages to migrate database objects and data to SQL Azure. SSIS uses an
ODBC connection to connect to SQL Azure, and just as with Access 2010,
we need to make sure the SQL Server Native Client 10.0 driver is
installed. Besides the driver requirement, creating an SSIS package in Business Intelligence Development Studio (BIDS) is the same as working with other SQL Server versions.
When running on a
schedule, SSIS packages are not suitable for migrating database objects.
SSIS is good for migrating data, and may be an alternative to the data
synchronization services mentioned above.
DAC Packs
One more option we have is the data-tier application package (DAC Pack).
DAC Packs can be used to migrate database schemas from one server
instance to another. DAC Packs can be created either in SSMS or with
custom .NET code. The SSMS option is easier, but is a manual process. An
overview of using DAC Packs can be found at http://msdn.microsoft.com/en-us/library/ee210546.aspx.
We can extract DAC Packs from
SQL Server 2000 or higher, but we can deploy DAC Packs only on SQL Azure
and SQL Server 2008 R2 or higher a version.
A DAC Pack is created in SSMS by right-clicking on a database name, then choosing Tasks | Extract data-tier application.
By following through the wizard, we can create a DAC Pack. The output
of the Extract wizard is a file stored on our local machine. A .dacpac file is actually just a ZIP file containing several XML files that describe our database's structure.
To deploy the DAC Pack, we need
to connect to the database instance in SSMS 2008 R2, right-click on the
instance name, and choose Deploy Data-tier Application.
One of the major downsides to a
DAC Pack is that not all object types are supported. We also don't get
to choose what is included in our DAC Pack; SQL Server assumes we want
everything to be included. This means we need to be careful with what
we're doing or we might migrate some half-baked features into
production, or migrate views or stored procedures that reference a
non-available database.
DAC Packs do not migrate data. So after we deploy a DAC Pack, we would need to use SSIS to migrate the data.
If we want to use custom .NET code, the MSDN documentation for the DAC Pack namespace can be found at http://msdn.microsoft.com/en-us/library/microsoft.sqlserver.management.dac.aspx.
BCP
For migrating large amounts of
data to SQL Azure, the command line BCP.exe utility can be utilized.
BCP works the same with SQL Azure as any other version of SQL Server.
Documentation for the BCP.exe utility can be found at http://msdn.microsoft.com/en-us/library/ms162802(SQL.105).aspx.