Three of the key-frame classes begin with the word Spline: SplineDoubleKeyFrame, SplinePointKeyFrame, and SplineColorKeyFrame. These classes have KeyTime and Value properties like the Discrete and Linear keyframes, but they also define a property named KeySpline.
This property allows you to create a key frame that speeds up or slows
down (or both) during its course but still ending at the correct value
by the time KeyTime comes around. The change in velocity is governed by a Bézier spline.
KeySpline is a structure with two properties named ControlPoint1 and ControlPoint2 of type Point. The X and Y coordinates of each of these points must be between 0 and 1. A single KeySpline object effectively describes a Bézier curve that begins at the point (0, 0) and ends at the point (1, 1) with these two control
points. It is not possible to create an arbitrary Bézier curve under
these constraints—for example, the curve can’t make a loop—but you’ll
see you have a considerable amount of flexibility.
Conceptually, during the course
of the key frame, the X coordinate of this spline represents normalized
time, which changes linearly from 0 to 1. The Y coordinate is the
normalized value of the animation, also changing from 0 to 1 but in a
non-linear fashion.
Certainly the best way to get a feel for spline-based key frames is to experiment with them, and I have just the program. It’s even called SplineKeyFrameExperiment:
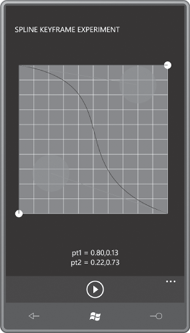
You can move the control points of the spline using the blue semi-translucent circles. The ApplicationBar has only one button labeled “animate”:
Example 1. Silverlight Project: SplineKeyFrameExperiment File: MainPage.xaml (excerpt)
<phone:PhoneApplicationPage.ApplicationBar>
    <shell:ApplicationBar>
        <shell:ApplicationBarIconButton IconUri="/Images/appbar.transport.play.rest
.png"
                                        Text="animate"
                                        Click="OnAppbarAnimateButtonClick" />
    </shell:ApplicationBar>
</phone:PhoneApplicationPage.ApplicationBar>
|
When you press it, the white
ball on the bottom of the grid moves linearly from left to right,
representing the linear increase in time. The white ball at the right of
the grid moves non-linearly from top to bottom based on the shape of
the spline.
For purposes of simplicity,
the layout of the screen is based on a grid with a fixed width and
height of 400 pixels, so the program will need to be modified a bit for a
smaller screen.
The content area begins with a gray 400-pixel square with horizontal and vertical grid lines every 40 pixels. Each grid line represents 0.1 units for displaying the spline.
Example 2. Silverlight Project: SplineKeyFrameExperiment File: MainPage.xaml (excerpt)
<Grid x:Name="ContentPanel" Grid.Row="1" Margin="12,0,12,0">
    <Grid.RowDefinitions>
        <RowDefinition Height="*" />
        <RowDefinition Height="Auto" />
    </Grid.RowDefinitions>

    <Grid Name="graphGrid"
          Grid.Row="0"
          HorizontalAlignment="Center"
          VerticalAlignment="Center">

        <!-- Background -->
        <Path Fill="#808080"
              Data="M 0 0 L 400 0, 400 400, 0 400 Z" />

        <!-- Horizontal lines -->
        <Polyline Stroke="{StaticResource PhoneForegroundBrush}"
                  Points="0 0 400 0" />
        <Polyline Stroke="{StaticResource PhoneForegroundBrush}"
                  Points="0 40 400 40" />
        <Polyline Stroke="{StaticResource PhoneForegroundBrush}"
                  Points="0 80 400 80" />
        <Polyline Stroke="{StaticResource PhoneForegroundBrush}"
                  Points="0 120 400 120" />
        <Polyline Stroke="{StaticResource PhoneForegroundBrush}"
                  Points="0 160 400 160" />
        <Polyline Stroke="{StaticResource PhoneForegroundBrush}"
                  Points="0 200 400 200" />
        <Polyline Stroke="{StaticResource PhoneForegroundBrush}"
                  Points="0 240 400 240" />
        <Polyline Stroke="{StaticResource PhoneForegroundBrush}"
                  Points="0 280 400 280" />
        <Polyline Stroke="{StaticResource PhoneForegroundBrush}"
                  Points="0 320 400 320" />
        <Polyline Stroke="{StaticResource PhoneForegroundBrush}"
                  Points="0 360 400 360" />
        <Polyline Stroke="{StaticResource PhoneForegroundBrush}"
                  Points="0 400 400 400" />
        <!-- Vertical lines -->
        <Polyline Stroke="{StaticResource PhoneForegroundBrush}"
                  Points="0 0 0 400" />
        <Polyline Stroke="{StaticResource PhoneForegroundBrush}"
                  Points="40 0 40 400" />
        <Polyline Stroke="{StaticResource PhoneForegroundBrush}"
                  Points="80 0 80 400" />
        <Polyline Stroke="{StaticResource PhoneForegroundBrush}"
                  Points="120 0 120 400" />
        <Polyline Stroke="{StaticResource PhoneForegroundBrush}"
                  Points="160 0 160 400" />
        <Polyline Stroke="{StaticResource PhoneForegroundBrush}"
                  Points="200 0 200 400" />
        <Polyline Stroke="{StaticResource PhoneForegroundBrush}"
                  Points="240 0 240 400" />
        <Polyline Stroke="{StaticResource PhoneForegroundBrush}"
                  Points="280 0 280 400" />
        <Polyline Stroke="{StaticResource PhoneForegroundBrush}"
                  Points="320 0 320 400" />
        <Polyline Stroke="{StaticResource PhoneForegroundBrush}"
                  Points="360 0 360 400" />
        <Polyline Stroke="{StaticResource PhoneForegroundBrush}"
                  Points="400 0 400 400" />
        . . .
    </Grid>

    <TextBlock Name="txtblk"
               Grid.Row="1"
               TextAlignment="Center"
               Margin="0, 24" />
</Grid>
|
The TextBlock at the bottom is used to display the values of the two control points.
The markup below is for the
Bézier curve that always begins at the upper-left of the grid, which
represents the point (0, 0), and which ends at the bottom-right of the
grid, representing the point (1, 1). The two control points (Point1 and Point2 of the BezierSegment object) are user-selectable.
This snippet of XAML also
includes the two tangent lines from the end points to the control
points. I would much prefer to bind the various properties of these
elements to each other using data bindings, but in Silverlight 3 data
binding targets must always be properties of elements, and these are properties of PathSegment derivatives.
Example 3. Silverlight Project: SplineKeyFrameExperiment File: MainPage.xaml (excerpt)
<!-- Bezier curve -->
<Path Stroke="{StaticResource PhoneBackgroundBrush}">
    <Path.Data>
         <PathGeometry>
            <PathFigure StartPoint="0 0">
                <BezierSegment x:Name="bezierSegment"
                               Point1="200 80"
                               Point2="200 320"
                               Point3="400 400" />
            </PathFigure>
        </PathGeometry>
    </Path.Data>
</Path>

<!-- Tangent lines -->
<Path Stroke="{StaticResource PhoneAccentBrush}">
    <Path.Data>
        <PathGeometry>
            <PathFigure StartPoint="0 0">
                <LineSegment x:Name="tangentLine1"
                             Point="200 80" />
            </PathFigure>
        </PathGeometry>
    </Path.Data>
</Path>

<Path Stroke="{StaticResource PhoneAccentBrush}">
    <Path.Data>
        <PathGeometry>
            <PathFigure StartPoint="400 400">
                <LineSegment x:Name="tangentLine2"
                             Point="200 320" />
            </PathFigure>
        </PathGeometry>
    </Path.Data>
</Path>
|
Here are the two little
white balls that appear on the bottom and right, one representing time
and the other representing the animated object:
Example 4. Silverlight Project: SplineKeyFrameExperiment File: MainPage.xaml (excerpt)
<!-- Balls -->
<Path Fill="{StaticResource PhoneForegroundBrush}">
    <Path.Data>
        <EllipseGeometry x:Name="timeBall"
                         RadiusX="10"
                         RadiusY="10"
                         Center="0 400" />
    </Path.Data>
</Path>

<Path Fill="{StaticResource PhoneForegroundBrush}">
    <Path.Data>
        <EllipseGeometry x:Name="animaBall"
                         RadiusX="10"
                         RadiusY="10"
                         Center="400 0" />
    </Path.Data>
</Path>
|
You can’t see it when the
program is inactive, but two lines—one horizontal and one
vertical—connect the small balls with the spline curve. These lines
track the spline curve when the small balls are moving:
Example 5. Silverlight Project: SplineKeyFrameExperiment File: MainPage.xaml (excerpt)
<!-- Tracking lines -->
<Line x:Name="timeTrackLine"
    Stroke="{StaticResource PhoneBackgroundBrush}"
    Y2="400" />

<Line x:Name="animaTrackLine"
    Stroke="{StaticResource PhoneBackgroundBrush}"
    X2="400" />
|
Finally, two semi-transparent circles respond to touch input and are used to drag the control points within the grid:
Example 6. Silverlight Project: SplineKeyFrameExperiment File: MainPage.xaml (excerpt)
<!-- Draggers -->
<Path Name="dragger1"
      Fill="{StaticResource PhoneAccentBrush}"
      Opacity="0.5">
    <Path.Data>
        <EllipseGeometry x:Name="dragger1Geometry"
                         RadiusX="50"
                         RadiusY="50"
                         Center="200 80" />
    </Path.Data>
</Path>

<Path Name="dragger2"
      Fill="{StaticResource PhoneAccentBrush}"
      Opacity="0.5">
    <Path.Data>
        <EllipseGeometry x:Name="dragger2Geometry"
                         RadiusX="50"
                         RadiusY="50"
                         Center="200 320" />
    </Path.Data>
</Path>
|
The centers of these two EllipseGeometry objects provide the two control points of the KeySpline object. In the code-behind file, the constructor initializes the TextBlock at the bottom with the values, normalized to the range of 0 to 1:
Example 7. Silverlight Project: SplineKeyFrameExperiment File: MainPage.xaml.cs (excerpt)
public partial class MainPage : PhoneApplicationPage
{
    public MainPage()
    {
        InitializeComponent();
        UpdateTextBlock();
    }

    void UpdateTextBlock()
    {
        txtblk.Text = String.Format("pt1 = {0:F2}\npt2 = {1:F2}",
                                    NormalizePoint(dragger1Geometry.Center),
                                    NormalizePoint(dragger2Geometry.Center));
    }

    Point NormalizePoint(Point pt)
    {
        return new Point(pt.X / 400, pt.Y / 400);
    }
    . . .
}
|
With the absence of data bindings in the XAML, the OnManipulationDelta override must modify two additional properties of type Point (plus the TextBlock) every time one of the semi-transparent circles is dragged:
Example 8. Silverlight Project: SplineKeyFrameExperiment File: MainPage.xaml.cs (excerpt)
protected override void OnManipulationDelta(ManipulationDeltaEventArgs args)
{
    Point translation = args.DeltaManipulation.Translation;

    if (args.ManipulationContainer == dragger1)
    {
        Point pt = new Point(Clamp(dragger1Geometry.Center.X + translation.X),
                             Clamp(dragger1Geometry.Center.Y + translation.Y));
        dragger1Geometry.Center = pt;
        bezierSegment.Point1 = pt;
        tangentLine1.Point = pt;
        UpdateTextBlock();
    }
    if (args.ManipulationContainer == dragger2)
    {
        Point pt = new Point(Clamp(dragger2Geometry.Center.X + translation.X),
                             Clamp(dragger2Geometry.Center.Y + translation.Y));

        dragger2Geometry.Center = pt;
        bezierSegment.Point2 = pt;
        tangentLine2.Point = pt;
        UpdateTextBlock();
    }

    base.OnManipulationDelta(args);
}

double Clamp(double input)
{
    return Math.Max(0, Math.Min(400, input));
}
|
When the button in the ApplicationBar is pressed, the program needs to set four different animations with identical KeySpline objects and then start the Storyboard going:
Example 9. Silverlight Project: SplineKeyFrameExperiment File: MainPage.xaml.cs (excerpt)
void OnAppbarAnimateButtonClick(object sender, EventArgs args)
{
    Point controlPoint1 = NormalizePoint(dragger1Geometry.Center);
    Point controlPoint2 = NormalizePoint(dragger2Geometry.Center);

    splineKeyFrame1.KeySpline = new KeySpline();
    splineKeyFrame1.KeySpline.ControlPoint1 = controlPoint1;
    splineKeyFrame1.KeySpline.ControlPoint2 = controlPoint2;

    splineKeyFrame2.KeySpline = new KeySpline();
    splineKeyFrame2.KeySpline.ControlPoint1 = controlPoint1;
    splineKeyFrame2.KeySpline.ControlPoint2 = controlPoint2;

    splineKeyFrame3.KeySpline = new KeySpline();
    splineKeyFrame3.KeySpline.ControlPoint1 = controlPoint1;
    splineKeyFrame3.KeySpline.ControlPoint2 = controlPoint2;

    splineKeyFrame4.KeySpline = new KeySpline();
    splineKeyFrame4.KeySpline.ControlPoint1 = controlPoint1;
    splineKeyFrame4.KeySpline.ControlPoint2 = controlPoint2;

    storyboard.Begin();
}
|
That storyboard is defined in the Resources collection of the page:
Example 10. Silverlight Project: SplineKeyFrameExperiment File: MainPage.xaml (excerpt)
<phone:PhoneApplicationPage.Resources>
    <Storyboard x:Name="storyboard"
                SpeedRatio="0.25">
        <PointAnimation Storyboard.TargetName="timeBall"
                        Storyboard.TargetProperty="Center"
                        From="0 400" To="400 400" Duration="0:0:1" />

        <DoubleAnimation Storyboard.TargetName="timeTrackLine"
                         Storyboard.TargetProperty="X1"
                         From="0" To="400" Duration="0:0:1" />

        <DoubleAnimation Storyboard.TargetName="timeTrackLine"
                         Storyboard.TargetProperty="X2"
                         From="0" To="400" Duration="0:0:1" />

        <DoubleAnimation Storyboard.TargetName="animaTrackLine"
                         Storyboard.TargetProperty="X1"
                         From="0" To="400" Duration="0:0:1" />

        <PointAnimationUsingKeyFrames Storyboard.TargetName="animaBall"
                                      Storyboard.TargetProperty="Center">
            <DiscretePointKeyFrame KeyTime="0:0:0" Value="400 0" />
            <SplinePointKeyFrame x:Name="splineKeyFrame1"
                                 KeyTime="0:0:1" Value="400 400" />
        </PointAnimationUsingKeyFrames>

        <DoubleAnimationUsingKeyFrames Storyboard.TargetName="timeTrackLine"
                                       Storyboard.TargetProperty="Y1">
            <DiscreteDoubleKeyFrame KeyTime="0:0:0" Value="0" />
            <SplineDoubleKeyFrame x:Name="splineKeyFrame2"
                                  KeyTime="0:0:1" Value="400" />
        </DoubleAnimationUsingKeyFrames>

        <DoubleAnimationUsingKeyFrames Storyboard.TargetName="animaTrackLine"
                                       Storyboard.TargetProperty="Y1">
            <DiscreteDoubleKeyFrame KeyTime="0:0:0" Value="0" />
            <SplineDoubleKeyFrame x:Name="splineKeyFrame3"
                                  KeyTime="0:0:1" Value="400" />
        </DoubleAnimationUsingKeyFrames>

        <DoubleAnimationUsingKeyFrames Storyboard.TargetName="animaTrackLine"
                                       Storyboard.TargetProperty="Y2">
            <DiscreteDoubleKeyFrame KeyTime="0:0:0" Value="0" />
            <SplineDoubleKeyFrame x:Name="splineKeyFrame4"
                                  KeyTime="0:0:1" Value="400" />
        </DoubleAnimationUsingKeyFrames>
    </Storyboard>
</phone:PhoneApplicationPage.Resources>
|
Try it out: If you set both
control points to (1, 0) you get an animation that starts off slow and
then gets very fast. Setting both control points to (0, 1) has the
opposite effect. Set the first control point to (1, 0) and the second to
(0, 1) and you get an animation that starts off slow, then gets fast,
and ends up slow. Switch them and get the opposite effect.
Of course, you don’t have to
use the extremes. You’ll probably want to find values that have a more
subtle effect. You can simulate free
fall with values of (0.25, 0) and (0.6, 0.2), for example. For an
object moving up and decelerating from the effects of gravity, subtract
each of those coordinates from 1.
Yes, I have an example.
