Much like BasicEffect and EnvironmentMapEffect, SkinnedEffect implements all three of the standard interfaces: IEffectMatrices, IEffectLighting, and IEffectFog.
This section focuses only on the new pieces of functionality. This
effect is primarily used to enable you to render animated objects (or
“skinned” objects).
Animation for a particular
model is normally stored within the model itself and is included when
you are importing and processing the model. However, by default, you
won’t be able to get this data at runtime, so you need to build a
content processor to store this data.
This appears to be the most
complex example you’ve seen so far, but despite the number of projects,
it isn’t that complicated. First, you need the actual example project,
so create a new game project called SkinnedEffectExample.
You also need two other projects though: your content processor project
and another game library project to hold these shared types.
In your solution, you should have two projects: the SkinnedEffectExample game project and the SkinnedEffectExampleContent
project. Right-click your solution file in Visual Studio, select Add
-> New Project, and then choose a Game Library project that will hold
all of the shared types between your game and the content processor.
You can call this one SkinningInformation.
Lastly, right-click the solution again in Visual Studio and choose Add
-> New Project, but this time choose the Content Pipeline Extension
Library. You can call this SkinnedModelProcessor.
To make sure that both your
game and the content processor have access to your shared data types,
right-click the References node (located under your SkinnedModelProcessor project) and select Add Reference. Choose the Projects tab, and select your SkinningInformation project. Next, do the same thing for the SkinnedEffectExample project, and now you’re basically ready to get started.
To add the shared data types, remove the class1.cs from your SkiningInformation project, right-click the project, select Add -> New Item, and choose a new code file called SharedTypes.cs. Add the following code to that file:
using System;
using System.Collections.Generic;
using Microsoft.Xna.Framework;
 using Microsoft.Xna.Framework.Content;
public class Keyframe
{
    public Keyframe(int bone, TimeSpan time, Matrix transform)
    {
        Bone = bone;
        Time = time;
        Transform = transform;
    }
    private Keyframe() { }
    [ContentSerializer]
    public int Bone { get; private set; }
    [ContentSerializer]
    public TimeSpan Time { get; private set; }
    [ContentSerializer]
    public Matrix Transform { get; private set; }
}
The first shared type is a KeyFrame.
This is essentially the state of a bone at a given point in time.
Remember that the bone describes the transform of a particular portion
of the model. By using key frames, a model can define a wide variety of
animations by simply having the bones placed at particular places in
time.
Next, you need another piece of shared data, so add the following lines to the code file:
public class AnimationClip
{
    public AnimationClip(TimeSpan duration, List<Keyframe> keyframes)
    {
        Duration = duration;
        Keyframes = keyframes;
    }
    private AnimationClip() { }
    [ContentSerializer]
    public TimeSpan Duration { get; private set; }
    [ContentSerializer]
    public List<Keyframe> Keyframes { get; private set; }
}
This defines the total
animation as a list of key frames. The duration is the total length of
animation, and the key frames are also stored. Because this class is
self-explanatory, add another shared type here:
public class SkinningData
{
    public SkinningData(Dictionary<string, AnimationClip> animationClips,
                        List<Matrix> bindPose, List<Matrix> inverseBindPose,
                        List<int> skeletonHierarchy)
    {
        AnimationClips = animationClips;
        BindPose = bindPose;
        InverseBindPose = inverseBindPose;
        SkeletonHierarchy = skeletonHierarchy;
    }
    private SkinningData() { }
    [ContentSerializer]
    public Dictionary<string, AnimationClip> AnimationClips { get;
         private set; }
    [ContentSerializer]
    public List<Matrix> BindPose { get; private set; }
    [ContentSerializer]
    public List<Matrix> InverseBindPose { get; private set; }
    [ContentSerializer]
    public List<int> SkeletonHierarchy { get; private set; }
}
This is the data type
that holds the animations for use at runtime. It has a few properties,
namely a list of animation clips that the model supports along with the
bind pose, the inverse of the bind pose, and a skeleton hierarchy. The
bind pose is the “pose” of the model before any animation occurs (where
the inverse is, of course, the inverse of this). The skeleton hierarchy
is the list of indices into the bones.
Notice that many of the properties in these shared data types include the ContentSerializer attribute.
There is one more type to add before you can start with the processor. Add the following class:
public class AnimationPlayer
{
    AnimationClip currentClipValue;
    TimeSpan currentTimeValue;
    int currentKeyframe;
    Matrix[] boneTransforms;
    Matrix[] worldTransforms;
    Matrix[] skinTransforms;
    SkinningData skinningDataValue;
    public AnimationPlayer(SkinningData skinningData)
    {
        if (skinningData == null)
            throw new ArgumentNullException("skinningData");
        skinningDataValue = skinningData;
        boneTransforms = new Matrix[skinningData.BindPose.Count];
        worldTransforms = new Matrix[skinningData.BindPose.Count];
        skinTransforms = new Matrix[skinningData.BindPose.Count];
    }
    public void StartClip(AnimationClip clip)
    {
        if (clip == null)
            throw new ArgumentNullException("clip");
        currentClipValue = clip;
        currentTimeValue = TimeSpan.Zero;
        currentKeyframe = 0;
        // Initialize bone transforms to the bind pose.
        skinningDataValue.BindPose.CopyTo(boneTransforms, 0);
    }
    public void Update(TimeSpan time, bool relativeToCurrentTime,
                       Matrix rootTransform)
    {
        UpdateBoneTransforms(time, relativeToCurrentTime);
        UpdateWorldTransforms(rootTransform);
        UpdateSkinTransforms();
    }
    public void UpdateBoneTransforms(TimeSpan time,
        bool relativeToCurrentTime)
    {
        if (currentClipValue == null)
            throw new InvalidOperationException(
                        "AnimationPlayer.Update was called before StartClip");
        // Update the animation position.
        if (relativeToCurrentTime)
        {
            time += currentTimeValue;
            // If we reached the end, loop back to the start.
            while (time >= currentClipValue.Duration)
                time -= currentClipValue.Duration;
        }
        if ((time < TimeSpan.Zero) || (time >= currentClipValue.Duration))
            throw new ArgumentOutOfRangeException("time");
        // If the position moved backwards, reset the keyframe index.
        if (time < currentTimeValue)
        {
            currentKeyframe = 0;
            skinningDataValue.BindPose.CopyTo(boneTransforms, 0);
        }
        currentTimeValue = time;
        // Read keyframe matrices.
        IList<Keyframe> keyframes = currentClipValue.Keyframes;
        while (currentKeyframe < keyframes.Count)
        {
            Keyframe keyframe = keyframes[currentKeyframe];
            // Stop when we've read up to the current time position.
            if (keyframe.Time > currentTimeValue)
                break;
            // Use this keyframe.
            boneTransforms[keyframe.Bone] = keyframe.Transform;
            currentKeyframe++;
        }
    }
    public void UpdateWorldTransforms(Matrix rootTransform)
    {
        // Root bone.
        worldTransforms[0] = boneTransforms[0] * rootTransform;
        // Child bones.
        for (int bone = 1; bone < worldTransforms.Length; bone++)
        {
            int parentBone = skinningDataValue.SkeletonHierarchy[bone];
            worldTransforms[bone] = boneTransforms[bone] *
                                         worldTransforms[parentBone];
        }
    }
    public void UpdateSkinTransforms()
    {
        for (int bone = 0; bone < skinTransforms.Length; bone++)
        {
            skinTransforms[bone] = skinningDataValue.InverseBindPose[bone] *
                                        worldTransforms[bone];
        }
    }
    public Matrix[] GetBoneTransforms()
    {
        return boneTransforms;
    }
    public Matrix[] GetWorldTransforms()
    {
        return worldTransforms;
    }
    public Matrix[] GetSkinTransforms()
    {
        return skinTransforms;
    }
    public AnimationClip CurrentClip
    {
        get { return currentClipValue; }
    }
    public TimeSpan CurrentTime
    {
        get { return currentTimeValue; }
    }
}
This object is created from a
SkinningData object, and the constructor validates the data and creates
the arrays of matrices that are used. The next method is StartClip,
which tells the animation player to start a new set of animation. This
method resets the current animation members, and then copies the bind
pose transforms to the bone transforms.
As your animation plays, the various matrices need to be updated, so the Update
method does exactly this. It takes in the amount of time that has
elapsed, whether or not the time is relative to the current time, and
the root transform of the animation. This in turn calls three helper
methods to update the sets of matrices.
The first of these
helper methods updates the bone transforms by looking at the list of key
frames. First, it checks the time, does a few parameter checks,
determines whether the animation has reached the end (and loops back to
start if it has), and then begins looking through the key frames. It
sets the bone transforms for the key frames required, and then exits the
loop. These key frames come from the model during content processing.
Next, it updates the world
transforms, which is nothing more than transforming the root bone by the
root transform passed in to update, then transforming each child bone
by its bone transform and its parent’s bone transforms.
For the last of the helper
methods, it updates the skin transforms by transforming the inverse bind
pose of each bone with the world transform. Finally, there are a few
extra methods and properties to expose the private members publicly.
With the shared types out of
the way, you can actually create your content processor now to get the
animation data into your game.
Go to your SkinnedModelProcessor project, remove the code file it created, and add a new one called SkinnedModelProcessor.cs. First, add the following code:
using System;
using System.Collections.Generic;
using Microsoft.Xna.Framework;
using Microsoft.Xna.Framework.Graphics;
using Microsoft.Xna.Framework.Content.Pipeline;
using Microsoft.Xna.Framework.Content.Pipeline.Graphics;
using Microsoft.Xna.Framework.Content.Pipeline.Processors;
namespace SkinnedModelProcessor
{
    [ContentProcessor]
    public class SkinnedModelProcessor : ModelProcessor
    {
        public override ModelContent Process(NodeContent input,
             ContentProcessorContext context)
        {
            // Chain to the base ModelProcessor class
            ModelContent model = base.Process(input, context);
            return model;
        }
}
Although this isn’t exciting,
it is the basis for the processor you create next. You created a new
content processor, and it is derived from the already existing ModelProcessor. In the Process method (currently), call the base Process method to get all the model data and return it. Although this does nothing more than the ModelProcessor (yet), it now has the infrastructure to do so.
To get the animation data through, add the following as the first line of code in your Process overload:
ValidateMesh(input, context, null);
This method validates the mesh, however, it doesn’t exist yet, so let’s add it to the class:
static void ValidateMesh(NodeContent node, ContentProcessorContext context,
                            string parentBoneName)
{
    MeshContent mesh = node as MeshContent;
    if (mesh != null)
    {
        if (parentBoneName != null)
        {
            context.Logger.LogWarning(null, null,
                "Mesh {0} is a child of bone {1}. SkinnedModelProcessor " +
                "does't correctly handle meshes that are children of bones.",
                mesh.Name, parentBoneName);
        }
        if (!MeshHasSkinning(mesh))
        {
            context.Logger.LogWarning(null, null,
                "Mesh {0} has no skinning info, so it has been deleted.",
                mesh.Name);
            mesh.Parent.Children.Remove(mesh);
            return;
        }
    }
    else if (node is BoneContent)
    {
        // If this is a bone, remember that we are now looking inside it.
        parentBoneName = node.Name;
    }
    // Recurse (iterating over a copy of the child collection,
    // because validating children may delete some of them).
    foreach (NodeContent child in new List<NodeContent>(node.Children))
        ValidateMesh(child, context, parentBoneName);
}
static bool MeshHasSkinning(MeshContent mesh)
{
    foreach (GeometryContent geometry in mesh.Geometry)
    {
        if (!geometry.Vertices.Channels.Contains(VertexChannelNames.Weights()))
            return false;
    }

    return true;
}
As it checks the parameters, if it finds problems, it uses the context.Logger
property to log warnings. This class is part of the content pipeline
that runs during build time, so these logged warnings show up in the
Visual Studio IDE as warnings during build time.
First,
this method checks whether the node is a mesh and if it is, it performs
two checks. It determines whether the mesh is a child of a bone and log
a warning if so because this processor isn’t equipped to handle that
scenario. Next, it checks whether the mesh has skinning information and
if it does not, it removes itself and logs a warning.
If the current node being
checked isn’t a mesh, it stores the bone instead because the bone is
naturally the parent for all children of this node. After it checks
these parameters, this method also recursively iterates over the entire
list of children to validate that they’re all valid meshes.
In the Process override, add the following code after your ValidateMesh call to get the animation data:
// Find the skeleton.
BoneContent skeleton = MeshHelper.FindSkeleton(input);
if (skeleton == null)
    throw new InvalidContentException("Input skeleton not found.");
// We don't want to have to worry about different parts of the model being
// in different local coordinate systems, so let's just bake everything.
FlattenTransforms(input, skeleton);
// Read the bind pose and skeleton hierarchy data.
IList<BoneContent> bones = MeshHelper.FlattenSkeleton(skeleton);
if (bones.Count > SkinnedEffect.MaxBones)
{
    throw new InvalidContentException(string.Format(
        "Skeleton has {0} bones, but the maximum supported is {1}.",
        bones.Count, SkinnedEffect.MaxBones));
}
List<Matrix> bindPose = new List<Matrix>();
List<Matrix> inverseBindPose = new List<Matrix>();
List<int> skeletonHierarchy = new List<int>();
foreach (BoneContent bone in bones)
{
    bindPose.Add(bone.Transform);
    inverseBindPose.Add(Matrix.Invert(bone.AbsoluteTransform));
    skeletonHierarchy.Add(bones.IndexOf(bone.Parent as BoneContent));
}
// Convert animation data to our runtime format.
Dictionary<string, AnimationClip> animationClips;
animationClips = ProcessAnimations(skeleton.Animations, bones);
static void FlattenTransforms(NodeContent node, BoneContent skeleton)
{
    foreach (NodeContent child in node.Children)
    {
        // Don't process the skeleton, because that is special.
        if (child == skeleton)
            continue;
        // Bake the local transform into the actual geometry.
        MeshHelper.TransformScene(child, child.Transform);
        // Having baked it, we can now set the local
        // coordinate system back to identity.
        child.Transform = Matrix.Identity;
        // Recurse.
        FlattenTransforms(child, skeleton);
    }
}
This
recursively looks through all nodes in this piece of content and
transforms the portions of the scene into the same (local) coordinate
system. This makes dealing with the various transforms much easier.
Next, you get the bind pose of the skeleton and throw an error if it has
too many bones for this effect. Then, create the three lists you need
to maintain the animation data, and fill them with the appropriate
information. Finally, create a set of animation clips to store with the
following ProcessAnimations helper methods:
static Dictionary<string, AnimationClip> ProcessAnimations(
    AnimationContentDictionary animations, IListBoneContent> bones)
{
    // Build up a table mapping bone names to indices.
    Dictionary<string, int> boneMap = new Dictionary<string, int>();
    for (int i = 0; i < bones.Count; i++)
    {
        string boneName = bones[i].Name;
        if (!string.IsNullOrEmpty(boneName))
            boneMap.Add(boneName, i);
    }
    // Convert each animation in turn.
    Dictionary<string, AnimationClip> animationClips;
    animationClips = new Dictionary<string, AnimationClip>();
    foreach (KeyValuePair<string, AnimationContent> animation in animations)
    {
        AnimationClip processed = ProcessAnimation(animation.Value, boneMap);
        animationClips.Add(animation.Key, processed);
    }
    if (animationClips.Count == 0)
    {
        throw new InvalidContentException(
                    "Input file does not contain any animations.");
    }
    return animationClips;
}
static AnimationClip ProcessAnimation(AnimationContent animation,
                                        Dictionary<string, int> boneMap)
{
    List<Keyframe> keyframes = new List<Keyframe>();
    // For each input animation channel.
    foreach (KeyValuePair<string, AnimationChannel> channel in
        animation.Channels)
    {
        // Look up what bone this channel is controlling.
        int boneIndex;
        if (!boneMap.TryGetValue(channel.Key, out boneIndex))
        {
            throw new InvalidContentException(string.Format(
                "Found animation for bone '{0}', " +
                "which is not part of the skeleton.", channel.Key));
        }
        // Convert the keyframe data.
        foreach (AnimationKeyframe keyframe in channel.Value)
        {
            keyframes.Add(new Keyframe(boneIndex, keyframe.Time,
                                        keyframe.Transform));
        }
    }
    // Sort the merged keyframes by time.
    keyframes.Sort(CompareKeyframeTimes);
    if (keyframes.Count == 0)
        throw new InvalidContentException("Animation has no keyframes.");
    if (animation.Duration <= TimeSpan.Zero)
        throw new InvalidContentException("Animation has a zero duration.");
    return new AnimationClip(animation.Duration, keyframes);
}
static int CompareKeyframeTimes(Keyframe a, Keyframe b)
{
    return a.Time.CompareTo(b.Time);
}
Finally, store this data back into the model before you return it from being processed. So at the end of the Process override, before you return the model, add the following code:
model.Tag = new SkinningData(animationClips, bindPose,
                                inverseBindPose, skeletonHierarchy);
This stores the data you processed during build time into the model object at runtime and in the Tag parameter. Build your solution to get the content processor built and ready for use.
Now, you need to add a reference to your content pipeline processor project to your content project. So under the SkinnedEffectExampleContent node, right-click the references node, select Add Reference, and choose the projects tab. Then double-click the SkinnedModelProcessor project to add the reference.
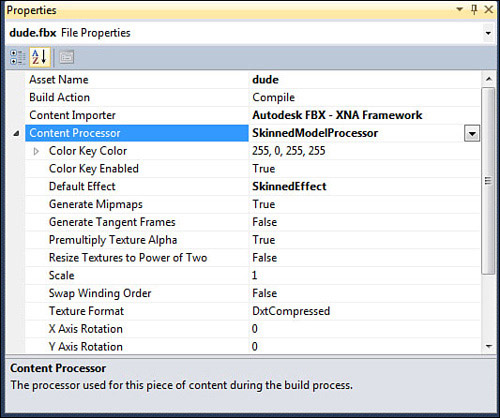
Now, you’re ready for the example, which is simple now. First, add a model to your content project, namely dude.fbx.
Unlike the models you’ve added before, change the default processor
that this model uses. Under the Content Processor property, choose SkinnedModelProcessor
from the list, and then open up the tree of properties under this.
Under these, change the Default Effect property to SkinnedEffect, which
is the effect we’re using for this example (see Figure 1).
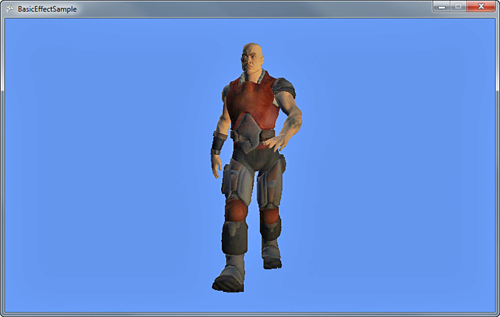
You might be surprised at
how little code is required for the rest of this. Because you did a bulk
of the work in the content processor (during build time), the runtime
components are simple and easy.
Note
The content pipeline is a powerful
tool you will want to take advantage of at every opportunity. Anything
you can do at build time rather than runtime is a performance saving.
Add the following variables to your game project:
Model model;
AnimationPlayer animationPlayer;
Matrix view;
Matrix proj;
In your LoadContent method, instantiate the following code:
model = Content.Load<Model>("dude");
SkinningData skinningData = model.Tag as SkinningData;
if (skinningData == null)
    throw new InvalidOperationException
        ("This model does not contain a SkinningData tag.");
// Create an animation player, and start decoding an animation clip.
animationPlayer = new AnimationPlayer(skinningData);
animationPlayer.StartClip(skinningData.AnimationClips["Take 001"]);
proj = Matrix.CreatePerspectiveFieldOfView(
    MathHelper.PiOver4, GraphicsDevice.Viewport.AspectRatio, 1.0f, 300.0f);
view = Matrix.CreateLookAt(
    new Vector3(2, 45, -110), new Vector3(0,35,0), Vector3.Up);
Notice that you use the Tag parameter of the model to load the SkinningData
object that is set as part of the content processing. If this value is
null, an error is thrown because it probably means you didn’t set the
correct content processor. Next, create a new animation player using the
data, and start the first clip. In this case, Dude has only one
animation named “Take 001,” and that is what you use. If there are multiple animations, pick the one you want. Finally, set up your camera matrices.
Because animation is
happening, you need to have your character’s animation update while the
game is running—no better place for that than the Update method, so add the following to that override:
animationPlayer.Update(gameTime.ElapsedGameTime, true, Matrix.Identity);
This calls your animation Update
helper method. You use the elapsed time and have no special root
transform, so this is pretty simplistic. The only thing left to do now
is to draw, so replace your Draw method with the following:
protected override void Draw(GameTime gameTime)
{
    GraphicsDevice.Clear(Color.CornflowerBlue);
    Matrix[] bones = animationPlayer.GetSkinTransforms();
    foreach (ModelMesh mesh in model.Meshes)
    {
        foreach (SkinnedEffect effect in mesh.Effects)
        {
            effect.SetBoneTransforms(bones);
            effect.View = view;
            effect.Projection = proj;
            effect.EnableDefaultLighting();
            effect.SpecularColor = Vector3.Zero;
        }
        mesh.Draw();
    }
}
Next, get the list of
skin transforms for the current animation, and then loop through each
mesh (and each effect on them) to set the bones and the camera
information before finally drawing your model.