Because it has been around the longest, it makes sense to start with BasicEffect.
This effect is anything but basic, and the various permutations of
things it can do are downright mind boggling at times. However, we might
as well dive right in! Start by creating a new game project, and add
box.fbx to the content project. Declare both the model variable and a
basic effect:
Model model;
BasicEffect effect;
Update your LoadContent method to instantiate these objects:
model = Content.Load<Model>("box");
effect = new BasicEffect(GraphicsDevice);
effect.Projection = Matrix.CreatePerspectiveFieldOfView(MathHelper.PiOver4,
    GraphicsDevice.Viewport.AspectRatio, 1.0f, 100.0f);
effect.View = Matrix.CreateLookAt(new Vector3(2, 3, 2), Vector3.Zero, Vector3.Up);
Loading the model has been
done several times, and creating the basic effect is pretty simple as
well. It takes in the graphics device as its only parameter. You also
use the Projection and View matrix parameters on the basic effect to set up your default camera. Because you’re creating and manipulating your own effect (BasicEffect), add a DrawModel method :
private Matrix GetParentTransform(Model m, ModelBone mb)
{
    return (mb == m.Root) ? mb.Transform :
        mb.Transform * GetParentTransform(m, mb.Parent);
}
private void DrawModel(Model m, Matrix world, BasicEffect be)
{
    foreach (ModelMesh mm in model.Meshes)
    {
        foreach (ModelMeshPart mmp in mm.MeshParts)
        {
            be.World = GetParentTransform(m, mm.ParentBone) * world;
            GraphicsDevice.SetVertexBuffer(mmp.VertexBuffer, mmp.VertexOffset);
            GraphicsDevice.Indices = mmp.IndexBuffer;
            be.CurrentTechnique.Passes[0].Apply();
            GraphicsDevice.DrawIndexedPrimitives(
                PrimitiveType.TriangleList, 0, 0,
                mmp.NumVertices, mmp.StartIndex, mmp.PrimitiveCount);
        }
    }
}
Note
BasicEffect is the
default effect that is created for this model during content importing,
but you use a new one for ease of these examples.
Finally, replace your Draw method to render the model, and notice an ugly white box on the screen, much like you see in Figure 1.
protected override void Draw(GameTime gameTime)
{
    GraphicsDevice.Clear(Color.CornflowerBlue);
    DrawModel(model, Matrix.Identity, effect);
}
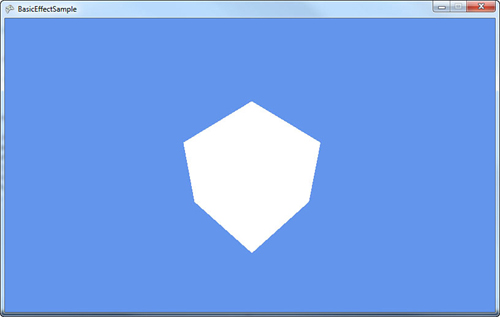
As you can see, the
box is not visually appealing. It doesn’t even appear 3D! This is
because it has no lighting on it, so everything has the same color,
which means you can’t see edges that make everything appear flat. Adding
a simple call to EnableDefaultLighting on
the effect after you have set the view matrix makes your box appear 3D
because it turns on lights and makes the different faces of the box
shaded differently. You’ve seen the box like this many times before. So
instead, let’s try something different.
Basic Lighting
If you added the call to EnableDefaultLighting, remove it and add the following after the view matrix is set in LoadContent:
effect.LightingEnabled = true;
This tells the effect to
enable the lightning engine. Now run the application, and notice a
similar shape as the first time you ran this application, but there is a
bright white square in the center followed by the other portions of the
block looking flat and black as in Figure 2.
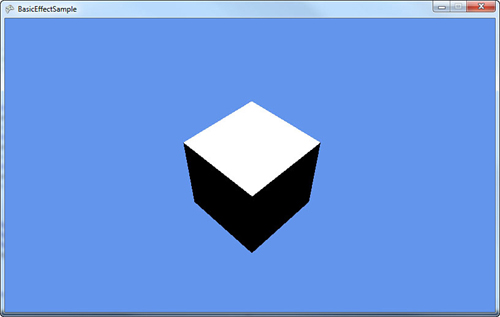
To understand how
enabling lighting made portions of the box turn pitch black, first take a
basic look at how lighting works. Basic effect gives you four different
functions of lights for you to modify: an ambient light, directional
lights, specular highlights, and the emissive color.
The ambient light is the
easiest to visualize and understand. You can think of ambient light as
the light that is always on, always around, comes from every direction,
and lights everything equally. Notice an AmbientLightColor property on BasicEffect
that defaults to black, which is why the sides of your box look pure
black. Add the following line after enabling the lights in LoadContent:
effect.AmbientLightColor = Color.Purple.ToVector3();
Running the application now
changes the black portions of the box to purple because that is the
color of the ambient light. The top of the box is still bright white.
Note
Notice that all colors used in the built-in effects are not Color
objects, but vector objects. The x, y, and z components of the vector
object map to the red, green, and blue color components where 0.0f is
fully off and 1.0f is fully on. Vector3.Zero is pure black, and Vector3.One is pure white. The Color object also has two helper methods, ToVector3 and ToVector4, to easily get the appropriate data.
Changing the ambient light
color to another color shows you that the portions of your box that were
originally black and are now purple change to the color you are using
as the ambient light color. If you change it back to white, you are back
to where you started with a pure white square-like shape. That’s
because of the next light type, directional lights.
As the name implies,
directional lights come from a certain direction. The sun is a good
example of a directional light conceptually. The light goes in a
particular direction infinitely without becoming more dim the farther
away it goes, and without having a real source. Although the sun doesn’t
meet these criteria, from the perspective of the Earth, it is close
enough. The built-in basic effect has support for up to three different
directional lights, and by default, only the first one is enabled. These
lights are accessed via three separate properties called DirectionalLight0, DirectionalLight1, and DirectionalLight2. Each directional light has a few properties that are interesting to look at, too.
First, the directional light has an Enabled property to determine whether it is on or not on. Much like the ambient light color, there is a DiffuseColor
property that is the diffuse color of the light (you can think of this
as simply the color of the light). This property defaults to pure white
(Vector3.One), which is why the top of the box currently as white. A
directional light also needs to have a Direction property that defaults to Vector3.Down, which also explains why the top of the box is pure white.
By switching LightingEnabled
to true, you not only turn on lighting, but you also get the defaults
for all of the lighting-centric properties, so a black ambient light and
a single directional light turned on, pointing straight down with a
white light. This explains the appearance of the box.
If you switch the direction, notice the box is lit differently. For example, add the following line after enabling the lights:
effect.DirectionalLight0.Direction = Vector3.Left;
This causes the top of the box
to turn black again (the direction is no longer on top of it), but the
right side of the box to turn white. This is because the direction of
the light moves to the left, causing the right side to illuminate. If
you use Vector3.Right, a pure black
box appears because the left side of the box is lit, but you cannot see
that side from where your camera is. Of course, having only one side of
the cube light up isn’t interesting, so change the direction slightly
such as the following line:
effect.DirectionalLight0.Direction = Vector3.Normalize(new Vector3(-1,-1,0));
Both
the top and the right portions of the box are now gray. Notice that you
normalized the vector before passing it into the direction, because Direction is required to be a unit vector (meaning that the length of the vector must be one, which is also what Normalize
does). The top and side are the same color gray because the angle
between the direction of the light and the normal of the face is the
same on each side with that vector (equally lighting the right and top
faces). Change the direction to the following line:
effect.DirectionalLight0.Direction = Vector3.Normalize(new Vector3(-1,-1.5f,0));
Lighting Calculations
The final color of each piece
of your model when it is lit comes from a wide variety of sources.
Directional light is calculated using the dot product of the direction
vector and the normal vector for the current face. The normal vector is
perpendicular to the plane of the face. Without normal vectors, all
lighting calculations (aside from ambient, which is everywhere equally)
would not work. The color of the light is scaled by the dot product.
That color is combined with vertex colors on the model, textures that
are being rendered, and the ambient light.
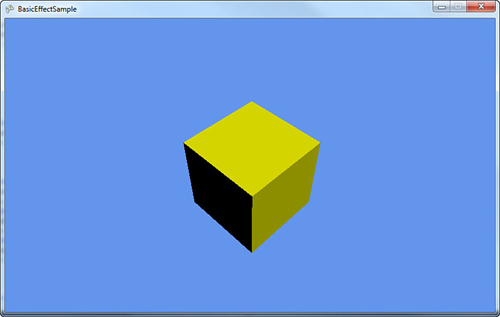
If you change the color, the light changes to that color. Add the following line after setting the direction:
effect.DirectionalLight0.DiffuseColor = Color.Yellow.ToVector3();
The box is now a yellow color.
If you use the previous direction, the top of the box is a light yellow,
the right is a dark yellow, and the front is pitch black. This is
because there is no light on the front of the box and it uses the
ambient color (see Figure 3).
The
basic effect class supports up to three different directional lights.
These lights can be turned on all at once, one at a time, or not at all.
Just because they happen to be named in a numeric order doesn’t mean
you have to use them in that order. For example, add the following lines
after your current light settings in LoadContent:
effect.DirectionalLight1.Enabled = true;
effect.DirectionalLight1.DiffuseColor = Color.Blue.ToVector3();
effect.DirectionalLight1.Direction = Vector3.Left;
This is setting the second
of the directional lights basic effect uses to a blue color pointing to
the left. Running the application shows you that the top square of the
box is the same dark yellow color, and the right side (which now has a
light yellow light as well as a solid blue light) is an odd purplish
color. This is because the two light colors blend together. You can tell
this by setting the DirectionalLight0.Enabled
property to false and see that the right face is now a solid blue
because it isn’t combined with the yellow light. Set it back to true, so
you can see the combination of all three lights. Replace your lightning
code with the following lines:
effect.DirectionalLight0.Enabled = true;
effect.DirectionalLight0.DiffuseColor = Color.Red.ToVector3();
effect.DirectionalLight0.Direction = Vector3.Normalize(new Vector3(-1,-1.5f,0));
effect.DirectionalLight1.Enabled = true;
effect.DirectionalLight1.DiffuseColor = Color.Blue.ToVector3();
effect.DirectionalLight1.Direction = Vector3.Normalize(new Vector3(1, -1.5f, -1));
effect.DirectionalLight2.Enabled = true;
effect.DirectionalLight2.DiffuseColor = Color.Green.ToVector3();
effect.DirectionalLight2.Direction = Vector3.Normalize(new Vector3(0, -1.5f, -1));
This takes three different
lights: red, green, blue, shining all on the box in different
directions. Each light hits more than one face, so you see a combination
of the colors (mostly red on the right face, a pinkish color on the top
face, and mostly blue on the front face). Each of these lights can be
controlled individually or combined.
There is also a helper method on BasicEffect called EnableDefaultLighting,
which sets up a standard lighting rig. This is actually not something
unique to games or even 3D graphics. Photographers and movie makers
discovered long ago that taking pictures of things looked much better
when using more than one light and specifically, they looked best with
at least three lights (this is also why this class supports three
lights).
This is normally done with a
key light that is the brightest of the lights and is pointed directly at
the subject. A fill light that is dimmer also points at the subject,
although usually at a ninety degree angle from the key light. This light
helps balance out the image by illuminating some of the shadows that
are too dark from the key light. Finally, the backlight, which as the
name implies, shines from behind the subject to help separate him or her
from the background and to give subtle detail. The back light is
normally the dimmest light.
With
all the basics of directional lighting out of the way, let’s move on to
the other major light, specular lighting. This is used in the standard
lighting rig that the EnableDefaultLighting helper method creates for you. What are specular highlights?
A specular highlight is the
bright spot on an object. It makes objects appear shiny. You can’t see
this on a box though, so let’s make a few changes to the current
project. First, delete the lighting code you added so far (you should
just have the world and view matrices set on the effect). Next, add the sphere.x
object from the downloadable examples to your content project. It is
much easier to see this effect on a sphere. Finally, change your model
loading to use the sphere rather than the box.
Run the application and
notice a white circle in the middle of your screen, much like you saw
the box before. Again, this is because there are no lights in the scene
anymore. So first, turn on a directional light, so you can see the
sphere as a sphere, not a circle, as follows:
effect.LightingEnabled = true;
effect.DirectionalLight0.Enabled = true;
effect.DirectionalLight0.DiffuseColor = Color.Red.ToVector3();
effect.DirectionalLight0.Direction = Vector3.Normalize(new Vector3(0, -1.5f, -1));
The sphere looks like a sphere
rather than a circle, but it doesn’t have a shiny look. This is because
the specular color of the directional light defaults to black, so you do
not see it. Add the following line directly after setting the
direction:
effect.DirectionalLight0.SpecularColor = Color.White.ToVector3();
This turns on the specular color to a full white color, and much like you see in Figure 4, your sphere now has a bright white spot on it.
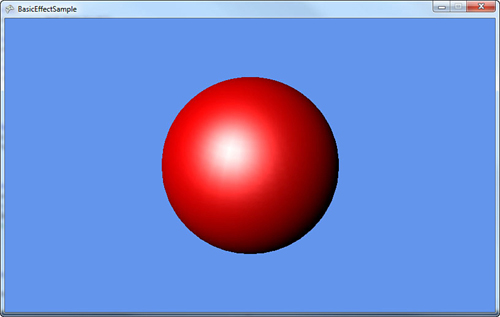
The
specular color is much like the other colors because you can combine it
with any of the others. The white specular light is combined with the
red diffuse light and forms the bright spot. If you change the specular
color from white to blue, notice that your white spot turns more
purplish (the red diffuse light and the blue specular light combine to a
purple color). Each directional light in the effect includes a specular
color.
There are two other properties of specular lighting that are on the effect itself, not on any of the directional lights:the SpecularColor of the material and the SpecularPower
of the effect. The power property is a float value that determines how
concentrated the shiny spot is. Higher values make the effect more
concentrated (a smaller spotlight on the sphere), and larger values
lower the concentration and make the spotlight effect larger.
To see this behavior in action, add the following code to your Draw method before the DrawModel call:
effect.SpecularPower = (float)gameTime.TotalGameTime.TotalSeconds * 2.0f;
This starts the specular
power at 0 (and your sphere looks almost completely white) and raises
it higher as the application runs (it gains a power of 1.0f every half
second). Notice that the spotlight effect quickly concentrates from the
full sphere to a smaller spot, and then slowly gets more concentrated to
a small point if you let it run long enough. Remove the line and let’s
talk about the specular material color.
The SpecularColor on
the effect is the color that is reflected by the lights. The default of
this property is white, so all color is reflected making the spotlight
effect white. Add this line after setting the light’s specular color in
the LoadContent method:
effect.SpecularColor = Color.Red.ToVector3();
This reflects only the red
light of the white specular light. If you run this, the sphere looks
similar to before, but rather than a bright white spot, you see a red
spot instead. If you change the SpecularColor
on the directional light to a color without red light, for example, say
blue, the specular effect completely disappears. This is because there
is no red light to reflect a pure blue light and no specular effect.
Notice that you can see
portions of how the sphere was created in the light because the vertices
of the sphere stick out in the spotlight effect. This is because colors
are determined by default per vertex, which show you these vertices
when they’re close. If your graphics card can support it, you can have
this effect do its lighting calculations per pixel rather than per
vertex to give a much more smooth (and realistic) effect.
Add this line to the end of your lighting code in LoadContent to turn on per pixel light if your system supports it:
effect.PreferPerPixelLighting = true;
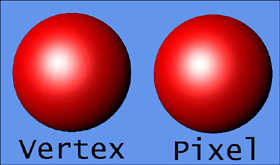
Notice that the spotlight is smooth. See Figure 5 for a comparison between per vertex and per pixel lighting.
Note
Per pixel lighting can look
amazing, but at a cost. On Windows Phone 7, this process can hinder
performance.
The last lighting property is the EmissiveColor
of the material. Unlike the specular material, this color is not
reflected. It can be thought of as the color of light that the object
actually emits. The default value of this is a pure black color (the
object doesn’t emit anything). To see how this affects your sphere,
replace your lighting code in LoadContent (after view and projection matrices are set) with the following:
effect.LightingEnabled = true;
effect.DirectionalLight0.Enabled = true;
effect.DirectionalLight0.DiffuseColor = Color.White.ToVector3();
effect.DirectionalLight0.Direction = Vector3.Normalize(new Vector3(-1, -1.5f, 0));
This makes a sphere lit with a single white directional light. To make the sphere emit some red light, add the following line:
effect.EmissiveColor = Color.Red.ToVector3();
Notice a vastly
different sphere. The dark portions without the emissive color are now
bright red, and they lighten to white as the light from the directional
light takes over. If you switch the color of the directional light to
blue, it lightens to purple instead of white, because the blue light is
combining with the red light to form purple.
