UIElement defines an Opacity
property that you can set to a value between 0 and 1 to make an element
(and its children) more or less transparent. But a somewhat more
interesting property is OpacityMask, which can “fade out” part of an element. You set the OpacityMask to an object of type Brush; most often you’ll use one of the two GradientBrush derivatives.
The actual color of the brush is ignored. Only the alpha channel is used to govern the opacity of the element.
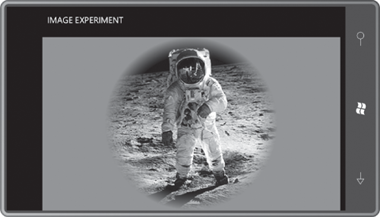
For example, you can apply a RadialGradientBrush to the OpacityMask property of an Image element:
<Image Source="Images/BuzzAldrinOnTheMoon.png">
    <Image.OpacityMask>
        <RadialGradientBrush>
            <GradientStop Offset="0" Color="White" />
            <GradientStop Offset="0.8" Color="White" />
            <GradientStop Offset="1" Color="Transparent" />
        </RadialGradientBrush>
    </Image.OpacityMask>
</Image>
Notice that the RadialGradientBrush
is opaque in the center, and continues to be opaque until a radius of
0.8, at which point the gradient goes to fully transparent at the edge
of the circle. Here’s the result, a very nice effect that looks much
fancier than the few lines of XAML would seem to imply:
Here’s a popular technique that uses two identical elements but one of them gets both a ScaleTransform to flip it upside down, and an OpacityMask to make it fade out:
<Image Source="Images/BuzzAldrinOnTheMoon.png"
       Stretch="None"
       VerticalAlignment="Top" />
<Image Source="Images/BuzzAldrinOnTheMoon.png"
       Stretch="None"
       VerticalAlignment="Top"
       RenderTransformOrigin="0.5 1">
    <Image.RenderTransform>
        <ScaleTransform ScaleY="-1" />
    </Image.RenderTransform>
    <Image.OpacityMask>
        <LinearGradientBrush StartPoint="0 0" EndPoint="0 1">
            <GradientStop Offset="0" Color="#00000000" />
            <GradientStop Offset="1" Color="#40000000" />
        </LinearGradientBrush>
    </Image.OpacityMask>
</Image>
The two Image
elements are the same size and aligned at the top and center. Normally
the second one would be positioned on top of the other. But the second
one has a RenderTransform set to a ScaleTransform that flips the image around the horizontal axis. The RenderTransformOrigin
is set at (0.5, 1), which is the bottom of the element. This causes the
scaling to flip the image around its bottom edge. Then a LinearGradientBrush is applied to the OpacityMask property to make the reflected image fade out:
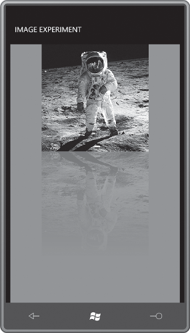
Notice that the GradientStop
values apply to the unreflected image, so that full transparency (the
#00000000 value) seems to be at the top of the picture and then is
reflected to the bottom of the composite display.
It is often little touches
like these that make a program’s visuals pop out just a little more and
endear themselves to the user. But indiscriminate use of OpacityMask—particularly
in combination with complex animations—is discouraged because it
sometimes tends to cripple performance. The general rule is: Only use OpacityMask if the effect is really, really cool.
