WriteableBitmap has two ways to get the visuals of a UIElement onto a bitmap. The first uses one of the constructors:
WriteableBitmap writeableBitmap = new WriteableBitmap(element, transform);
The element argument is of type UIElement and the transform argument is of type Transform. This constructor creates a bitmap based on the size of the UIElement argument as possibly modified by the Transform argument (which you can set to null).
The element and all its visual children are rendered on the bitmap. However, any RenderTransform
applied to that element is ignored. Optionally taking account of that
transform is the rationale behind the second argument. The resultant
bitmap is based on the maximum horizontal and vertical coordinates of
the transformed element. Any part of the element that is transformed
into a negative coordinate space (to the left or above the original
element) is cropped.
Here’s a simple sample program. The content grid is given a background based on the current accent color. It contains a TextBlock and an Image element:
Example 1. Silverlight Project: RecursivePageCaptures File: MainPage.xaml (excerpt)
<Grid x:Name="ContentPanel" Grid.Row="1" Margin="12,0,12,0"
      Background="{StaticResource PhoneAccentBrush}">

    <TextBlock Text="Tap anywhere to capture page"
               HorizontalAlignment="Center"
               VerticalAlignment="Center" />

    <Image Name="img"
           Stretch="Fill" />
</Grid>
|
The Image
element has no bitmap to display but when it does, it will ignore the
bitmap’s aspect ratio to fill the content grid and obscure the TextBlock.
When the screen is tapped, the code-behind file simply sets the Image element source to a new WriteableBitmap based on the page itself:
Example 2. Silverlight Project: RecursivePageCaptures File: MainPage.xaml.cs (excerpt)
public partial class MainPage : PhoneApplicationPage
{
    public MainPage()
    {
        InitializeComponent();
    }

    protected override void OnManipulationStarted(ManipulationStartedEventArgs args)
    {
        img.Source = new WriteableBitmap(this, null);

        args.Complete();
        args.Handled = true;
        base.OnManipulationStarted(args);
    }
}
|
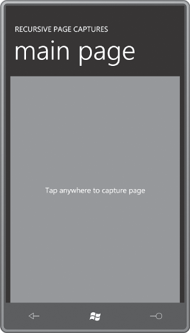
When you first run the program, the screen looks like this:

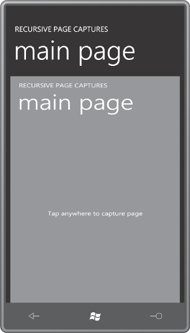
Tap once, and the whole page becomes the bitmap displayed by the Image element:

Keep in mind that the PhoneApplicationPage object being captured has its Background property set to the default value of null,
so that’s why you see the original background of the content panel
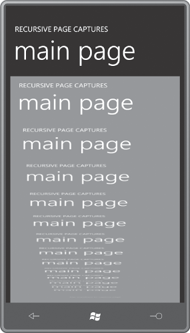
behind the captured titles. You can continue tapping the screen to
recapture the page content, now including the previous Image element:

There is no sense in which these elements are “retained” by the bitmap in any way other than becoming part of the bitmap image.
The WriteableBitmap class also has a Render method with the same two arguments as the constructor I just demonstrated:
writeableBitmap.Render(element, transform);
You’ll need to follow the Render call with a call to Invalidate to get the actual bitmap to reflect the visuals of the element argument:
writeableBitmap.Invalidate();
Obviously the WriteableBitmap
must obviously already have been created at the time of these calls, so
it already has a fixed size. Based on the size of the element and the
transform, some (or all) of the element might be cropped.
If you try calling Render with a newly created Button element (for example) you’ll probably discover that it doesn’t work. A newly created Button element has a size of zero. You’ll need to call Measure and Arrange on the element to give it a non-zero size. However, I have generally been unsuccessful in giving some elements a non-zero size even after calling Measure and Arrange. The process seems to work a lot better if the element is already part of a visual tree. It works much better with Image elements and Shape derivatives.
Here’s a program that obtains a square bitmap from the phone’s picture library, and then chops it up into four quadrants, each of which is half the width and half the height of the original bitmap.
The content area of the SubdivideBitmap program contains a TextBlock and a Grid with two rows and two columns of equal size. Each of the four cells of this Grid contains an Image element with names that indicate the location in the grid: For example, imgUL is upper-left and imgLR is lower-right.
Example 3. Silverlight Project: SubdivideBitmap File: MainPage.xaml (excerpt)
<Grid x:Name="ContentPanel" Grid.Row="1" Margin="12,0,12,0">
    <TextBlock Name="txtblk"
               Text="Touch to choose image"
               HorizontalAlignment="Center"
               VerticalAlignment="Center" />

    <Grid HorizontalAlignment="Center"
          VerticalAlignment="Center">
        <Grid.RowDefinitions>
            <RowDefinition Height="*" />
            <RowDefinition Height="*" />
        </Grid.RowDefinitions>

        <Grid.ColumnDefinitions>
            <ColumnDefinition Width="*" />
            <ColumnDefinition Width="*" />
        </Grid.ColumnDefinitions>

        <Image Name="imgUL" Grid.Row="0" Grid.Column="0" Margin="2" />
        <Image Name="imgUR" Grid.Row="0" Grid.Column="1" Margin="2" />
        <Image Name="imgLL" Grid.Row="1" Grid.Column="0" Margin="2" />
        <Image Name="imgLR" Grid.Row="1" Grid.Column="1" Margin="2" />
    </Grid>
</Grid>
|
The code-behind file for the MainPage class is set up for a PhotoChooserTask: As required, the PhotoChooserTask object is defined as a field and the Completed event handler is attached at the end of the constructor:
Example 4. Silverlight Project: SubdivideBitmap File: MainPage.xaml.cs (excerpt)
public partial class MainPage : PhoneApplicationPage
{
    PhotoChooserTask photoChooser = new PhotoChooserTask();
    public MainPage()
    {
        InitializeComponent();
        photoChooser.Completed += OnPhotoChooserCompleted;
    }
    protected override void OnManipulationStarted(ManipulationStartedEventArgs args)
    {
        int dimension = (int)Math.Min(ContentPanel.ActualWidth,
                                      ContentPanel.ActualHeight) - 8;

        photoChooser.PixelHeight = dimension;
        photoChooser.PixelWidth = dimension;
        photoChooser.Show();

        args.Complete();
        args.Handled = true;
        base.OnManipulationStarted(args);
    }
    . . .
}
|
The OnManipulationStarted override then calls the Show method of the PhotoChooserTask requesting a square bitmap using dimensions based on the size of the content panel. Eight pixels are subtracted from this dimension to account for the Margin property set on each Image element in the XAML file.
When the Completed event is fired by the PhotoChooserTask, the handler begins by creating a BitmapImage object based on the stream referencing the chosen bitmap. It then creates an Image element (named imgBase) to display the bitmap. Notice that this Image element is not part of a visual tree. It exists solely as a source for Render calls.
Example 5. Silverlight Project: SubdivideBitmap File: MainPage.xaml.cs (excerpt)
void OnPhotoChooserCompleted(object sender, PhotoResult args)
{
    if (args.Error != null || args.ChosenPhoto == null)
        return;

    BitmapImage bitmapImage = new BitmapImage();
    bitmapImage.SetSource(args.ChosenPhoto);

    Image imgBase = new Image();
    imgBase.Source = bitmapImage;
    imgBase.Stretch = Stretch.None;
    // Upper-left
    WriteableBitmap writeableBitmap = new WriteableBitmap(bitmapImage.PixelWidth / 2,
                                                          bitmapImage.PixelHeight / 2);
    writeableBitmap.Render(imgBase, null);
    writeableBitmap.Invalidate();
    imgUL.Source = writeableBitmap;

    // Upper-right
    writeableBitmap = new WriteableBitmap(bitmapImage.PixelWidth / 2,
                                          bitmapImage.PixelHeight / 2);
    TranslateTransform translate = new TranslateTransform();
    translate.X = -bitmapImage.PixelWidth / 2;
    writeableBitmap.Render(imgBase, translate);
    writeableBitmap.Invalidate();
    imgUR.Source = writeableBitmap;

    // Lower-left
    writeableBitmap = new WriteableBitmap(bitmapImage.PixelWidth / 2,
                                          bitmapImage.PixelHeight / 2);
    translate.X = 0;
    translate.Y = -bitmapImage.PixelHeight / 2;
    writeableBitmap.Render(imgBase, translate);
    writeableBitmap.Invalidate();
    imgLL.Source = writeableBitmap;

    // Lower-right
    writeableBitmap = new WriteableBitmap(bitmapImage.PixelWidth / 2,
                                          bitmapImage.PixelHeight / 2);
    translate.X = -bitmapImage.PixelWidth / 2;
    writeableBitmap.Render(imgBase, translate);
    writeableBitmap.Invalidate();
    imgLR.Source = writeableBitmap;

    txtblk.Visibility = Visibility.Collapsed;
}
|
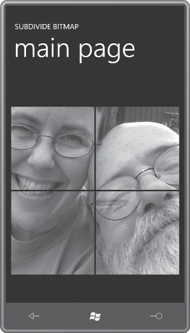
The remainder of the Completed event handler creates four WriteableBitmap objects, each ½ the width and ½ the height of the original. (This calculation is based on the dimensions of the BitmapImage and not the dimensions of the Image, which at this time will report a zero size.)
Except for the first of the four Render calls, a TranslateTransform is also defined that shifts to the left or up (or both) by half the bitmap dimension. Each call to Render is followed by an Invalidate call. Each WriteableBitmap is then assigned to the Source property of the appropriate Image element in the XAML file. The Margin property of those Image elements separates them sufficiently to make it clear that we’re now dealing with four separate Image elements:

Notice that the code uses a single TranslateTransform
object. Normally you wouldn’t want to share a transform among multiple
elements unless you wanted the same transform to be applied to all
elements. But here the TranslateTransform is only being used temporarily for rendering purposes.