1. Problem
You want to create a photo catalog application that captures from the camera device and saves locally, not in the media library.
2. Solution
You must work with the PictureDecoder
class and store the data as an array of bytes, because an image is
essentially a stream of bytes. Then you can use this array to write data
inside an IsolatedStorageFile class.
3. How It Works
PictureDecoder is used to decode a JPEG file into a WriteableBitmap that provides a BitmapSource (constant set of pixels) that can be written.
4. The Code
In this recipe, you will
play with some features of Windows Phone, combining them in an
interesting application. You know how
isolated storage works and how you can add files to it and open them.
Now you want to create an organized list of directories (1 directory : 1
album)
Our interface is composed of a
home page, from which the user can start to take a photo, and the image
gallery, where the user can navigate inside the storage structure.
HomePage.xaml contains this structure:
...
<Grid x:Name="LayoutRoot" Background="Transparent">
  <Grid.RowDefinitions>
    <RowDefinition Height="Auto"/>
    <RowDefinition Height="*"/>
  </Grid.RowDefinitions>
<!--TitlePanel contains the name of the application and page title-->
  <StackPanel x:Name="TitlePanel" Grid.Row="0" Margin="12,17,0,28">
    <TextBlock x:Name="ApplicationTitle" Text="Photo App" Style="{StaticResource
        PhoneTextNormalStyle}"/>
  </StackPanel>

  <Grid x:Name="ContentPanel" Grid.Row="1" Margin="12,0,12,0">
    <Button Content="Capture a Photo" Height="72" Margin="47,6,76,0" Name="CameraButton"
          VerticalAlignment="Top" Click="CameraButton_Click" />
    <Image Height="337" HorizontalAlignment="Left" Margin="12,84,0,0" Name="image"
          Stretch="Fill" VerticalAlignment="Top" Width="438" />
    <TextBox Height="72" HorizontalAlignment="Left" Margin="-4,457,0,0"
          Name="FileNameTextBox" Text="TextBox" VerticalAlignment="Top" Width="460" />
    <TextBlock Height="30" HorizontalAlignment="Left" Margin="98,433,0,0"
          Name="textBlock1" Text="Choose a name and album" VerticalAlignment="Top" Width="242" />
    <ListBox Height="96" HorizontalAlignment="Left" Margin="6,522,0,0" Name="AlbumsListBox"
          VerticalAlignment="Top" Width="444" />
  </Grid>
</Grid>

<phone:PhoneApplicationPage.ApplicationBar>
  <shell:ApplicationBar IsVisible="True" IsMenuEnabled="True">
    <shell:ApplicationBarIconButton IconUri="/icons/appbar.save.rest.jpg" Text="Save"
       x:Name="SaveButton" Click="SaveButton_Click" />
    <shell:ApplicationBarIconButton IconUri="/icons/appbar.folder.rest.jpg" Text="Archive"
       x:Name="PhotosButton" Click="PhotosButton_Click" />

    <shell:ApplicationBar.MenuItems>
      <shell:ApplicationBarMenuItem Text="Create Album" x:Name="CreateAlbumButton"
        Click="CreateAlbumButton_Click" />
    </shell:ApplicationBar.MenuItems>
  </shell:ApplicationBar>

</phone:PhoneApplicationPage.ApplicationBar>

...
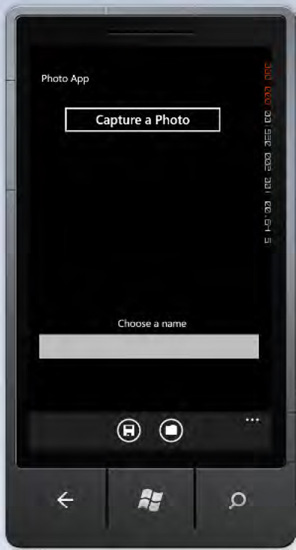
This Xaml will be shown, as you can see in Figure 1. When the user clicks the CameraButton, you want to start CameraCaptureTask and show a preview. Then the user can choose an album and a filename.
Start analyzing the CreateAlbumButton_Click event handler, which shows a page where the user can create a new album:
...
private void CreateAlbumButton_Click(object sender, EventArgs e)
{
  NavigationService.Navigate(new Uri("/CreateAlbum.xaml", UriKind.Relative));
}
...
This code navigates to the CreateAlbum.xaml page, which is easy to understand because it's composed of only three elements: a text block, a text box, and a button.
<Grid x:Name="ContentPanel" Grid.Row="1" Margin="12,0,12,0">
  <TextBlock Height="30" HorizontalAlignment="Center" Text="Album Name"
    VerticalAlignment="Top" />
  <TextBox Height="72" HorizontalAlignment="Left" Margin="0,42,0,0"
    Name="AlbumNameTextbox" Text="Album" VerticalAlignment="Top" Width="460" />
  <Button Content="Create" Height="72" HorizontalAlignment="Left" Margin="12,120,0,0"
    Name="CreateAlbumButton" VerticalAlignment="Top" Width="438"
    Click="CreateAlbumButton_Click" />
</Grid>
The most important part of this code is the event handler associated with the click of CreateAlbumButton, because here you create the directory that will contain the new album:
private void CreateAlbumButton_Click(object sender, RoutedEventArgs e)
{
  using (var store = IsolatedStorageFile.GetUserStoreForApplication())
  {
    if (store.DirectoryExists(this.AlbumNameTextbox.Text))
      MessageBox.Show("Album already exists");
    else
    {
      store.CreateDirectory(AlbumNameTextbox.Text);
      NavigationService.Navigate(new Uri("/MainPage.xaml", UriKind.Relative));
    }
  }
}
Similarly, by creating a new file, the IsolatedStorageFile
class allows us to access the functionality of the directories. So
first you check whether an album with that name exists. If it does, you
show a warning to the user. Otherwise, you create the album and move
into the main window to enable the user to fill the new album.
At this point, it is time to show what happens in the main window when the user clicks CameraButton. But first there are some preliminary steps to be done, including editing the MainPage
constructor in the usual way (in order to leave some actions not
discriminatory for the operation of the application, when the page is
loaded).
public MainPage()
{
  InitializeComponent();
  this.Loaded += new RoutedEventHandler(MainPage_Loaded);
}
And you declare at the class level the following member:
...
        CameraCaptureTask cameraTask;
        ...
Now take a look at the implementation of the loaded event handler:
...
void MainPage_Loaded(object sender, RoutedEventArgs e)
        {
            cameraTask = new CameraCaptureTask();
            cameraTask.Completed += new EventHandler<PhotoResult>(cameraTask_Completed);
            AlbumsListBox.ItemsSource = IsolatedStorageFile.GetUserStoreForApplication()
                    .GetDirectoryNames();
        if (AlbumsListBox.Items.Count > 0)
            AlbumsListBox.SelectedIndex = 0;
        }
...
You initialize cameraTask and associate it to the completed event on your event handler cameraTask_Completed, but this hides the code that allows us to interact with the method GetDirectoryNames,
which retrieves the names of all directories in isolated storage. At
this point, for the first part of the interface, you complete the click
handler for the CameraButton component:
private void CameraButton_Click(object sender, RoutedEventArgs e)
{
  cameraTask.Show();
}
That does nothing more than
start the task to use the photo camera. Now assume that the user has
clicked a picture. You must provide a preview, because maybe you have
implemented in your application the capability to apply filters or other
amazing features (we leave this to your imagination).
We'll show you the preview inside the image control with the code contained within the event handler cameraTask_Completed, but before we do this, you must add another member at the class level:
...
    byte[] _imageAsByte;
    ...
Then all you need to do with _imageAsByte is as you can see below
void cameraTask_Completed(object sender, PhotoResult e)
        {
            if (e.TaskResult == TaskResult.OK)
            {
                _imageAsByte = new byte[e.ChosenPhoto.Length];
                e.ChosenPhoto.Read(_imageAsByte, 0, _imageAsByte.Length);

                e.ChosenPhoto.Seek(0, SeekOrigin.Begin);

                this.image.Source = PictureDecoder.DecodeJpeg(e.ChosenPhoto);
            }
        }
This code is
responsible for checking that the user has actually accepted the photo
from the interface. Then you create an array of bytes as large as the
size of the photo taken, and you start reading the photo taken,
instantiating the array, and filling it with the image. Finally,
returned to the beginning of the image you convert it to JPEG, thanks to
the support class PictureDecoder showing the image on the display.
The user is ready, in your
case, to apply filters to the image or to edit it as desired (if you
allowed that), and then to save it. In the application bar, you have a
button that does just this—save the image in the library, according to
the folder and filename chosen.
private void SaveButton_Click(object sender, EventArgs e)
{
  if (_imageAsByte == null)
  {
    MessageBox.Show("Nothing to Save");
    return;
  }

  using (var store = IsolatedStorageFile.GetUserStoreForApplication())
  {
    if (!store.FileExists(System.IO.Path.Combine(
                    AlbumsListBox.SelectedItem as string,
                   FileNameTextBox.Text)) ||
         store.FileExists(System.IO.Path.Combine(
                    AlbumsListBox.SelectedItem as string,FileNameTextBox.Text))
           && MessageBox.Show("Overwrite the file?", "Question",
                              MessageBoxButton.OKCancel) == MessageBoxResult.OK)
         {
       using (var stream = store.CreateFile(System.IO.Path.Combine(
                  AlbumsListBox.SelectedItem as string, FileNameTextBox.Text)))
       {
           stream.Write(_imageAsByte, 0, _imageAsByte.Length);
       }
     }
  }
}
First, by using this
method, you ensure that it is legitimate for the user to save an image,
because it is actually present. Then you access the isolated storage to
ensure that in the selected directory (album), there isn't a file with
that name. If there is, you ask the user to overwrite it. If one of
these two conditions occurs, you create the file stream in the file
contents in the directory specified and write the stream, by using the
array of bytes that represents the image.
At this point, the photo
has been saved and inserted in the gallery(your gallery and not the
media library), and you just have to scroll down to discover the
pictures you have saved. Then via the button click to PhotosButton, thanks to the usual Navigation Service, will lead you to that page Albums is the page used to show images
The page consists of two list boxes for albums and other images:
<Grid x:Name="ContentPanel" Grid.Row="1" Margin="12,0,12,0">
  <Grid.RowDefinitions>
    <RowDefinition Height="150" />
    <RowDefinition Height="*" />
  </Grid.RowDefinitions>
  <ListBox Height="150" HorizontalAlignment="Left" Name="AlbumsListBox"
           VerticalAlignment="Top" Width="460"
           SelectionChanged="AlbumsListBox_SelectionChanged" />
  <ListBox Grid.Row="1" Height="546" HorizontalAlignment="Left" Margin="-4,0,0,0"
           Name="PhotoListbox" VerticalAlignment="Top" Width="460" />
</Grid>
When a new album is
selected, the directory changes to list the files in it. But first, you
want to show all the directories in the same way in which you showed
them on the main page:
void Albums_Loaded(object sender, RoutedEventArgs e)
{
  using (IsolatedStorageFile store =
             IsolatedStorageFile.GetUserStoreForApplication())
  {
    this.AlbumsListBox.ItemsSource = store.GetDirectoryNames();
  }
}
And when an element of the list AlbumsListBox is selected, you change the directory listing:
private void AlbumsListBox_SelectionChanged(object sender, SelectionChangedEventArgs e)
{
  using (IsolatedStorageFile store = IsolatedStorageFile.GetUserStoreForApplication())
  {
    this.PhotoListbox.ItemsSource = store.GetFileNames(string.Format("{0}\\*",
              this.AlbumsListBox.SelectedItem));
  }
}
As you can see, you've used a
search function, which when used with a wildcard, could display all the
files in a selected folder. However, you could apply a different
pattern in other cases—for example, if the user wanted to do a search
within the photos.
