Windows Server 2008 R2 systems can use either the Windows Server Backup command-line tool, wbadmin.exe, or the PowerShell Windows Server Backup cmdlets. The command-line backup tool used for this example is named wbadmin.exe and can be accessed using a Command Prompt window. Wbadmin.exe is very functional and can be used to perform most of the functions available in the GUI.
Note
If
a full GUI edition of Windows Server 2008 R2 is deployed on the
network, the Windows Server Backup console can be used to remotely
manage a Server Core backup to keep management simple.
Understanding and becoming familiar and fluent with the command-line options of wbadmin.exe
is very useful for administrators who need to manage Windows Server
2008 R2 Server Core systems or who need advanced automation
capabilities. The following sections detail a few common tasks that can
be performed using wbadmin.exe.
Viewing Backup History
To view the backup history of a system, perform the following steps:
1. | Log on to the Windows Server 2008 R2 system with an account with administrator privileges.
|
2. | Open a command prompt.
|
3. | Type in wbadmin.exe Get Versions and press Enter to list the backup history.
|
To perform the same task using Windows PowerShell, perform the following steps:
1. | Log on to the Windows Server 2008 R2 system with an account with administrator privileges.
|
2. | Click
Start, click All Programs, click Accessories, click the Windows
PowerShell folder, right-click on Windows PowerShell, and select Run As
Administrator.
|
3. | Type cd \ and press Enter.
|
4. | Type Add-PsSnapin Windows.ServerBackup and press Enter.
|
5. | To get the list of all of the available Windows Server Backup PowerShell cmdlets, type the command Get-Command *wb* -Commandtype cmdlet and press Enter.
|
6. | To get the history list, type Get-WbBackupSet and press Enter.
|
Running a Manual Backup to Remote Storage Using wbadmin.exe
Using wbadmin.exe to
run backups can be tedious. To understand each of the options available
for a manual backup in a Command Prompt window, type wbadmin.exe Start Backup /?
and press Enter. To run a manual backup and store it on a remote server
share, a few options are required. The data will be stored on the
remote server share \\Server30\NetworkBackup,
the Bare Metal Recovery item, referred to as the AllCritical option
used in our example, will be selected for backup. This item includes all
volumes in use
by the system, including volumes that contain applications and shared
data folders, as well as the System State. For this example, the
companyabc\administrator account will be used to connect to the remote
share. To run the manual backup using the preceding criteria, perform
the following steps:
1. | Log on to the Windows Server 2008 R2 system with an account with administrator privileges.
|
2. | Open a command prompt.
|
3. | Type wbadmin.exe Start Backup –backuptarget:\\Server2\NetworkBackup –AllCritical -user:companyabc\administrator –password:My$3cretPW! and press Enter to start the backup.
|
4. | The
backup window will state that the network share cannot be securely
protected, press Y, and then press Enter to allow the backup to run to
this network share.
|
5. | The backup progress will be detailed in the Command Prompt window. After the backup completes, type exit to close the Command Prompt window.
|
To perform the previous
backup task using Windows PowerShell is a much more detailed task and
requires several steps to make this work. To perform a manual backup to a
network share capable of Bare Metal Recovery, perform the following
steps:
1. | Log on to the Windows Server 2008 R2 system with an account with administrator privileges.
|
2. | Click
Start, click All Programs, click Accessories, click the Windows
PowerShell folder, right-click on Windows PowerShell, and select Run As
Administrator.
|
3. | Type cd \ and press Enter.
|
4. | Type Add-PsSnapin Windows.ServerBackup and press Enter.
|
5. | Type $BMRPolicy=New-WbPolicy and press Enter.
|
6. | Type $BMRCred=Get-Credential and press Enter.
|
7. | A
Windows dialog box opens; enter the username and password combination
that will be used to connect to the network share, and click OK to save
the credentials and return to the PowerShell window.
|
8. | Back in the PowerShell window, type $NetShareBackup=New-WbBackupTarget –NetworkPath \\Server30\NetworkBackup -Credential $BMRCred and press Enter.
|
9. | Type Add-WbBackupTarget –policy $BMRPolicy –Target $NetShareBackup and press Enter.
|
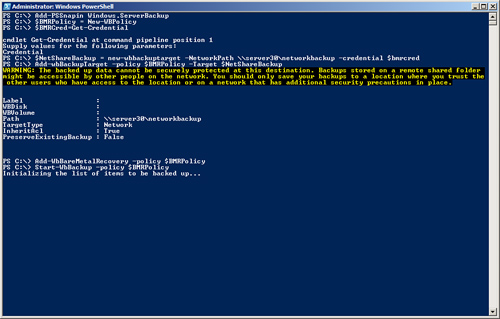
10. | Type Add-WbBareMetalRecovery –policy $BMRPolicy and press Enter.
|
11. | Type Start-WbBackup –policy $BMRPolicy and press Enter. The backup should start, as shown in Figure 1.
|
