Now that you have learned how to back up
your data and systems, this section goes over the processes to restore
that data. One can easily argue that restore is the most important part.
If for no other reason, a successful restore implies a successful
backup is available.
In
many cases, a restore is the logical reversal of the backup process.
However, there are still some decisions the administrator makes. This
section reviews restore processes for databases, restoring or moving the
CMS, and a bare metal restore of a Lync Server server.
Although it is simple to devise a strong backup plan,
it is more challenging to plan for restoring service. There are simply
too many unknowns with respect to the reason for the restore to plan for
immediate restoration in all scenarios. There are literally infinite
solutions available. This section covers the basics of restoring service
in common situations.
Restoring Lync Server Databases
The database restore process is similar to the backup
process outlined previously. Again, there is nothing unique about a
Lync Server database. That is to say, it can be restored like any other
SQL database. Remember that your backup process performed a
point-in-time backup, meaning any changes made after the backup was
performed are not included and will not be restored.
For the front end pool, only the RTC database needs
to be restored. The RTCDyn database contains transient information and
is re-created by the Front End Server. The RTCConfig database contains
configuration information; however, it will be re-created by restoring
the CMS in the next step.
The following steps walk through the process of
restoing the RTC database. These steps assume the server is up and
stable. These steps are not a complete instruction set for server
replacement.
1. | Open the SQL Management Studio tool and connect to the appropriate SQL instance where the RTC database is stored.
|
2. | Expand Databases and find the RTC database.
|
3. | Right-click the RTC database and select Tasks – Restore – Database.
|
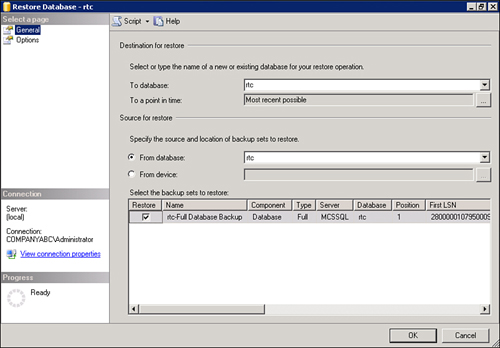
4. | In
the window that displays, ensure the RTC database is selected for
source and destination. A proper configuration of this screen is shown
in Figure 1.
|
5. | In the left column, select the Options item.
Tip
Most of the items can be left at their default settings. However, it is recommended to select the Overwite the Existing Database check box. This ensures there is no lingering garbage from a previous corrupted database.
|
6. | Click OK to restore the database.
|
Create TSQL Script to Restore the RTC Database
There are two ways to create the TSQL script for
restoring the RTC database. If you are familiar with TSQL, it’s fairly
simple to write the script and set it as a job.
Tip
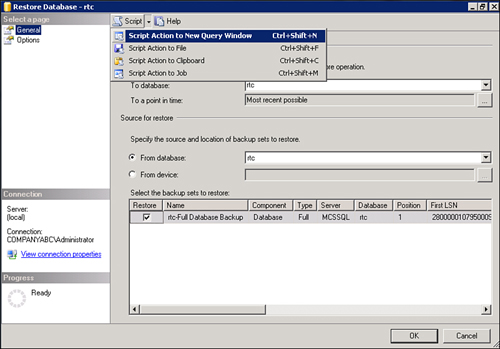
If you are not familiar with TSQL, there is a way to
have the SQL Management studio write the script for you. Follow steps
1–5 as shown previously. However, instead of clicking OK, click the Script button at the top of the window and choose Script Action to New Query Window, as shown in Figure 2. Simply run the query to create the backup.
For the process outlined previously, the script is included here.
RESTORE DATABASE [rtc] FROM DISK = N'C:\Program Files\Microsoft SQL
Server\MSSQL10.MSSQLSERVER\MSSQL\Backup\rtc.bak' WITH FILE = 1, NOUNLOAD,
REPLACE, STATS = 10
GO
Restoring the Central Management Store
Just
like backing up the CMS, the restore process is performed with Lync
Server Command Shell cmdlets. If you are looking to simply restore a
known good configuration, use the Import-CsConfiguration and
Import-CsLisConfiguration cmdlets. However, if the CMS is offline
permanently or you simply want to move the CMS to a different pool, use
the Move-CsManagementServer cmdlet.
The Import-CsConfiguration cmdlet imports the Lync
Server global configuration from a exported file. There are two syntaxes
for the command and both are displayed in the following:
Import-CsConfiguration – Filename <string> [-Force <switchParameters>
Export-CsConfiguration –ByteInput <Byte[]>
The parameters are defined as follows:
Filename—
Path to the .zip file to be imported. You must use either the –FileName
or –AsBytes flag, but you cannot use both in the same command.
ByteInput—
Imports the topology based on a byte array stored in a variable from
the export-CsConfiguration cmdlet. You must use either the –FileName or
–AsBytes flag, but you cannot use both in the same command.
Force— Suppresses the display of nonfatal errors when running the command.
If you want to move the CMS or you need to in a disaster recovery scenario, you’ll use the Move-CsManagementServer cmdlet.
Caution
It is important to note that the
Move-CsManagementServer cmdlet must be run from the server that becomes
the new CMS owner. It cannot be run from a different system or the
system where the CMS currently resides.
The syntax for the command is as follows:
Move-CsManagementServer –Confirm [<SwitchParameter>] [-CsConfiguration
<String>] [-CsLisConfiguration <String>] [-Force <switchParameter>] [-Report
<String>]
The parameters are defined as follows:
Confirm— Prompts the user for confirmation before executing the command.
CsConfiguration— Full path to the Lync Server .zip file created by the Export-CsConfiguration command.
CsLisConfiguration— Full path to the Lync Server .zip file created by the Export-CsLisConfiguration command.
Force—
Forces the management server to move even if the existing database is
offline. This parameter is required in a disaster recovery situation.
Note that some data may be lost when using the force switch, so it
should be used only as a last resort.
Report— Creates an HTML log file at the specified location.
In a nondisaster recovery scenario where you are just moving the CMS to another server, the command is simple:
However, in a disaster recovery scenario it would look more like this:
Move-CsManagementServer -CsConfiguration "C:\backup\CSConfiguration.zip" -
CsLisConfiguration "C:\backup\CSLisConfiguration.zip -Force -Report
"C:\logs\MoveCMS.html"
Of all the various restore processes, these tools are
the most powerful. Armed with them, an administrator can recover from
nearly any scenario.
Restoring Lync Server Servers
The server backup process process was outlined. This
section covers the server restore process using the same tool, Windows
Server Backup. Even if you are only restoring and not performing any
actual backup tasks, Windows Server Backup must be added as a feature
before it can be used. From the Server Manager tool, right-click Features and select Add Features. In the window that displays, select the Windows Server Backup Features check box. Click Next, and then click Install to finish the installation. A reboot is not required before using the feature.
Launch Windows Server Backup from the Start menu. Follow these steps to restore the server:
1. | In the right action pane, click Recover.
|
2. | Choose
whether the backup file is located locally or on another server.
Following the backup process previously outlined, it is stored on
another server. Choose this option, and then click Next.
|
3. | Choose Remote Shared Folder, and then click Next.
|
4. | Enter the UNC path to the share. For the example shown, it is \\MCSDPM\Backups.
|
5. | Choose
the appropriate date of the backup you want to restore. The text at the
top of the page shows the dates of the oldest and newest backups. Click
Next.
|
6. | Select System State and click Next.
|
7. | Select Original location and click Next.
|
8. | Click Recover.
|
After the system reboots, follow the same process, but choose to recover the volume.
Alternatively, an administrator can load the
Windows 2008 R2 OS disc and start the Windows Recovery Environment.
This allows a bare metal recovery. Assuming the same or identical
hardware, this is the best way to ensure a successful recovery.
Troubleshooting
The backup process is straightforward; it’s usually
the restore process that is challenging. This section reviews common
issues and areas to check should the process not go smoothly.
When running the Lync Server cmdlets, ensure you
started the command shell in Administrator mode. Many cmdlets won’t work
unless executed in an elevated privilege environment. The errors can
often be cryptic and not explicitly say they failed because of a shell
permissions issue.
Often, even after a clean restore, a server may not
respond as expected. In this scenario, it is recommended to uninstall
the Lync Server binaries from the system using the Programs and Features
item in the Control Panel. After a reboot, reinstall Lync Server. The
server pulls clean data from the CMS and should begin to function
correctly.
A
disaster recovery situation is not the best time to find out that your
backups were not successful. Monitor the backup logs and be diligent in
ensuring a good backup is always available. Despite the extra time
required, always verify a backup to ensure its validity.
