Microsoft announced its Secure Computing
initiative in 2002 and has continued to improve the security of their
products ever since. For Outlook 2007, this means a great increase in
the number of security and antispam features available when using the
Outlook 2007 client and Exchange Server 2007. Similarly, improvements
have been made in the area of preventing unwanted viruses or malicious
scripts from executing when a message is received or previewed.
Microsoft continues to integrate advanced email security features such
as digital signing of messages, mail encryption, and Information Rights
Management.
Support for Secured Messaging
Microsoft’s Outlook 2007 development team has
taken the feedback from IT groups as well as from end users and has
recognized the ever-increasing need for secured messaging. To stay ahead
of competitors, Outlook 2007 expanded its support for secured
messaging, including S/MIME, digital signing, message encryption, and
smart card support.
S/MIME Support, Digital Signatures, and Email Encryption
Though S/MIME support has been available in
previous versions of Outlook, Outlook 2007 provides updated support for
the latest S/MIME functionality. Using S/MIME, email messages
are encrypted by the recipient’s public key and can be decrypted, and,
therefore, made accessible, only with the recipient’s private key. This
private/public key exchange is critical for secure email correspondence.
Use of S/MIME support requires that the Outlook
2007 client have a certificate for cryptography on the client computer
(and is stored locally either in the Microsoft Windows certificate store
or on a smart card), and can be pushed through Registry settings or via
Group Policy to easily implement S/MIME throughout an organization.
This type of internal certificate use is usually performed via an
internal Public Key Infrastructure (PKI).
S/MIME support also includes digital signing.
Digital signing allows for security labels and signed secure message
receipts. This is a way for a message recipient to be sure that the
message came from the person who claimed to send it. Using Outlook 2007,
enterprisewide security labels are enforced such as “For Internal Use
Only” or labeling messages to restrict the forwarding or printing of
messages through Information Rights Management. In addition, users can
now request S/MIME affirmation of receipt of a message. By requesting a
receipt, the sender confirms that the recipient recognized and verified
the digital signature because no receipt is received unless the
recipient, who should have received the message, actually does receive
the message. Only then does the sender receive the digitally signed read
receipt. This allows email users to more safely trust the information
they receive via email. This can be especially valuable when email is
used for workflow or approval processes.
Setting Email Security on a Specific Message
Security such as payload encryption or digital
signing can be set for an individual email using the options available
when creating an email message. Clicking on the Options button opens the
Message Options dialog box. There, the user clicks can access the
Security Properties page to set the security for the message. The user
can choose to encrypt the message and/or add a digital signature,
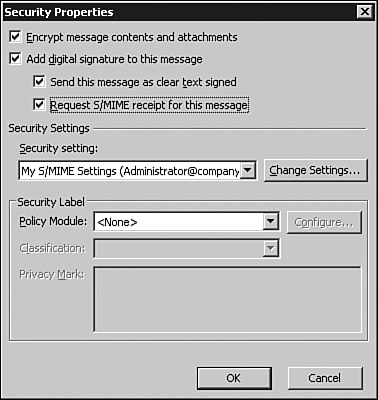
request S/MIME receipt, and configure the security settings.
To do this, follow these steps:
1. | Open a new message.
|
2. | Click the Options tab and click More Options.
|
3. | Click the Security Settings button.
|
4. | Add security settings as desired, similar to the ones shown in Figure 1.

|
5. | Click OK when you are finished.
|
6. | Continue with the email as normal.
|
Setting Email Security on the Entire Mailbox
Security settings can also be globally configured for the entire mailbox so that they apply at all times.
To do this, follow these steps:
1. | Go to Tools, Trust Center.
|
2. | Select Email Security from the left pane.
|
3. | Enable the choices desired for security for the entire mailbox:
Encrypt Contents and Attachments for Outgoing Messages Add Digital Signature to Outgoing Messages Send
Clear Text Signed Messages When Sending Signed Messages (picked by
default). (This allows users who don’t have S/MIME security to read the
message.) Request S/MIME Receipt for All S/MIME Signed Messages
|
4. | For
all choices (except the third choice) to work properly, the user must
get a digital certificate provided by the administrator. This can be
imported by clicking on the Import/Export button at the bottom of the
window beneath Digital IDs (Certificates) or by clicking on Get a
Digital ID.
|
5. | After you import the digital certificate, the security functionality is complete.
|
6. | Click OK when you are finished.
|
Attaching Security Labels to Messages
Also a feature in Outlook 2007, security labels
can be configured by the administrator and used by the end user to add
security messages to the heading of any email messages. Security labels
require digital certificates and denote the sensitivity and security of
an email. This functionality leveraged Information Rights Management
functions made possible
by Exchange and Active Directory. Security labels include information
in the email header such as “Do not forward outside of the company” or
“Confidential.” They can be configured on a message-by-message basis or
for the entire mailbox.
To configure a security label for a single message, follow these steps:
1. | Open a new message.
|
2. | Click the Options tab and click More Options.
|
3. | Click Security Settings from the Message Options window.
|
4. | Click the Add Digital Signature to This Message check box.
|
5. | Choose the security label, classification, and privacy mark that apply to the message.
|
6. | Click OK when you are finished.
|
To configure a security label for all messages in the mailbox, follow these steps:
1. | Go to Tools, Trust Center.
|
2. | Click E-Mail Security in the left pane.
|
3. | Click Settings.
|
4. | Click Security Labels.
|
5. | Choose the policy module, classification, and privacy mark that will apply to all messages.
|
6. | Click OK three times when you are finished.
|
Using Junk Email Filters to Reduce Spam
Improved antispam and antiphishing have now been
integrated into both Outlook 2007 and Exchange Server 2007. With this
feature, the end user can configure the level of antispam filtering
desired and control the level of restriction in which messages will be
checked. These local functions work in tandem with antispam settings on
the Exchange 2007 server.
In today’s workplace, it is commonplace for 90%
of incoming mail to be spam. Rather than burden the end user with the
task of reviewing and deleting spam messages, Outlook 2007 is able to
determine if a message is spam and prevent the user from having to deal
with it. This can be especially helpful as spam messages are often
infected with viruses or contain materials that would be inappropriate
in the workplace. Occasionally, Outlook 2007 misses some messages that
are actually spam, but the user has the ability to help improve the
system when using Exchange 2007. By tagging a message as spam, Exchange
will be more likely to catch a similar spam message in the future. This
can benefit an entire network when users tag spam messages in this way.
With the Outlook 2007 Junk E-mail filter,
messages are reviewed when the client receives them to determine if the
message should be treated as junk or valid email. To do this, the filter
analyzes each message based on a class or criteria and imported spammer
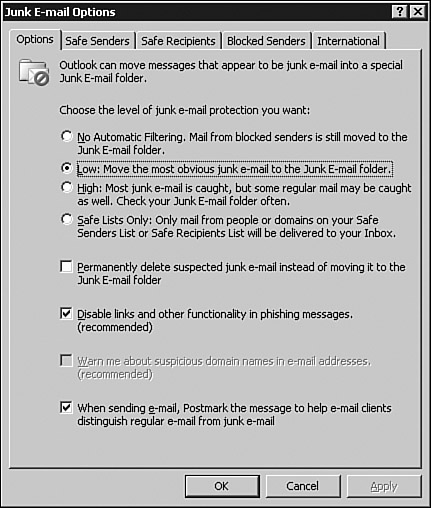
list. When Outlook is initially installed, the default setting is Low,
which catches only the most obvious junk email. This setting is
configurable by the end user and can be changed to increase the level of
sensitivity on the junk email feature. This catches more unwanted email
but increases the chance of false positives. False positives are valid
messages that are mistakenly junked. It is important to occasionally
check the Junk Mail folder to ensure that no valid messages were
accidentally junked. Messages caught by the filter and determined to be
junk mail are moved to a Junk E-mail folder in the Outlook 2007 client.
The end user can and should review emails checking for false positive
emails that were accidentally specified as junk. Optionally, the end
user can configure the option to permanently delete junk email messages
as they arrive and not save them to the folder at all. This setting
should be used with caution.
To configure junk email filtering, follow these steps:
1. | In Outlook 2007, go to Tools, Options, Preferences tab.
|
2. | Under Email, click on the Junk Email button.
|
3. | On the Options tab shown in Figure 2, choose the level of blockage desired.

|
4. | Click OK when you are finished.
|
Utilizing the Safe Senders List
If
the Outlook 2007 Junk E-mail filter incorrectly determines that a
message is junk, the end user can add the sender’s email address to a
Safe Senders list. This list prevents the filter from identifying any
new emails from that sender to be classified as junk mail. This function
is also referred to as a “white list.” The Safe Senders list supports
both email addresses and wildcard domains for safe senders. So, a user
could add [email protected] to allow that one user to send them messages, or a user could add @companyabc.com
to allow any user from companyabc.com to send them a message without
any chance of the message being flagged as spam. By default, all email
addresses in the end user’s contacts list are automatically included in
the Safe Senders list, as are any names listed in the Exchange 2007
Global Address List. The option to Automatically Add People/E-Mail to
the Safe Senders List can be very useful in reducing the amount of
manual interaction with the Safe Senders list.
Utilizing the Safe Recipients List
The Safe Recipients list performs a very
similar function to the Safe Senders list. The Safe Recipients list
allows the user to configure email lists or mail-enabled groups of which
they are a member. Any messages sent from these email groups are
automatically considered as “safe.”
Utilizing the Blocked Senders List
The opposite of the Safe Senders list is the
Blocked Senders list. This concept is often referred to as a “black
list.” By entering email addresses or wildcard domains, a user can tell
Outlook 2007 to automatically junk any and all messages received from
the blocked senders.
Tip
It is important to understand that Blocked
Sender rules are based only on the Reply-to addresses given in the
email. Reply-to addresses can be forged in an attempt to slip around
antispam systems.
Utilizing the International List
Outlook 2007 also has the ability to flag
messages as junk based on where they came from. The International tab
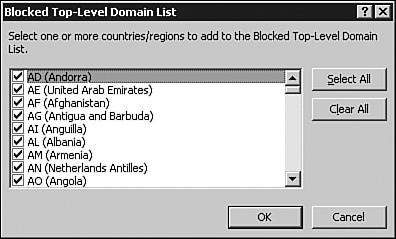
allows a user to block entire top-level domains (shown in Figure 3) or to block messages in particular languages. This is a more encompassing option than blocking by domain name.

To add users to the Safe Senders, Safe Recipients, Blocked Senders, or International lists, do the following:
1. | Select Tools, Options, and go to the Preference List tab. Click the Junk E-mail button.
|
2. | Choose
one of the tabs (Safe Senders, Safe Recipients, or Blocked Senders),
and then click Add to insert the user to the appropriate list.
|
3. | Type in the SMTP email address of the user, group, or domain (such as [email protected] or @companyabc.com).
|
4. | Click OK when you are finished.
|
Tip
Many services provide lists of junk senders
for import into a Blocked Senders list. These lists are created based on
known spammers. If your organization wants to provide the end users
with a list of trusted or junk senders, the end user can easily import
the list by clicking on the Import from File button.
Avoiding Web Beaconing
Web beaconing refers to the use of references to
external content via email to identify a message as having been read.
This allows a spammer to validate their list of addresses by identifying
the messages that reached a valid user and were opened. When the end
user opens the message or views it in the preview pane, the computer
retrieves this external content. Outlook 2007 has the ability to block
web beaconing, which can help reduce the chances of a user getting onto
more spam lists.
To enable web beacon filtering, from Outlook 2007, do the following:
1. | Click Tools and then click Trust Center.
|
2. | Select Automatic Download in the left pane.
|
3. | Check the Don’t Download Pictures Automatically in HTML E-Mail Messages or RSS Items check box.
|
4. | Click OK when you are finished. |