You can configure additional settings for
the package distribution process if the SMS defaults aren’t appropriate
within your environment.
To access these settings, in the SMS
Administrator Console, navigate to the Component Configuration folder
under the site name, the Site Settings, expand it, right-click Software
Distribution, and select Properties to display the Software Distribution
Properties dialog box, shown in Figure 1.
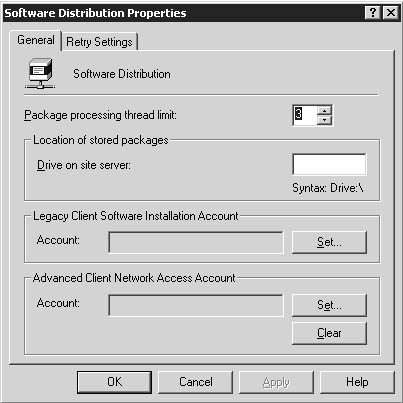
The
Package Processing Thread Limit option in the General tab lets you
identify how many threads to allocate to Distribution Manager to process
packages for the site. The default value is 3, but it can range from 1
through 7. In this case, more is not always better. If your site server
were only processing packages—and not performing any other functions—you
might bump up this number, monitor the site server’s performance, and
determine what value achieves an optimum level of performance between
package processing and other server functions. A higher number of
allocated threads might be appropriate and assignable.
However, if the site server has all SMS functions
enabled—package distribution, Remote Tools, inventory collection, all
site system roles, and so on—increasing the number of threads might
prove to be detrimental to the site server’s overall performance. The
best rule of thumb would be to try adjusting the number if you think you
need to improve package processing performance and then use the various
tools available to monitor the site server’s performance and its other
functions to find the best balance.
Three other options you can configure in the
General tab are Location Of Stored Packages, which identifies for SMS
the drive on which it should create the compressed package folder
(SMSPKG), the Legacy Client Software Installation account, and the
Advanced Client Network Access account. When programs are executed at
the client computer, they will run under the local user account’s
security context unless otherwise noted in the program properties. Since
most users are logged on as users and not as administrators, this means
that these programs will run under the local user context. As you have
probably discovered, most application software installs .DLL files,
modifies registry entries, stops and starts services, and performs other
tasks that require an administrative security context on the client.
For Windows 98 clients, this security context is not usually a big
issue. However, it’s a big issue for SMS clients running Windows NT 4.0
or later since they maintain a local account database and provide more
security over system modifications.
Security poses a problem when you’re dealing with
SMS packages. One of our main objectives here is to be able to remotely
install software on clients without the user’s—or the
administrator’s—intervention.
SMS 2003, however, does provide solutions to the
security issue for both the Legacy Client and the Advanced Client. The
first involves the use of an internal account that SMS creates on the
Legacy Client when a higher level of security access is required to run a
program. This account, named SMSCliToknAcct&, is created
automatically and is granted Act As Part Of The Operating System, Log
On As A Service, and Replace Process Level Token user rights on the
client. The SMSCliToknAcct& account will be sufficient in most
cases. However, if the program execution requires that the program
connect to network resources other than the distribution point,
SMSCliToknAcct& will fail because it’s created as a local account
rather than a domain account. In this case you should identify and use
the Legacy Client Software Installation account.
You create the Legacy Client Software
Installation account in the Windows domain (or domains) your clients are
members of. The easiest thing to do, of course, would be to make the
account a member of the Domain Admins global group in the domain that
the Windows client is a member of. As you know, when a computer running
Windows joins a Windows domain, the Domain Admins global group is made a
member of the local Administrators group on that computer. Making the
account a member of the Domain Admins group would give it the
appropriate level of local rights on the Windows client (provided you
haven’t altered the local Administrator group memberships to exclude the
Domain Admins group), but this arrangement isn’t secure. Ideally, this
account should be made a direct member of the local Administrator’s
group on each client computer or be given the appropriate level of
security access required to run the programs you create.
After you create and configure the account
appropriately, identify it to SMS in the General tab of the Software
Distribution Properties dialog box by clicking Set next to the Legacy
Client Software Installation Account text box and entering the name of
the account in the Windows Account dialog box.
Ideally, for Windows 2000 clients and later, you
should install the SMS Advanced Client, as this is a more secure SMS
client. One of the ways in which this security is manifested is in its
use of computer accounts to carry out tasks like installing software on
the client. When the client connects to a distribution point, it uses
the security context of the local user to do so. You can specify an
optional Advanced Client Network Access account to make this connection
more secure. Create this account in the domain as you would the Legacy
Client Connection account.
After you create and configure the account
appropriately in the domain, identify it to SMS in the General tab of
the Software Distribution Properties dialog box by clicking Set next to
the Advanced Client Network Access Account text box and entering the
name of the account in the Windows Account dialog box.
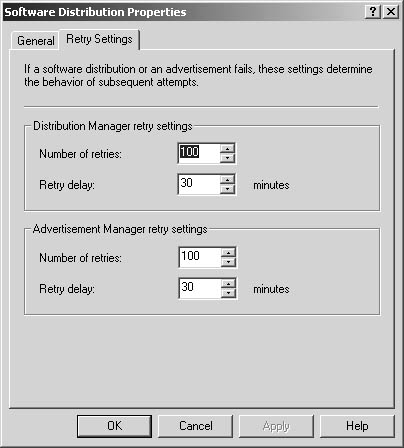
The Retry Settings tab of the Software Distribution Properties dialog box is fairly self-explanatory, as shown in Figure 2.
It lets you alter the retry settings for Distribution Manager’s
attempts to deliver packages and for Advertisement Manager’s attempts to
advertise programs and specify the delay between attempts.