After you’ve installed the Hyper-V role, you need to
actually configure Hyper-V and then start adding virtual machines. The
management tool for Hyper-V is the Hyper-V
Manager console. Like other management consoles in Windows Server 2008
R2, it integrates into the Server Manager console. You can use it there
or run it as a stand-alone tool. We prefer stand-alone—frankly, it takes
up less screen space. Open Administrative Tools, and select Hyper-V
Manager from the list to run the stand-alone Hyper-V Manager console.
Note:
You could run the Hyper-V
Manager console by starting it from the command line, but unlike other
Windows Server 2008 management consoles, it’s not put in
%windir%\system32. It is actually in %ProgramFiles%\Hyper-V, which isn’t
on your path. The command line for this is
"%ProgramFiles%\Hyper-V\virtmgmt.msc" (quotes required)
Note:
If you’re running Hyper-V on
Server Core, you need to install the Hyper-V management tools onto a
Windows 7 or Windows Server 2008 R2 computer and run them remotely. See
Microsoft Knowledge Base article 974877 at http://support.microsoft.com/kb/974877. You use the same steps as if you were running the console locally, but you have to connect to the server first.
1. Configuring Networks
The first step after installing Hyper-V is to configure your networks. The step in the Add Roles Wizard creates the network
and attaches it to the network cards you selected. Depending on the
selections you made, the networks created during the install might need
to be changed to reflect the type of network you need. And, of course,
if you installed on Hyper-V Server, no network configuration has been done at all.
Hyper-V supports three kinds of virtual networks:
External
An external network is a virtual network switch that binds to the
physical network adapter, providing access to resources outside the
virtual network. An external network can be assigned to a VLAN.
Internal
An internal network is a virtual network switch that allows virtual
machines on the server to connect to each other and to the parent
partition. An internal network can be assigned to a VLAN.
Private
A private network is a virtual network switch that allows virtual
machines to connect to each other, but it provides no connection between
the virtual machines and the physical computer.
1.1. Setting Network Type
To set your networks to be
external networks, allowing them to connect through the physical network
adapter to outside the physical computer, use the following steps:
Open the Hyper-V Manager console if it isn’t already open.
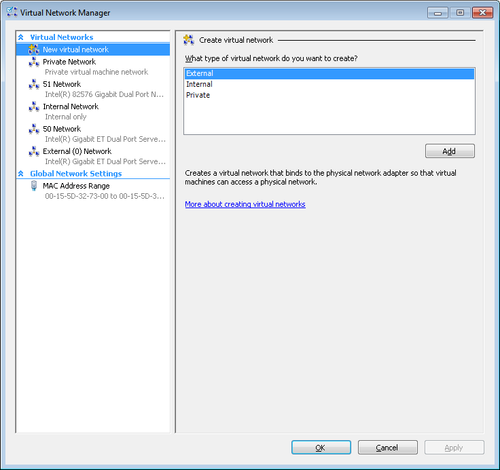
Select
the Hyper-V computer in the left pane, and then click Virtual Network
Manager in the Actions pane to open the Virtual Network Manager as shown
in Figure 1.

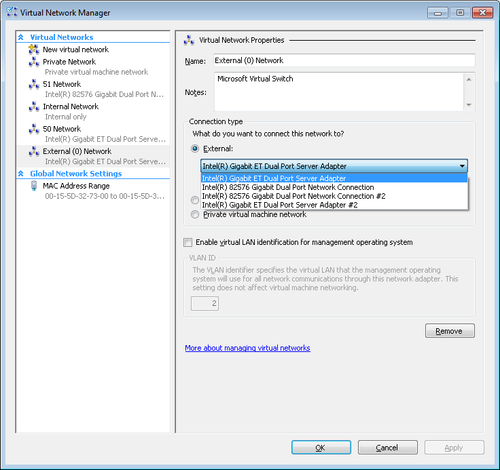
Select
the Virtual Network you want to make an external network. Edit the name
to provide a more meaningful description, and add any notes you want to
add.
Select
External, and select the physical network adapter you want to connect
this virtual network to from the drop-down list, as shown in Figure 2.

Click OK to close the Virtual Network Manager, and apply your changes.
2. Server Settings
The next step in configuring
your Hyper-V server is to set the overall server settings and the
user-specific settings. General server settings include the default
location for hard disks and the default location for virtual machines.
User-specific settings include keyboard settings and saved credentials.
To set the server settings for a Hyper-V server, use the following steps:
Open the Hyper-V Manager console if it isn’t already open.
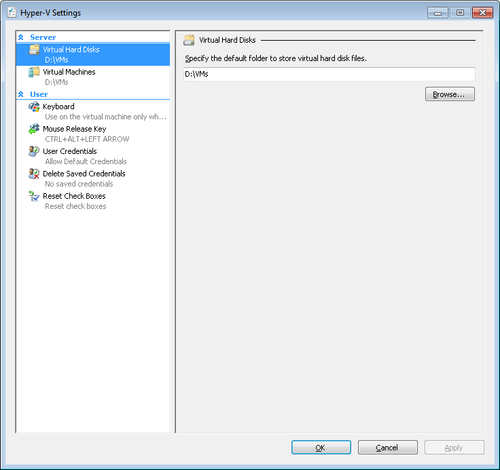
Select
the Hyper-V computer in the left pane, and then click Hyper-V Settings
in the Actions pane to open the Hyper-V Settings dialog box, shown in Figure 3.

Select
Virtual Hard Disks in the left pane, and enter the top of the path to
use as a default for storing the virtual hard disk (VHD)
files used by virtual machines. You can change the actual path of any
specific VHD later. This just sets the default location.
Select Virtual Machines in the left pane, and set the default path for storing virtual machine snapshot files.
Select Keyboard in the left pane, and specify how special Windows key combinations (such as Alt+Tab and Ctrl+Esc) are used.
Select
Mouse Release Key, and set the default key combination to release a
captured mouse when connecting to a virtual machine that doesn’t have
integration components installed.
Select Delete Saved Credentials or Reset Check Boxes to remove any saved credentials on the server or to reset all the Don’t Ask Me Again check boxes on the server.
Click OK to change the settings and return to the main Hyper-V Manager.
Note:
With the release of Service Pack 1 (SP1) for Windows Server
2008 R2, Hyper-V supports special Non-Uniform Memory Architecture
(NUMA) settings. However, realistically, these are not particularly
relevant in an SBS environment, though with the latest dual processor
servers they are technically possible. In general, we suggest you leave
this setting at the default, enabled.
The default locations that Microsoft has chosen for VHD
files and snapshot files don’t make any sense at all. The default
location is on the system drive of the parent partition. That’s just a
really bad idea. Your VHD files could take up hundreds of gigabytes of
space, possibly terabytes of space. Do they really think your system
drive is the right place for all that? Well, we certainly don’t.
Frankly, we think they should either ask the question during the install
or actually go out and inspect your system and choose an appropriate
default based on your system configuration. But they didn’t make that
choice, so you need to take steps to fix it.
The default for snapshots
is also on the system drive of the parent partition, and again these
are files that are going to take up a lot of space. Plus, putting these
files on the system drive is a bad decision for performance.
We suggest creating one or more disk volumes specifically for storing VHDs and snapshots.
This makes backups easier, allows you to store your VHDs on your
fastest array, and just makes good sense. Even if you had to completely
rebuild the server, by having your VHDs and snapshot files on separate
volumes, you greatly simplify the recovery process.