Downloading and Installing
SharePoint Designer 2010
SharePoint Designer
is available free of charge from Microsoft who wants to encourage power
users and developers to customize the SharePoint 2010 environment to
meet a wide variety of business needs. The workstation or server needs
to have .NET 3.5 installed, and as discussed in the previous section,
the web application needs to be configured to allow the use of
SharePoint Designer 2010.
SharePoint Designer 2010
is available in both 32- and 64-bit versions, so developers should be
sure to download the version that corresponds to their workstation’s
operating system version. The main decision point between 32- and 64-bit
development machines comes down to the 4GB limit for 32-bit Vista and
XP workstations.
To Install SharePoint
Designer 2010, follow these steps:
1. | If it is
not already installed on the workstation that will house SharePoint
Designer 2010, install .NET 3.5 from the following link: http://www.microsoft.com/downloads/details.aspx?familyid=333325FD-AE52-4E35-B531-508D977D32A6&displaylang=en
|
2. | |
3. | Run the SharePointDesigner.exe and complete the install
by selecting either the standard or custom options.
|
With SharePoint Designer
2010 downloaded and installed, development can begin immediately as long
as the user has a minimum of designer-level rights to a SharePoint 2010
site.
Creating a Reusable Workflow
from SharePoint Designer 2010
To create a reusable
workflow, the site that will house the workflow must be opened from
SharePoint Designer 2010, and then the workflow is designed, tested, and
published to the site. It can then added to a list or library on that
site and is then ready for use. The following example creates a reusable
workflow that is triggered whenever the word “rush” is found in the
title field of a document. The application in this example is a
collaboration site where managers (User1 and User2) need to review and
provide feedback on documents in different libraries before they can be
released to marketing. Complaints had occurred before when User1 and
User2 weren’t responsive enough, so the workflow was created. If a user
thinks his or her document deserves “rush” status, he or she simply
needs to add that text to the title field, and the workflow will
initiate, and User1 will be informed of the task, and once he completes
it, User2 will be assigned a task. Auditing information will track the
responsiveness of both User1 and User2.
This workflow takes
advantage of the Start Feedback Process action in SharePoint Designer
2010, which contains the logic and functionality of the Collect Feedback
workflow that is a standard workflow in SharePoint Server 2010. So,
this is an example of a workflow within a workflow that enables even
relatively novice workflow designers to take advantage of the standard
workflows provided out of the box.
Follow these steps to open a
SharePoint 2010 site and create this site workflow:
1. | Open
SharePoint Designer 2010 by clicking the Start button, click All
Programs, SharePoint, and then click Microsoft SharePoint Designer 2010.
|
2. | From the File tab, the Sites node should be open; if it
does not open, click Sites. Then click the Open Site icon.
|
3. | Type the URL of the site (for example,
http://abcsp1004/sites/Chapter28) or select the site from the list of
available sites if it has been accessed before, as shown in Figure 1.
Note: Do not include a page name such as default.aspx or
/pages/home.aspx.

|
4. | Click
Workflows from the Site Objects list in the navigation pane.
|
5. | Click Reusable Workflow from the Workflows tab, and the
Create Reusable Workflow window will open, as shown in Figure 2.
|
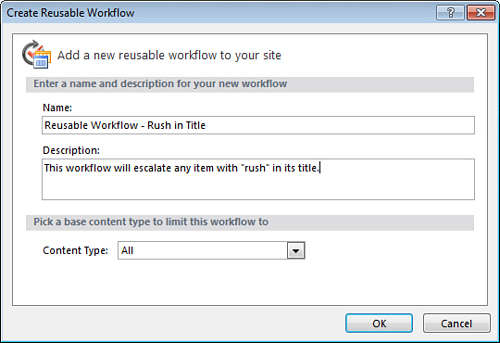
6. | Provide a
title for the workflow, such as Reusable
Workflow – Rush in Title, and a description if desired. In
this case, the description is entered as follows: This workflow will
escalate any item with 'rush' in its title. Leave Content Type set
to All, and click OK.
|
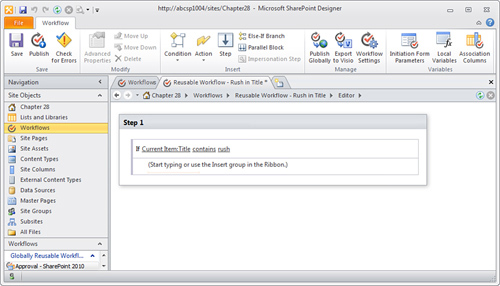
7. | Click the flashing line in the Step 1 box and type if current and press Enter;
Designer will determine that you want to enter If current item field
equals value. Alternatively, you can click the Condition button and
choose If Current Item Field Equals Value.
|
8. | Click the link labeled Field in the Step 1 box, and
select Title from the drop-down menu.
|
9. | Click the link labeled Equals in the Step 1 box, and
select Contains from the drop-down menu.
|
10. | Click the link labeled value in the Step 1 box, and
type rush and press Enter.
The results will look like Figure 3.
Note
Before making changes to a
production system, test your code on a development server or, at a
minimum, in a different site collection.
|
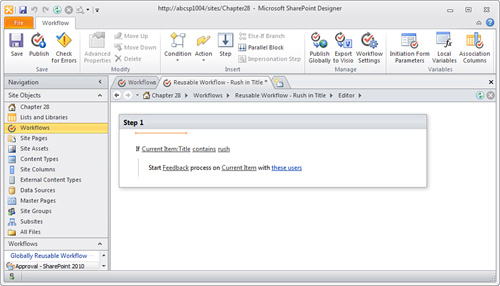
11. | Click the
area directly below the line where data was just entered and type Start feedback and press Enter.
Designer 2010 will interpret this to mean Start Feedback Process. The
results will be the same as Figure 4. This action
effectively imbeds a Collect Feedback workflow within this Reusable
Workflow, which provides significant functionality within the workflow,
as will be demonstrated upon completion of the workflow.
|
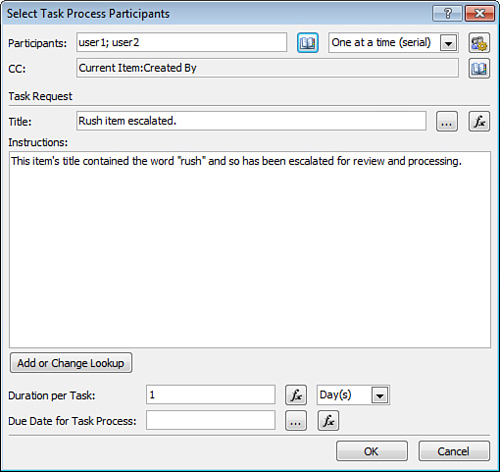
12. | Click the
These Users link, and the Select Task Participants window will open.
|
13. | In the Participants field, enter two valid usernames
separated by a semicolon (;) (User1;User2
in this example). Leave One at a Time (Serial) selected in the field to
the right of Participants.
|
14. | In the CC field, click the Select Users icon on the
right, and click User Who Created Current Item, and then click the Add
button. Click OK.
|
15. | In the
Title field, enter the text Rush Item
Escalated.
|
16. | In the Instructions field, enter text describing the
activity, such as, This item's title
contained the word 'rush' and so has been escalated for review and
processing.
|
17. | In the Duration per Task field, enter 1 and verify that
Days is selected to the right. The window should look like Figure 5.
Click OK.
|
18. | Click the
Check for Errors button on the Ribbon and the message “The workflow
contains no errors” should display.
|
19. | Click the Publish button on the Ribbon, and the
workflow will publish to the site.
|
In this next section, the
workflow will be initiated, and started, to display the functionality
without completing the entire workflow. To test the workflow, follow
these steps:
1. | Log in to
the site as an account with owner-level privileges
(http://abcsp1004/sites/Chapter28/documents in this example).
|
2. | Add the Reusable workflow to the library by accessing
Library Settings and clicking the Workflow Settings link in the
Permissions and Management section.
|
3. | The Reusable workflow should appear in the Select a
Workflow Template list, as shown in Figure 6. Click the
workflow.
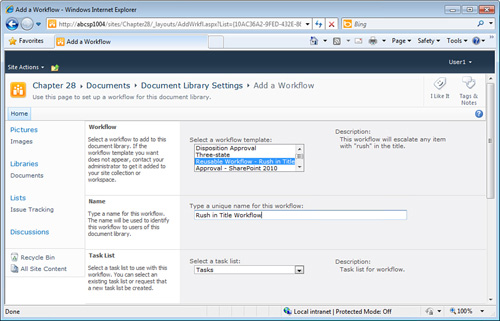
|
4. | Enter a name for the workflow in the Name section
(for example, Rush in Title Workflow
Automatic).
|
5. | Leave the Task list and History list settings at their
defaults.
|
6. | Under
Start Options, verify that the Allow This Workflow to Be Manually
Started by an Authenticated User with Edit Item Permissions is checked,
and check the Start This Workflow When a New Item Is Created and Start
This Workflow When an Item Is Changed boxes. Click OK.
|
7. | Now, log in as a user who is not involved in the
feedback process but has contributor-level privileges in the library
(for example, User3).
|
8. | Access the document library on the site and upload a
sample document. For this example, the document title is “User3’s
super-important document.docx.”
|
9. | Next, edit the properties of the document and add the
term rush to the Title
field, and save.
|
10. | The
column titled Rush in Title Workflow will appear in the library and the
document should be set to a status of In Progress in that column.
|
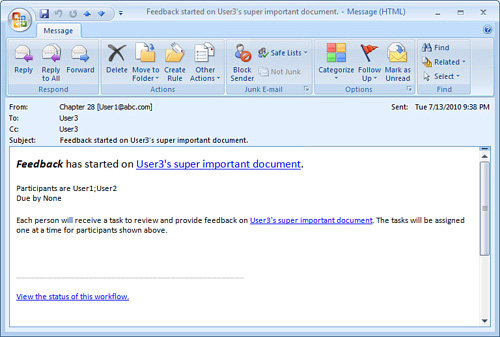
11. | Open Outlook for this user (User3) and an email will be
there, announcing the start of the Feedback workflow, as shown in Figure 7.
|
12. | Log out,
and then log back in as the first approver (User1 in this example). Open
Outlook and note that an email has been received, as shown in Figure 8.

|
The rest of the workflow
won’t be covered here, but it gives User1 a change to provide feedback
on the document and then once approved, a task will be created for User2
and that user will be given a chance to provide feedback.
