2. Exchange Server
2010 Editions
Exchange Server 2010 comes
in two editions: Standard edition and Enterprise edition. Standard
edition supports five databases on each server, and Enterprise edition
supports up to 100 databases on each server. Both editions support high
availability through database availability groups on the Enterprise
edition of Windows Server 2008 and Windows Server 2008 R2. You select an
edition of Exchange Server 2010 when you enter the license key as a
postinstallation task. You do not select an edition of Exchange Server
2010 during the installation process. You should choose to deploy the
Enterprise edition of Exchange Server 2010 when you want to host more
than five databases on a server.
Although the 70-662 exam does
not cover licensing, each user or device that accesses Exchange requires
a standard Client Access License (CAL). A standard CAL gives access to
the majority of Exchange Server 2010 features such as Outlook Web App,
Federated Calendar Sharing, and standard email functionality. If a user
needs advanced Exchange Server 2010 functionality, such as custom
retention policies, voicemail with Unified Messaging, and Multi-Mailbox
Search and Legal Hold, it is necessary to have both a Standard user CAL
and an Enterprise CAL. The Enterprise CAL is a license that is obtained
in addition to the Standard CAL and is not a replacement for the
Standard CAL.
Note:
EXCHANGE SERVER EDITIONS
AND CALs
To find out more about the
editions of Exchange and licensing, consult the following article: http://www.microsoft.com/exchange/2010/en/us/Licensing.aspx.
3. Postinstallation
Tasks
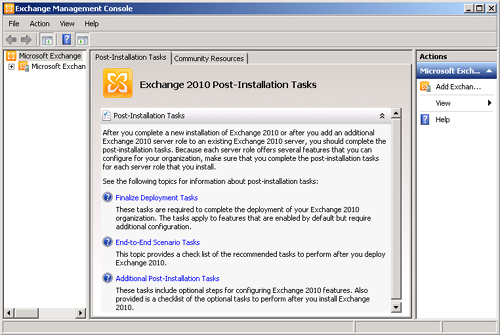
When a graphical
installation completes, the Exchange Management Console automatically
opens. The console will display the information shown in Figure 5, reminding you to complete postinstallation
tasks. Clicking on the Finalize Deployment Tasks item launches a browser
session to a page on Microsoft that provides postdeployment advice. It
is possible to view this page only if the Exchange Server is able to
establish a browsing session to the Internet, either directly or through
a proxy.
This TechNet page instructs you to perform the
following tasks:
Enter the product key
for Exchange Server 2010. You can do this using the Set-ExchangeServer
cmdlet or by navigating to Server Configuration in the Exchange
Management Console and clicking on Enter Product Key Group in the Action
pane. You must enter a product key within 120 days of deploying
Exchange Server 2010.
Install a product to protect Exchange Server 2010 from
malware. This includes but is not limited to Forefront Security 2010 for
Exchange Server.
If you have deployed the Mailbox
server role:
If
you have deployed the Client Access server role, configure secure
access for the Client Access server role and configure Exchange
ActiveSync security, authentication, and policies.
If you have deployed the Hub
Transport server role, configure domains for which you will accept email
messages and configure Internet mail flow.
If you
have deployed the Edge Transport server role, you need to configure an
EdgeSync between this server and the Hub Transport servers.
Note:
FINALIZE EXCHANGE DEPLOYMENT TASKS
You can review the
document that is launched when you click on the Finalize Deployment
Tasks item in Exchange Management Console by navigating to the following
TechNet link: http://technet.microsoft.com/en-us/library/bb125262.aspx.
4. Firewall
Configuration
The Exchange Server 2010
setup process configures Windows Firewall with Advanced Security so that
all necessary ports required to support the roles that you deploy are
open for server and client communication. As this process occurs
automatically, it is not necessary to use the Security Configuration
Wizard tool to configure these settings.
In some cases, it will be
necessary to configure the ports on a separate hardware-based firewall
to allow traffic to or from a server running Exchange Server 2010, such
as if you have a hardware firewall separating subnets on your
organization’s internal network. The most commonly used ports for each
role are as follows:
25 Hub Transport, Edge Transport server SMTP
traffic
135
Mailbox server MAPI access
80 Client Access server Autodiscover,
availability, Outlook Web App, Outlook Anywhere, Exchange ActiveSync
443 Client Access
server secure (SSL) Autodiscover, availability, Outlook Web App, Outlook
Anywhere, Exchange ActiveSync
Note:
EXCHANGE NETWORK PORT
REFERENCE
To learn more about the
network ports that are used by Exchange Server 2010, consult the
following article on TechNet: http://technet.microsoft.com/en-us/library/bb331973.aspx.
5. Verifying Setup
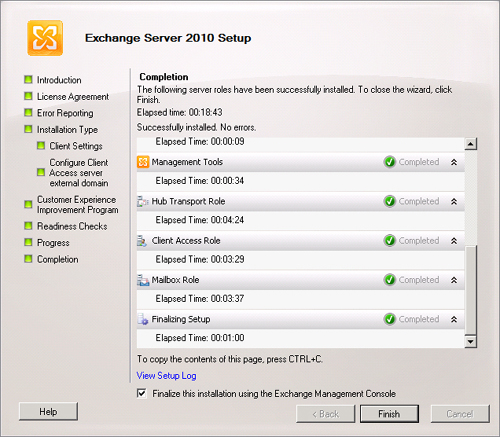
When you install Exchange
Server 2010 using the graphical setup tool, you are presented with a
setup summary detailing whether each step of the setup process has
completed successfully. This summary is shown in Figure 6 and allows you to quickly determine whether all
components have installed correctly. The completion summary will detail
steps that do not complete correctly should problems occur during the
installation.
When setup completes, you
can also view the setup log by clicking on View Setup Log from the
completion page of the setup wizard. This file can also be opened
directly using Notepad.exe and is stored at
C:\ExchangeSetupLogs\ExchangeSetup.log. This log is available whether
the setup fails or succeeds. This log is created and updated during the
Exchange installation process, and you can examine it using notepad.exe
to diagnose why a specific Exchange Server 2010 deployment has failed.
Another tool that you can
use to verify that Exchange Server 2010 has been deployed successfully
is the Get-Exchange Server cmdlet. Executing the Get-ExchangeServer
cmdlet provides information about a specific Exchange Server. You can
use the following command to view information about Exchange Server
VAN-EX1:
Get-ExchangeServer -Identity VAN-EX1 | Format-List
The output of this command
will inform you of which roles have been deployed, the path where
Exchange files have been installed, the network name of the Exchange
server, and the location of the Exchange Server’s Active Directory
object.
Note:
VERIFY AND INSTALLATION
To learn more about
verifying an Exchange Server 2010 installation, consult the following
TechNet link: http://technet.microsoft.com/en-us/library/bb125254.aspx.
