Understanding Virtual Private Networks
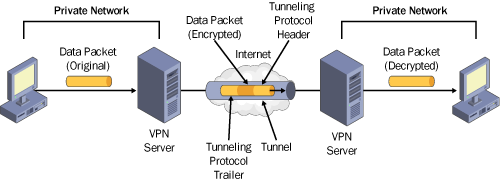
Virtual private networks
are logical networks that physically span the Internet. With a VPN,
private packets are first encrypted and then encapsulated within a
public packet addressed to the remote VPN server. This routing
information allows the encrypted payload of private data to “tunnel
through” the public network to reach its endpoint. Upon receiving the
encapsulated data through a VPN tunnel, the VPN server then removes the
public header and decrypts the private payload. Figure 1 illustrates this concept.
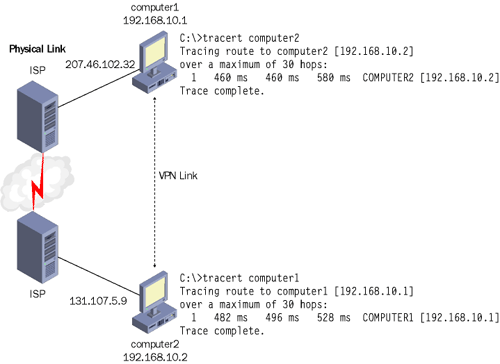
An
important feature of VPNs is that the public physical network through
which private data is sent becomes transparent to the two endpoints of
communication, as illustrated in Figure 2.
Two computers, Computer1 and Computer2, are physically connected only
through the Internet. The transparency of this physical link is revealed
in Figure 10-28
by the results of the Tracert command run at each computer. Although
many hops separate the two computers, each appears to the other as only
one hop away through the VPN connection. Communication occurs between
the two private IP addresses, each within the 192.168.10.0 subnet, as if
the computers were both located on an isolated network segment.
Exploring VPN Deployment Scenarios
VPNs
are typically deployed either to allow users remote access to a network
or to connect two or more private networks. The following section
describes the configuration requirements for these scenarios and for a
third, mixed scenario in which the VPN server is located behind a
firewall. Because all three scenarios involve network access beyond the
VPN server, the VPN servers in all cases must be enabled for LAN and
demand-dial routing (settings found on the General tab of the server
properties dialog box in the Routing And Remote Access console).
Furthermore, for all of the following scenarios, the dial-in properties
for all user accounts are assumed to be left at the default setting of
Control Access Through Remote Access Policy.
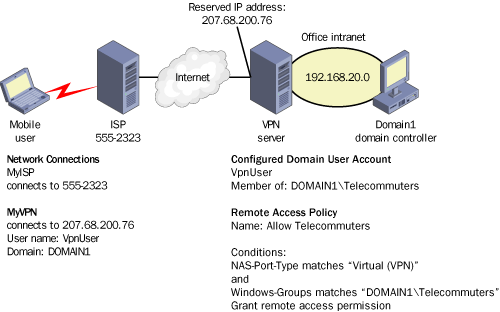
Remote Access VPN
In a basic remote access
scenario, the VPN allows a telecommuter to connect to an office network
through the Internet. To allow this type of VPN, an administrator
typically defines a remote access policy granting access to connections
matching a NAS-Port-Type condition of Virtual (VPN) and a Windows-Groups
condition matching a group created specifically for the purpose of
allowing VPN access. On the client side, the telecommuter uses the New
Connection Wizard to create a VPN connection specifying his/her own user
credentials and the IP address of the remote VPN server. The user then
dials in to a local ISP and connects to the office intranet through the
VPN connection. Alternatively, if the user is logging on to a domain
over the VPN connection, he/she can specify both the VPN and ISP
connections through the Log On To Windows dialog box.
Figure 3 illustrates this scenario.
Extranet/Router-To-Router VPN
In an extranet
scenario, two office networks connect by means of VPN servers running
Routing And Remote Access. On each server, demand-dial interfaces both
initiate and answer VPN connections. VPN connectivity depends on the
authorization of these demand-dial interfaces, not on the authorization
of individual users.
Note
Demand-dial
interfaces do not necessarily describe dial-up connections. VPN
interfaces in Routing And Remote Access are always considered a type of
demand-dial interface, even when they initiate and respond to
communication over a T1 line. |
For each
demand-dial VPN interface, you must configure a set of “dial-out”
credentials including a user name, password, and domain; by default, the
user name corresponds to the name of the demand-dial interface itself.
However, this user name must also match the name of the demand-dial
interface configured on the answering VPN server. To simplify
configuration, you can assign opposing demand-dial interfaces the same
name.
Figure 4 illustrates this scenario, in which both interfaces are given the name Buf_Syr,
which is then used for dial-out credentials. Both VPN servers are
members of a single domain named Domain1, and both subnets have local
domain controllers. For connectivity to be authorized, a user account
named Buf_Syr must already exist in the domain.
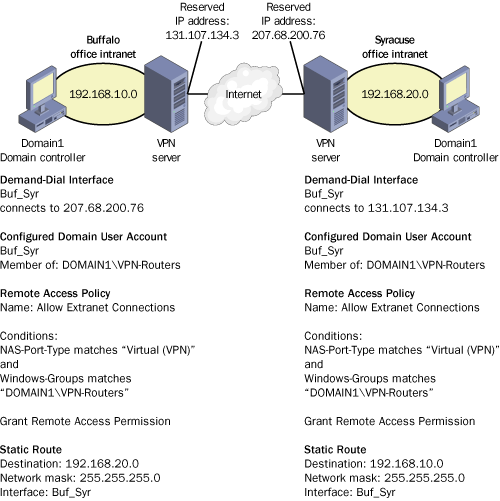
Remote access policies
must also authorize the connection. In this example, the policy grants
permission to VPN-type connections originating from user accounts in a
global group named VPN-Routers. Because the user account Buf_Syr is a
member of this global group, router-to-router VPN connections are
authorized by the policy at both locations.
Finally, to allow
full extranet connectivity, static routes must be deployed on each VPN
server. The function of these static routes is to direct traffic
destined for the opposite private network through the VPN demand-dial
interface. These static routes are used for return traffic in addition
to requests, so they must be configured on both servers even if all
remote requests originate from the same network.
Deploying Routing Protocols over VPNs
As
an alternative to static routes, you can also deploy a routing protocol
such as Routing Information Protocol (RIP) in an extranet scenario. To
do so, first add the chosen routing protocol to the Routing And Remote
Access console at each VPN server. Then add the VPN demand-dial
interface to the protocol and configure as needed. For instance, in the
case of RIP, you might choose to specify other VPN servers as RIP
neighbors, to use peer filtering through password security, or to
configure a much longer announcement interval than the default of 30
seconds. If you are deploying your VPN over dial-up lines, be sure to
configure the routers for autostatic updates.
When deploying a
routing protocol, verify that the protocol you choose is compatible with
the other routers on your network. Finally, be sure to configure your
network routers to accept updates from your VPN servers.
Mixed VPN with Firewall
Besides combining the remote access and extranet features described in the previous two scenarios, the network illustrated in Figure 5
adds a firewall to the network design. The VPN server, assigned a
public address, is located behind this firewall in a perimeter network.
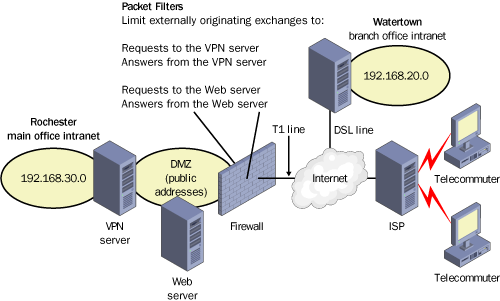
Firewalls
typically allow all traffic exchanges originating from the internal
network and block everything else. You then need to configure, where
necessary, specific packet filters to allow traffic exchanges that
originate from the external network to the VPN server.
In Figure 10-31,
for example, packet filters are configured to allow request traffic to
the VPN server and answer traffic from the same server. Because a Web
server is also deployed in the perimeter network, packet filters have
been defined to allow requests and answers to and from the Web server as
well.
Packet filters
are not necessary for access to services beyond the VPN server.
Generally, firewalls cannot filter packets based on the information
encapsulated within the VPN tunnel. Once these packets reach the VPN
server, only then are they stripped of the VPN header and decrypted. At
this point, they can be routed freely to any internal service.
